This the multi-page printable view of this section. Click here to print.
Documentation
- 1: Overview
- 2: Getting Started
- 2.1: First time users
- 2.2: Apache Installation
- 2.3: Docker Installation
- 2.4: Customize Installation
- 3: API services
- 3.1: Quick reference
- 3.2: GET data
- 3.3: POST data
- 3.4: Update data - PUT
- 4: Concepts
- 4.1: Core Objects
- 4.2: Trait Objects
- 4.3: Data Access Objects
- 4.4: Auxiliary Objects
- 5: Contribution Guidelines
- 6: Tutorials
- 6.1: Getting data with OpenDataBio-R
- 6.2: Import data with R
- 6.2.1: Import Locations
- 6.2.2: Import Taxons
- 6.2.3: Import Persons
- 6.2.4: Import Traits
- 6.2.5: Import Individuals & Vouchers
- 6.2.6: Import Measurements
1 - Overview
OpenDataBio is an opensource web-based platform designed to help researchers and organizations studying biodiversity in Tropical regions to collect, store, related and serve data. It is designed to accommodate many data types used in biological sciences and their relationships, particularly biodiversity and ecological studies, and serves as a data repository that allow users to download or request well-organized and documented research data.
Why?
Biodiversity studies frequently require the integration of a large amount of data, which require standardization for data use and sharing, and also continuous management and updates, particularly in Tropical regions where biodiversity is huge and poorly known.
OpenDataBio was designed based on the need to organize and integrate historical and current data collected in the Amazon region, taking into account field practices and data types used by ecologists and taxonomists.
OpenDataBio aim to facilitate the standardization and normalization of data, utilizing different API services available online, giving flexibility to user and user groups, and creating the necessary links among Locations, Taxons, Individuals, Vouchers and the Measurements and Media-files associated with them, while offering accessibility to the data through an API service, facilitating data distribution and analyses.
Main features
- Custom variables - the ability to define custom Traits, i.e. user defined variables of different types, including some special cases like Spectral Data, Colors, TaxonLinks and GeneBank. Measurements for such traits can be recorded for Individuals, Vouchers, Taxons and/or Locations.
- Taxons can be published or unpublished names (e.g. a morphotype), synonyms or valid names, and any node of the tree of life may be stored. Taxon insertion are checked against different nomenclature data sources (Tropicos, IPNI, MycoBank,ZOOBANK, GBIF), minimizing your search for correct spelling, authorship and synonyms.
- Locations are stored with their spatial Geometries, allowing location parent detection and spatial queries. Special location types, such as Plots and Transects can be defined, facilitating commonly used methods in biodiversity studies
- Data access control - data are organized in Datasets that permits to define an access policy (public, non-public) and a license for distribution of public datasets, becoming a self-contained dynamic data publication, versioned by the last edit date.
- Different research groups may use a single OpenDataBio installation, having total control over their particular research data edition and access, while sharing common libraries such as Taxonomy, Locations, Bibliographic References and Trait definitions.
- API to access data programatically - Tools for data exports and imports are provided through API services along with a API client in the R language, the OpenDataBio-R package.
- Autiting - the Activity Model audits changes in any record and downloads of full datasets, which are logged for history tracking.
- The BioCollection model allows administrators of Biological Collections to manage their Voucher records as well as user-requests, facilitating the interaction with users providing samples and data.
- A mobile data collector is planned with ODK or ODK-X
Learn more
- Getting Started: install OpenDataBio!
- FAQs: Check out some example code!
2 - Getting Started
OpenDataBio is a web-based software supported in Debian, Ubuntu and Arch-Linux distributions of Linux and may be implemented in any Linux based machine. We have no plans for Windows support, but it may be easy to install in a windows machine using Docker.
Opendatabio is written in PHP and developed with the Laravel framework. It requires a web server (apache or nginx), PHP and a SQL database – tested only with MySQL and MariaDB.
You may install OpenDataBio easily using the Docker files included in the distribution, but these docker files provided are meant for development only and required tuning to deploy a production site.
If you just want to test OpenDataBio in your computer, follow the Docker Installation.
Prep for installation
- You may want to request a Tropicos.org API key for OpenDataBio to be able to retrieve taxonomic data from the Tropicos.org database. If not provided, mainly the GBIF nomenclatural service will be used;
- OpenDataBio sends emails to registered users, either to inform about a Job that has finished, to send data requests to dataset administrators or for password recovery. You may use a Google Email for this, but will need to change the account security options to allow OpenDataBio to use the account to send emails (you need to turn on the
Less secure app accessoption in the Gmail My Account Page and will need to create a cron job to keep this option alive). Therefore, create a dedicated email address for your installation. Check the “config/mail.php” file for more options on how to send e-mails.
2.1 - First time users
OpenDataBio is software to be used online. Local installations are for testing or development, although it could be used for a single-user production localhost environment.
User roles
Attention
If you have registered you need someone to assign you a full user role, so you can enter data.- If you are installing, the first login to an OpenDataBio installation must be done with the default super-admin user:
admin@example.organdpassword1. These settings should be changed or the installation will be open to anyone reading the docs; - Self-registrations only grant access to datasets with privacy set to
registered usersand allows user do download data of open-access, but do not allow the user to edit nor add data; - Only full users can contribute with data.
- But only super admin can grant
full-user roleto registered users - different OpenDataBio installations may have different policies as to how you may gain full-user access. Here is not the place to find that info.
See also User Model.
Prep your full-user account
- Register yourself as Person and assign it as your user default person, creating a link between your user and yourself as collector.
- You need at least a dataset to enter your own data
- When becoming a full-user, a restricted-access Dataset and Project will be automatically created for you (your Workspaces). You may modify these entities to fit your personal needs.
- You may create as many Projects and Datasets as needed. So, understand how they work and which data they control access to.
Entering data
There three main ways to import data into OpenDataBio:
- One by one through the web Interface
- Using the OpenDataBio POST API services:
- importing from a spreadsheet file (CSV, XLXS or ODS) using the web Interface
- using the OpenDataBio R package client
- When using the OpenDataBio API services you must prep your data or file to import according to the field options of the POST verb for the specific ’endpoint’ your are trying to import.
R Tutorials
See the Import data with R Tutorial for examples on how to import data with API.Tips for entering data
- If first time entering data, you should use the web interface and create at least one record for each model needed to fit your needs. Then play with the privacy settings of your Workspace Dataset, and check whether you can access the data when logged in and when not logged in.
- Use Dataset for a self-contained set of data that should be distributed as a group. Datasets are dynamic publications, have author, data, and title.
- Although ODB attempt to minimize redundancy, giving users flexibility comes with a cost, and some definitions, like that of Traits or Persons may receive duplicated entries. So, care must be taken when creating such records. Administrators may create a ‘code of conduct’ for the users of an ODB installation to minimize such redundancy.
- Follow an order for importation of new data, starting from the libraries of common use. For example, you should first register Locations, Taxons, Persons, Traits and any other common library before importing Individuals or Measurements
- There is no need to import POINT locations before importing Individuals because ODB creates the location for you when you inform latitude and longitude, and will detect for you to which parent location your individual belongs to. However, if you want to validate your points (understand where such point location will placed), you may use the Location API with
querytypeparameter specified for this. - There are different ways to create PLOT and TRANSECT locations - see here Locations if that is your case
- Creating Taxons require only the specification of a
name- ODB will search nomenclature services for you, find the name, metadata and parents and import all of the them if needed. If you are importing published names, just inform this single attribute. Else, if the name is unpublished, you need to inform additional fields. So, separate the batch importation of published and unpublished names into two sets. - The
notesfield of any model is for both plain text or JSON object string formatted data. The Json option allows you to store custom structured data any model having thenotes field. You may, for example, store as notes some secondary fields from original sources when importing data, but may store any additional data that is not provided by the ODB database structure. Such data will not be validate by ODB and standardization of both tags and values depends on you. Json notes will be imported and exported as a JSON string, and will be presented in the interface as a formatted table; URLs in your Json will be presented as links.
2.2 - Apache Installation
These instructions are for an apache-based installation, but can be easily tuned to work with nginx.
Server requirements
- The minimum supported PHP version is 8.0
- The web server may be apache or nginx. For nginx, check configuration in the docker files to tune these instructions, which are for apache.
- It requires a SQL database, MySQL and MariaDB have been tested, but may also work with Postgres. Tested with MYSQL.v8 and MariaDB.v15.1.
- PHP extensions required ‘openssl’, ‘pdo’, ‘pdo_mysql’, ‘mbstring’, ’tokenizer’, ‘xlm’, ‘dom’, ‘gd’, ’exif’, ‘bcmath’, ‘zip’
- Pandoc is used to translate LaTeX code used in the bibliographic references. It is not necessary for the installation, but it is suggested for a better user experience.
- Requires Supervisor, which is needed background jobs
Create Dedicated User
The recommended way to install OpenDataBio for production is using a dedicated system user. In this instructions this user is odbserver.
Download OpenDataBio
Login as your Dedicated User and download or clone this software to where you want to install it.
Here we assume this is /home/odbserver/opendatabio so that the installation files will reside in this directory. If this is not your path, change below whenever it applies.
Download OpenDataBio
Prep the Server
First, install the prerequisite software: Apache, MySQL, PHP, Pandoc and Supervisor. On a Debian system, you need to install some PHP extensions as well and enable them:
sudo apt-get install software-properties-common
sudo add-apt-repository ppa:ondrej/php
sudo add-apt-repository ppa:ondrej/php ppa:ondrej/apache2
sudo add-apt-repository ppa:ondrej/php
sudo add-apt-repository ppa:ondrej/apache2

sudo apt-get install mysql-server php8.0 libapache2-mod-php8.0 php8.0-intl \
 php8.0-mysql php8.0-sqlite3 php8.0-gd php8.0-mysql php8.0-cli pandoc \
 php8.0-mbstring php8.0-xml php8.0-gd php8.0-bcmath php8.0-zip php8.0-curl \
 supervisor

sudo a2enmod php8.0
sudo phpenmod mbstring
sudo phpenmod xml
sudo phpenmod dom
sudo phpenmod gd
sudo a2enmod rewrite
sudo a2ensite
sudo systemctl restart apache2.service


#To check if they are installed:
php -m | grep -E 'mbstring|cli|xml|gd|mysql|pandoc|supervisord|bcmath|pcntl|zip'
Add the following to your Apache configuration.
- Change
/home/odbserver/opendatabioto your path (the files must be accessible by apache) - You may create a new file in the sites-available folder:
/etc/apache2/sites-available/opendatabio.confand place the following code in it.
touch /etc/apache2/sites-available/opendatabio.conf
echo '<IfModule alias_module>
        Alias /opendatabio      /home/odbserver/opendatabio/public/
        Alias /fonts /home/odbserver/opendatabio/public/fonts
        Alias /images /home/odbserver/opendatabio/public/images
        <Directory "/home/odbserver/opendatabio/public">
                Require all granted
                AllowOverride All
        </Directory>
</IfModule>' > /etc/apache2/sites-available/opendatabio.conf
This will cause Apache to redirect all requests for / to the correct folder, and also allow the provided .htaccess file to handle the rewrite rules, so that the URLs will be pretty. If you would like to access the file when pointing the browser to the server root, add the following directive as well:
RedirectMatch ^/$ /
Configure your php.ini file. The installer may complain about missing PHP extensions, so remember to activate them in both the cli (/etc/php/8.0/cli/php.ini) and the web ini (/etc/php/8.0/fpm/php.ini) files for PHP!
Update the values for the following variables:
Find files:
php -i | grep 'Configuration File'

Change in them:
	memory_limit should be at least 512M
	post_max_size should be at least 30M
	upload_max_filesize should be at least 30M
Something like:
[PHP]
allow_url_fopen=1
memory_limit = 512M

post_max_size = 100M
upload_max_filesize = 100M
Enable the Apache modules ‘mod_rewrite’ and ‘mod_alias’ and restart your Server:
sudo a2enmod rewrite
sudo a2ensite
sudo systemctl restart apache2.service
Mysql Charset and Collation
- You should add the following to your configuration file (mariadb.cnf or my.cnf), i.e. the Charset and Collation you choose for your installation must match that in the ‘config/database.php’
[mysqld]
character-set-client-handshake = FALSE  #without this, there is no effect of the init_connect
collation-server      = utf8mb4_unicode_ci
init-connect          = "SET NAMES utf8mb4 COLLATE utf8mb4_unicode_ci"
character-set-server  = utf8mb4
log-bin-trust-function-creators = 1
sort_buffer_size = 4294967295  #this is needed for geometry (bug in mysql:8)

[mariadb] or [mysql]
max_allowed_packet=100M
innodb_log_file_size=300M  #no use for mysql
- If using MariaDB and you still have problems of type #1267 Illegal mix of collations, then check here on how to fix that,
Configure supervisord
Configure Supervisor, which is required for jobs. Create a file name opendatabio-worker.conf in the Supervisor configuration folder /etc/supervisor/conf.d/opendatabio-worker.conf with the following content:
touch /etc/supervisor/conf.d/opendatabio-worker.conf
echo ";--------------
[program:opendatabio-worker]
process_name=%(program_name)s_%(process_num)02d
command=php /home/odbserver/opendatabio/artisan queue:work --sleep=3 --tries=1 --timeout=0 --memory=512
autostart=true
autorestart=true
user=odbserver
numprocs=8
redirect_stderr=true
stdout_logfile=/home/odbserver/opendatabio/storage/logs/supervisor.log
;--------------" > /etc/supervisor/conf.d/opendatabio-worker.conf
Folder permissions
Security
Folder and file permissions are important for securing a public server installation. If you don’t set them correctly, your site may be at risk.- Folders
storageandbootstrap/cachemust be writable by the Server user (usually www-data). Set0755permission to these directories. - Config
.envfile requires0640permission. - This link has different ways to set up permissions for files and folders of a Laravel application. Below the preferred method:
cd /home/odbserver

#give write permissions to odbserver user and the apache user
sudo chown -R odbserver:www-data opendatabio
sudo find ./opendatabio -type f -exec chmod 644 {} \;
sudo find ./opendatabio -type d -exec chmod 755 {} \;

#in these folders the server stores data and files.
#Make sure their permission is correct
cd /home/odbserver/opendatabio
sudo chgrp -R www-data storage bootstrap/cache
sudo chmod -R ug+rwx storage bootstrap/cache

#make sure the .env file has 640 permission
sudo chmod 640 ./.env
Install OpenDataBio
- Many Linux distributions (most notably Ubuntu and Debian) have different php.ini files for the command line interface and the Apache plugin. It is recommended to use the configuration file for Apache when running the install script, so it will be able to correctly point out missing extensions or configurations. To do so, find the correct path to the .ini file, and export it before using the
php installcommand.
For example,
export PHPRC=/etc/php/7.4/apache2/php.ini
-
The installation script will download the Composer dependency manager and all required PHP libraries listed in the
composer.jsonfile. However, if your server is behind a proxy, you should install and configure Composer independently. We have implemented PROXY configuration, but we are not using it anymore and have not tested properly (if you require adjustments, place an issue on GitLab). -
The script will prompt you configurations options, which are stored in the environment
.envfile in the application root folder.
You may, optionally, configure this file before running the installer:
- Create a
.envfile with the contents of the providedcp .env.example .env - Read the comments in this file and adjust accordingly.
- Run the installer:
cd /home/odbserver/opendatabio
php install
- Seed data - the script above will ask if you want to install seed data for Locations and Taxons - seed data is version specific. Check the seed data repository version notes.
Ready to go
If the install script finishes with success, you’re good to go! Point your browser to http://localhost/opendatabio. The database migrations include an administrator account, with loginadmin@example.org and password password1. Change the password after installing.
Installation issues
There are countless possible ways to install the application, but they may involve more steps and configurations.
- if you browser return 500|SERVER ERROR you should look to the last error in
storage/logs/laravel.log. If you have ERROR: No application encryption key has been specified run:
php artisan key:generate
php artisan config:cache
- If you receive the error “failed to open stream: Connection timed out” while running the installer, this indicates a misconfiguration of your IPv6 routing. The easiest fix is to disable IPv6 routing on the server.
- If you receive errors during the random seeding of the database, you may attempt to remove the database entirely and rebuild it. Of course, do not run this on a production installation.
php artisan migrate:fresh
- You may also replace the Locations and Taxons tables with seed data after a fresh migration using:
php seedodb
Post-install configs
- If your import/export jobs are not being processed, make sure Supervisor is running
systemctl start supervisord && systemctl enable supervisord, and check the log files atstorage/logs/supervisor.log. - You can change several configuration variables for the application. The most important of those are probably set
by the installer, and include database configuration and proxy settings, but many more exist in the
.envandconfig/app.phpfiles. In particular, you may want to change the language, timezone and e-mail settings. Runphp artisan config:cacheafter updating the config files. - In order to stop search engine crawlers from indexing your database, add the following to your “robots.txt” in your server root folder (in Debian, /var/www/html):
User-agent: *
Disallow: /
Storage & Backups
You may change storage configurations in config/filesystem.php, where you may define cloud based storage, which may be needed if have many users submitting media files, requiring lots of drive space.
- Data downloads are queue as jobs and a file is written in a temporary folder, and the file is deleted when the job is deleted by the user. This folder is defined as the
download diskin filesystem.php config file, which point tostorage/app/public/downloads. UserJobs web interface difficult navigation will force users to delete old jobs, but a cron cleaning job may be advisable to implement in your installation; - Media files are by default stored in the
media disk, which place files in folderstorage/app/public/media; - For regular configuration create both directories
storage/app/public/downloadsandstorage/app/public/mediawith writable permissions by the Server user, see below topic; - Remember to include media folder in a backup plan;
2.3 - Docker Installation
The easiest way to install and run OpenDataBio is using Docker and the docker configuration files provided, which contain all the needed configurations to run ODB. Uses nginx and mysql, and supervisor for queues
Docker files
laraverl-app/
----docker/*
----./env.docker
----docker-compose.yml
----Dockerfile
----Makefile
These are adapted from this link, where you find a production setting as well.
Installation
Download OpenDataBio
- Make sure you have Docker and Docker-compose installed in your system;
- Check if your user is in the docker group created during docker installation;
- Download or clone the OpenDataBio in your machine;
- Make sure your user is the owner of the opendatabio folder created and contents, else change ownership and group recursively to your user
- Enter the opendatabio directory
- Edit and adjust the environment file name
.env.docker(optional) - To install locally for development just adjust the following variables in the Dockerfile, which are needed to map the files owners to a docker user;
UIDthe numeric user your are logged in and which is the owner of all files and directories in the opendatabio directory.GDIthe numeric group the user belongs, usually same as UID.
- File
Makefilecontains shortcuts to the docker-compose commands used to build the services configured in thedocker-compose.ymland auxiliary files in thedockerfolder. - Build the docker containers using the shortcuts (read the Makefile to undersand the commands)
make build
- Start the implemented docker Services
make start
- See the containers and try log into the laravel container
docker ps
make ssh #to enter the container shell
make ssh-mysql #to enter the mysql container, where you may access the database shell using `mysql -uroot -p` or use the laravel user
- Install composer dependencies
make composer-install
- Migrate the database
make migrate
- You may also replace the Locations and Taxons tables with seed data:
make seed-odb
- If worked, then Opendatabio will be available in your browser http::/localhost:8080.
- Login with superuser
admin@example.organd passwordpassword1 - Additional configurations in these files are required for a production environment and deployment;
Data persistence
The docker images may be deleted without loosing any data. The mysql tables are stored in a volume. You may change to a local path bind.
docker volume list
Using
See the contents of Makefile
make stop
make start
make restart
docker ps
...
If you have issues and changed the docker files, you may need to rebuild:
#delete all images without loosing data
make stop
docker system prune -a  #and accepts Yes
make build
make start
2.4 - Customize Installation
Simple changes that can be implemented in the layout of a OpenDataBio web site
Logo and BackGround Image
To replace the Navigation bar logo and the image of the landing page,
just put your image files replacing the files in /public/custom/ without changing their names.
Texts and Info
To change the welcome text of the landing page, change the values of the array keys in the following files:
/resources/lang/en/customs.php/resources/lang/pt/customs.php- Do not remove the entry keys. Set to null to suppress from appearing in the footer and landing page.
NavBar and Footer
- If you want to change the color of the top navigation bar and the footer,
just replace css Boostrap 5 class in the corresponding tags and files in folder
/resources/view/layout. - You may add additional html to the footer and navbar, change logo size, etc… as you wish.
3 - API services
Every OpenDataBio installation provide a API service, allowing users to GET data programmatically, and collaborators to POST new data into its database. The service is open access to public data, requires user authentication to POST data or GET data of restricted access.
The OpenDataBio API (Application Programming Interface -API) allows users to interact with an OpenDataBio database for exporting, importing and updating data without using the web-interface.
 The OpenDataBio R package is a client for this API, allowing the interaction with the data repository directly from R and illustrating the API capabilities so that other clients can be easily built.
The OpenDataBio API allows querying of the database, data importation and data edition (update) through a REST inspired interface. All API requests and responses are formatted in JSON.
The API call
A simple call to the OpenDataBio API has four independent pieces:
- HTTP-verb - either
GETfor exports orPOSTfor imports. - base-URL - the URL used to access your OpenDataBio server + plus
/api/v0. For, example,http://opendatabio.inpa.gov.br/api/v0 - endpoint - represents the object or collection of objects that you want to access, for example, for querying taxonomic names, the endpoint is “taxons”
- request-parameters - represent filtering and processing that should be done with the objects, and are represented in the API call after a question mark. For example, to retrieve only valid taxonomic names (non synonyms) end the request with
?valid=1.
The API call above can be entered in a browser to GET public access data. For example, to get the list of valid taxons from an OpenDataBio installation the API request could be:
https://opendb.inpa.gov.br/api/v0/taxons?valid=1&limit=10
When using the OpenDataBio R package this call would be odb_get_taxons(list(valid=1)).
A response would be something like:
{
  "meta":
  {
    "odb_version":"0.9.1-alpha1",
    "api_version":"v0",
    "server":"http://opendb.inpa.gov.br",
    "full_url":"https://opendb.inpa.gov.br/api/v0/taxons?valid=1&limit1&offset=100"},
    "data":
    [
      {
        "id":62,
        "parent_id":25,
        "author_id":null,
        "scientificName":"Laurales",
        "taxonRank":"Ordem",
        "scientificNameAuthorship":null,
        "namePublishedIn":"Juss. ex Bercht. & J. Presl. In: Prir. Rostlin: 235. (1820).",
        "parentName":"Magnoliidae",
        "family":null,
        "taxonRemarks":null,
        "taxonomicStatus":"accepted",
        "ScientificNameID":"http:\/\/tropicos.org\/Name\/43000015 | https:\/\/www.gbif.org\/species\/407",
        "basisOfRecord":"Taxon"
    }]}
API Authentication
- Not required for getting any data with public access in the ODB database, which by default includes locations, taxons, bibliographic references, persons and traits.
- Authentication Required to GET any data that is not of public access, and is required to POST and PUT data.
- Authentication is done using an
API token, that can be found under your user profile on the web interface. The token is assigned to a single database user, and should not be shared, exposed, e-mailed or stored in version controls. - To authenticate against the OpenDataBio API, use the token in the “Authorization” header of the API request. When using the R client, pass the token to the
odb_configfunctioncfg = odb_config(token="your-token-here"). - The token controls the data you can get and can edit
Users will only have access to the data for which the user has permission and to any data with public access in the database, which by default includes locations, taxons, bibliographic references, persons and traits. Measurements, individuals, and Vouchers access depends on permissions understood by the users token.
API versions
The OpenDataBio API follows its own version number. This means that the client can expect to use the same code and get the same answers regardless of which OpenDataBio version that the server is running. All changes done within the same API version (>= 1) should be backward compatible. Our API versioning is handled by the URL, so to ask for a specific API version, use the version number between the base URL and endpoint:
http://opendatabio.inpa.gov.br/opendatabio/api/v1/taxons

http://opendatabio.inpa.gov.br/opendatabio/api/v2/taxons
Version v0
The API version 0 (v0) is an unstable version. The first stable version will be the API version 1.3.1 - Quick reference
API call format
base-URL + ‘/api/v0/’ + endpoint + ‘?’ + request-parametersTaxons endpoint example
https://opendb.inpa.gov.br/api/v0/taxons?valid=1&limit=2&offset=10GET DATA (downloads)
Shared get-parameters
All endpoints share these GET parameters:
idreturn only the specified resource. May be number or a comma delimited list, such asapi/v0/locations?id=1,50,124limit: the number of items that should be returned (must be greater than 0). Example:api/v0/taxons?limit=10offset: the initial record to extract, to be used with limit when trying to download a large amount of data. Example:api/v0/taxons?offset=10000&limit=10000returns 10K records starting from the 10K position of the current query.fields: the field or fields that should be returned. Each endpoint has its own fields but there are two special words, simple (default) and all, which return different collection of fields.fields=allmay return sub-objects for each object.fields ='raw'will return the raw table, speeding up the search, although values may be more difficult to understand. Example:api/v0/taxons?fields=id,scientificName,validsave_job: for large data retrieval, if you addsave_job=1to the params list a job will be created for your search, and the data can then be obtained using the userjobs api.
Download large datasets?
Thelimit and offset parameters can be used to divide your search into parts. Alternatively, use the save_job=T option and then download the data with the get_file=T parameter from the userjobs API.
wildcards
Some parameters accept an asterisk as wildcard, soapi/v0/taxons?name=Euterpe will return taxons with name exactly as “Euterpe”, while api/v0/taxons?name=Eut* will return names starting with “Eut”.
Endpoint parameters
| Endpoint | Description | Possible parameters |
|---|---|---|
| / | Tests your access | none |
| bibreferences | Lists of bibliographic references | id, bibkey |
| biocollections | List of Biocollections and other vouchers Repositories | id |
| datasets | Lists registered datasets or downloand the files of dataset versions | id, list_versions, file_name |
| individuals | Lists registered individuals | id, location, location_root,taxon, taxon_root, tag,project, dataset |
| individual-locations | Lists occurrences for individuals | individual_id, location, location_root,taxon, taxon_root, dataset |
| languages | Lists registered languages | |
| measurements | Lists Measurements | id, taxon,dataset,trait,individual,voucher,location |
| locations | Lists locations | root, id, parent_id,adm_level, name, limit, querytype, lat, long,project,dataset |
| persons | Lists registered people | id, search, name, abbrev, email |
| projects | Lists registered projects | id only |
| taxons | Lists taxonomic names | root, id, name,level, valid, external, project,dataset |
| traits | Lists variables (traits) list | id, name |
| vouchers | Lists registered voucher specimens | id, number, individual, location, collector, location_root,taxon, taxon_root, project, dataset |
| userjobs | Lists user Jobs | id, status,get_file |
POST DATA (imports)
Web-interface note
- Importing data from files through the web-interface require specifying the POST verb parameters of the ODB API
- Batch imports of Bibliographic References and MediaFiles are possible only through the web interface.
| Endpoint | Description | POST Fields |
|---|---|---|
| biocollections | Import BioCollections | name, acronym |
| individuals | Import individuals | collector, tag, dataset, date, (location or latitude + longitude)**, altitude, location_notes, location_date_time, x, y, distance , angle , notes , taxon , identifier , identification_date , modifier, identification_notes , identification_based_on_biocollection, identification_based_on_biocollection_id , identification_individual |
| individual-locations | Import IndividualLocations | individual, (location or latitude + longitude), altitude, location_notes, location_date_time, x, y, distance, angle |
| locations | Import locations | name, adm_level, (geom or lat+long)** , parent, altitude, datum, x, y , startx, starty, notes, ismarine |
| measurements | Import Measurements to Datasets | dataset, date, object_type, object_id, person, trait_id, value**, link_id, bibreference, notes, duplicated,location, parent_measurement |
| persons | Imports a list of people | full_name**, abbreviation, email, institution, biocollection |
| traits | Import traits | export_name, type, objects, name, description**, units, range_min, range_max, categories, wavenumber_min and wavenumber_max, value_length, link_type, bibreference, tags |
| taxons | Imports taxonomic names | name**, level, parent, bibreference, author, author_id or person, valid, mobot, ipni, mycobank, zoobank, gbif |
| vouchers | Imports voucher specimens | individual, biocollection, biocollection_type, biocollection_number, number, collector, date, dataset, notes |
PUT DATA (updates)
Attention
Only the endpoints listed below can be updated using the API and only the listed PUT fields can be updated on each endpoint. Field values are as explained for the POST API endpoints, except that in all cases you must also provide theid of the record to be updated.
| Endpoint | Description | PUT Fields |
|---|---|---|
| individuals | Update Individuals | (id or individual_id),collector, tag, dataset, date, notes , taxon , identifier , identification_date , modifier, identification_notes , identification_based_on_biocollection, identification_based_on_biocollection_id , identification_individual |
| individual-locations | Update Individual Locations | (id or individual_location_id), individual, (location or latitude + longitude), altitude, location_notes, location_date_time, x, y, distance, angle |
| locations | Update Locations | (id or location_id), name, adm_level, (geom or lat+long) , parent, altitude, datum, x, y , startx, starty, notes, ismarine |
| measurements | Update Measurements | (id or measurement_id), dataset, date, object_type, object_type, person, trait_id, value, link_id, bibreference, notes, duplicated,location, parent_measurement |
| persons | Update Persons | (id or person_id),full_name, abbreviation, email, institution, biocollection |
| vouchers | Update Vouchers | (id or voucher_id),individual, biocollection, biocollection_type, biocollection_number, number, collector, date, dataset, notes |
Nomenclature types
| Nomenclature types numeric codes | |
|---|---|
| NotType : 0 | Isosyntype : 8 |
| Type : 1 | Neotype : 9 |
| Holotype : 2 | Epitype : 10 |
| Isotype : 3 | Isoepitype : 11 |
| Paratype : 4 | Cultivartype : 12 |
| Lectotype : 5 | Clonotype : 13 |
| Isolectotype : 6 | Topotype : 14 |
| Syntype : 7 | Phototype : 15 |
Taxon Level (Rank)
| Level | Level | Level | Level |
|---|---|---|---|
-100 clade |
60 cl., class |
120 fam., family |
210 section, sp., spec., species |
0 kingdom |
70 subcl., subclass |
130 subfam., subfamily |
220 subsp., subspecies |
10 subkingd. |
80 superord., superorder |
150 tr., tribe |
240 var., variety |
30 div., phyl., phylum, division |
90 ord., order |
180 gen., genus |
270 f., fo., form |
40 subdiv. |
100 subord. |
190 subg., subgenus, sect. |
3.2 - GET data
- The OpenDataBio R package is a client for this API.
- No authentication required to access data with a public access policy
- Authentication token required only to get data with a non-public access policy
Shared GET parameters
All endpoints share these GET parameters:
idreturn only the specified resource. May be number or a comma delimited list, such asapi/v0/locations?id=1,50,124limit: the number of items that should be returned (must be greater than 0). Example:api/v0/taxons?limit=10offset: the initial record to extract, to be used with limit when trying to download a large amount of data. Example:api/v0/taxons?offset=10000&limit=10000returns 10K records starting from the 10K position of the current query.fields: the field or fields that should be returned. Each endpoint has its own fields but there are two special words, simple (default) and all, which return different collection of fields.fields=allmay return sub-objects for each object.fields ='raw'will return the raw table, speeding up the search, although values may be more difficult to understand. Example:api/v0/taxons?fields=id,scientificName,validsave_job: for large data retrieval, if you addsave_job=1to the params list a job will be created for your search, and the data can then be obtained using the userjobs api.
Download large datasets?
Thelimit and offset parameters can be used to divide your search into parts. Alternatively, use the save_job=T option and then download the data with the get_file=T parameter from the userjobs API.
wildcards
Some parameters accept an asterisk as wildcard, soapi/v0/taxons?name=Euterpe will return taxons with name exactly as “Euterpe”, while api/v0/taxons?name=Eut* will return names starting with “Eut”.
BibReferences Endpoint
The
bibreferencesendpoint interact with the bibreference table. Their basic usage is getting the registered Bibliographic References.
GET request-parameters
id=listreturn only references having the id or ids provided (exid=1,2,3,10)bibkey=listreturn only references having the bibkey or bibkeys (exbibkey=ducke1953,mayr1992)taxon=list of idsreturn only references linked to the taxon informed.limitandoffsetlimit query. see Common parameters.
Response fields
id- the id of the BibReference in the bibreferences table (a local database id)bibkey- the bibkey used to search and use of the reference in the web systemyear- the publication yearauthor- the publication authorstitle- the publication titledoi- the publication DOI if presenturl- an external url for the publication if presentbibtex- the reference citation record in BibTex format
Datasets Endpoint
The
datasetsendpoint interacts with the Datasets table and with static versions of Datasets. Useful for getting dataset_ids to import measurements, individuals, vouchers and media. You can also download files of static versions of the data, if any were generated by dataset administrators. This allows access to data from datasets in a faster way. Access to the data will depend on whether the version has a public license, or whether the user is a contributor, administrator or viewer of the dataset.
GET request-parameters
id=listreturn only datasets having the id or ids provided (exid=1,2,3,10)list_versions = booleanreturns the list of files and versions for one or moreiddatasets (egid='1,2,3,4',list_versions=1)file_name = stringreturns the data of a single file indicated by this parameter, as indicated in the list of versions returned (egid='1',file_name='2_Organisms.csv')
Response fields
With list_versions=1
dataset_id- the id of the dataset in the dataset table (a local database id)dataset- the name of the datasetversion- the name of the static version of the datasetlicense- the CreativeCommons license of the data versionaccess- indicating if it is OpenAccess or if the user has accessget_params- how to inform theparamsargument in the odb_get_datasets() function of the R package to get the data in files
With file_name
- Returns data from the given file
Just id or nothing
id- the id of the Dataset in the datasets table (a local database id)name- the name of the datasetprivacyLevel- the access level for the datasetcontactEmail- the dataset administrator emaildescription- a description of the datasetpolicy- the data policy if specifiedmeasurements_count- the number of measurements in the datasettaggedWidth- the list of tags applied to the dataset
Biocollections Endpoint
The
biocollectionsendpoint interact with the biocollections table. Their basic usage is getting the list of the Biological Collections registered in the database. Using for gettingbiocollection_idor validating your codes for importing data with the Vouchers or Individuals endpoints.
GET request-parameters
id=listreturn only ‘biocollections’ having the id or ids provided (exid=1,2,3,10)acronymreturn only ‘biocollections’ having the acronym or acronym provided (exacronym=INPA,SP,NY)
Response fields
id- the id of the repository or museum in the biocollections table (a local database id)name- the name of the repository or museumacronym- the repository or museum acronymirn- only for Herbaria, the number of the herbarium in the Index Herbariorum
Individuals Endpoint
The
individualsendpoints interact with the Individual table. Their basic usage is getting a list of individuals.
GET request-parameters
id=number or list- return individuals that have id or ids ex:id=2345,345location=mixed- return by location id or name or ids or names ex:location=24,25,26location=Parcela 25haof the locations where the individualslocation_root- same as location but return also from the descendants of the locations informedtaxon=mixed- the id or ids, or canonicalName taxon names (fullnames) ex:taxon=Aniba,Ocotea guianensis,Licaria cannela tenuicarpaortaxon=456,789,3,4taxon_root- same as taxon but return also all the individuals identified as any of the descendants of the taxons informedproject=mixed- the id or ids or names of the project, ex:project=3orproject=OpenDataBiotag=list- one or more individual tag number/code, ex:tag=individuala1,2345,2345Adataset=mixed- the id or ids or names of the datasets, return individuals having measurements in the datasets informedlimitandoffsetare SQL statements to limit the amount of data when trying to download a large number of individuals, as the request may fail due to memory constraints. See Common parameters.
Note
Notice that all search fields (taxon, location and dataset) may be specified as names (eg, “taxon=Euterpe edulis”) or as database ids. If a list is specified for one of these fields, all items of the list must be of the same type, i.e. you cannot search for ’taxon=Euterpe,24’. Also, location and taxon have priority over location_root and taxon_root if both informed.Response fields
id- the ODB id of the Individual in the individuals table (a local database id)basisOfRecordDWC - will be always ‘organism’ [dwc organism](DWCorganismIDDWC - a local unique combination of record info, composed of recordNumber,recordedByMain,locationNamerecordedByDWC - pipe “|” separated list of registered Persons abbreviationsrecordedByMain- the first person in recordedBy, the main collectorsrecordNumberDWC - an identifier for the individual, may be the code in a tree aluminum tag, a bird band code, a collector numberrecordedDateDWC - the record datescientificNameDWC - the current taxonomic identification of the individual (no authors) or “unidentified”scientificNameAuthorshipDWC - the taxon authorship. For taxonomicStatus unpublished: will be a ODB registered Person namefamilyDWCgenusDWCidentificationQualifierDWC - identification name modifiers cf. aff. s.l., etc.identifiedByDWC - the Person identifying the scientificName of this recorddateIdentifiedDWC - when the identification was made (may be incomplete, with 00 in the month and or day position)identificationRemarksDWC - any notes associated with the identificationlocationName- the location name (if plot the plot name, if point the point name, …)locationParentName- the immediate parent locationName, to facilitate use when location is subplothigherGeographyDWC - the parent LocationName ‘|’ separated (e.g. Brasil | Amazonas | Rio Preto da Eva | Fazenda Esteio | Reserva km37 | Manaus ForestGeo-PDBFF Plot | Quadrat 100x100 );decimalLatitudeDWC - depends on the location adm_level and the individual X and Y, or Angle and Distance attributes, which are used to calculate these global coordinates for the record; if individual has multiple locations (a monitored bird), the last location is obtained with this get APIdecimalLongitudeDWC - same as for decimalLatitudex- the individual X position in a Plot locationy- the individual Y position in a Plot locationgx- the individual global X position in a Parent Plot location, when location is subplot (ForestGeo standards)gy- the individual global Y position in a Parent Plot location, when location is subplot (ForestGeo standards)angle- the individual azimuth direction in relation to a POINT reference, either when adm_level is POINT or when X and Y are also provided for a Plot location this is calculated from X and Y positionsdistance- the individual distance direction in relation to a POINT reference, either when adm_level is POINT or when X and Y are also provided for a Plot location this is calculated from X and Y positionsorganismRemarksDWC - any note associated with the Individual recordassociatedMediaDWC - urls to ODB media files associated with the recorddatasetName- the name of the ODB Dataset to which the record belongs to DWCaccessRights- the ODB Dataset access privacy setting - DWCbibliographicCitation- the ODB Dataset citation - DWClicense- the ODB Dataset license - DWC
Individual-locations Endpoint
The
individual-locationsendpoint interact with the individual_location table. Their basic usage is getting location data for individuals, i.e. occurrence data for organisms. Designed for occurrences of organisms that move and have multiple locations, else the same info is retrieved with the Individuals endpoint.
GET request-parameters
individual_id=number or list- return locations for individuals that have id or ids ex:id=2345,345location=mixed- return by location id or name or ids or names ex:location=24,25,26location=Parcela 25haof the locations where the individualslocation_root- same as location but return also from the descendants of the locations informedtaxon=mixed- the id or ids, or canonicalName taxon names (fullnames) ex:taxon=Aniba,Ocotea guianensis,Licaria cannela tenuicarpaortaxon=456,789,3,4taxon_root- same as taxon but return also all the the locations for individuals identified as any of the descendants of the taxons informeddataset=mixed- the id or ids or names of the datasets, return individuals belonging to the datasets informedlimitandoffsetare SQL statements to limit the amount of data when trying to download a large number of individuals, as the request may fail due to memory constraints. See Common parameters.
Note
Notice that all search fields (taxon, location and dataset) may be specified as names (eg, “taxon=Euterpe edulis”) or as database ids. If a list is specified for one of these fields, all items of the list must be of the same type, i.e. you cannot search for ’taxon=Euterpe,24’. Also, location and taxon have priority over location_root and taxon_root if both informed.Response fields
individual_id- the ODB id of the Individual in the individuals table (a local database id)location_id- the ODB id of the Location in the locations table (a local database id)basisOfRecord- will be always ‘occurrence’ - DWC and [dwc occurrence](DWC;occurrenceID- the unique identifier for this record, the individual+location+date_time - DWCorganismID- the unique identifier for the Individual DWCrecordedDate- the occurrence date+time observation - DWClocationName- the location name (if plot the plot name, if point the point name, …)higherGeography- the parent LocationName ‘|’ separated (e.g. Brasil | Amazonas | Rio Preto da Eva | Fazenda Esteio | Reserva km37 | Manaus ForestGeo-PDBFF Plot | Quadrat 100x100 ) - DWCdecimalLatitude- depends on the location adm_level and the individual X and Y, or Angle and Distance attributes, which are used to calculate these global coordinates for the record - DWCdecimalLongitude- same as for decimalLatitude - DWCgeoreferenceRemarks- will contain the explanation of the type of decimalLatitude - DWCx- the individual X position in a Plot locationy- the individual Y position in a Plot locationangle- the individual azimuth direction in relation to a POINT reference, either when adm_level is POINT or when X and Y are also provided for a Plot location this is calculated from X and Y positionsdistance- the individual distance direction in relation to a POINT reference, either when adm_level is POINT or when X and Y are also provided for a Plot location this is calculated from X and Y positionsminimumElevation- the altitude for this occurrence record if any - DWCoccurrenceRemarks- any note associated with this record - DWCscientificName- the current taxonomic identification of the individual (no authors) or “unidentified” - DWCfamily- the current taxonomic family name, if apply - DWCdatasetName- the name of the ODB Dataset to which the record belongs to - DWCaccessRights- the ODB Dataset access privacy setting - DWCbibliographicCitation- the ODB Dataset citation - DWClicense- the ODB Dataset license DWC
Measurements Endpoint
The
measurementsendpoint interact with the measurements table. Their basic usage is getting Data linked to Individuals, Taxons, Locations or Vouchers, regardless of datasets, so it is useful when you want particular measurements from different datasets that you have access for. If you want a full dataset, you may just use the web interface, as it prepares a complete set of the dataset measurements and their associated data tables for you.
GET request-parameters
id=list of idsreturn only the measurement or measurements having the id or ids provided (exid=1,2,3,10)taxon=list of ids or namesreturn only the measurements related to the Taxons, both direct taxon measurements and indirect taxon measurements from their individuals and vouchers (extaxon=Aniba,Licaria). Does not consider descendants taxons for this usetaxon_rootinstead. In the example only measurements directly linked to the genus and genus level identified vouchers and individuals will be retrieved.taxon_root=list of ids or namessimilar totaxon, but get also measurements for descendants taxons of the informed query (extaxon=Lauraceaewill get measurements linked to Lauraceae and any taxon that belongs to it;dataset=list of idsreturn only the measurements belonging to the datasets informed (exdataset=1,2) - allows to get all data from a dataset.trait=list of ids or export_namesreturn only the measurements for the traits informed (extrait=DBH,DBHpomordataset=2?trait=DBH) - allows to get data for a particular traitindividual=list of individual idsreturn only the measurements for the individual ids informed (exindividual=1000,1200)voucher=list of voucher idsreturn only the measurements for the voucher ids informed (exvoucher=345,321)location=list of location idsreturn only measurements for the locations ids informed (exlocation=4,321)- does not retrieve measurements for individuals and vouchers in those locations, only measured locations, like plot soil surveys data.limitandoffsetare SQL statements to limit the amount of data when trying to download a large number of measurements, as the request may fail due to memory constraints. See Common parameters.
Response fields
id- the Measurement ODB id in the measurements table (local database id)basisOfRecordDWC - will be always ‘MeasurementsOrFact’ [dwc measurementorfact](DWCmeasured_type- the measured object, one of ‘Individual’, ‘Location’, ‘Taxon’ or ‘Voucher’measured_id- the id of the measured object in the respective object table (individuals.id, locations.id, taxons.id, vouchers.id)measurementIDDWC - a unique identifier for the Measurement record - combine measured resourceRelationshipID, measurementType and datemeasurementTypeDWC - the export_name for the ODBTrait measuredmeasurementValueDWC - the value for the measurement - will depend on kind of the measurementType (i.e. ODBTrait)measurementUnitDWC - the unit of measurement for quantitative traitsmeasurementDeterminedDateDWC - the Measurement measured datemeasurementDeterminedByDWC - Person responsible for the measurementmeasurementRemarksDWC - text note associated with this Measurement recordresourceRelationshipDWC - the measured object (resource) - one of ’location’,’taxon’,‘organism’,‘preservedSpecimen’resourceRelationshipIDDWC - the id of the resourceRelationshiprelationshipOfResourceDWC - will always be ‘measurement of’scientificNameDWC - the current taxonomic identification (no authors) or ‘unidentified’ if the resourceRelationship object is not ’location’familyDWC - taxonomic family name if appliesdatasetName- the name of the ODB Dataset to which the record belongs to - DWCaccessRights- the ODB Dataset access privacy setting - DWCbibliographicCitation- the ODB Dataset citation - DWClicense- the ODB Dataset license - DWCmeasurementLocationId- the ODB id of the location associated with the measurementmeasurementParentId- the ODB id of another related measurement (the parent measurement to which the current depends upon)decimalLatitudeDWC - a latitude em graus decimais da medição ou do objeto medido.decimalLongitudeDWC - a longitude em graus decimais da medição ou do objeto medido.
Media Endpoint
The
mediaendpoint interact with the media table. Their basic usage is getting the metadata associated with MediaFiles and the files URL.
GET request-parameters
individual=number or list- return media associated with the individuals having id or ids ex:id=2345,345voucher=number or list- return media associated with the vouchers having id or ids ex:id=2345,345location=mixed- return media associated with the locations having id or name or ids or names ex:location=24,25,26location=Parcela 25halocation_root- same as location but return also media associated with the descendants of the locations informedtaxon=mixed- the id or ids, or canonicalName taxon names (fullnames) ex:taxon=Aniba,Ocotea guianensis,Licaria cannela tenuicarpaortaxon=456,789,3,4taxon_root- same as taxon but return also all the locations for media related to any of the descendants of the taxons informeddataset=mixed- the id or ids or names of the datasets, return belonging to the datasets informedlimitandoffsetare SQL statements to limit the amount of data when trying to download a large number of individuals, as the request may fail due to memory constraints. See Common parameters.
Note
Notice that all search fields (taxon, location and dataset) may be specified as names (eg, “taxon=Euterpe edulis”) or as database ids. If a list is specified for one of these fields, all items of the list must be of the same type, i.e. you cannot search for ’taxon=Euterpe,24’. Also, location and taxon have priority over location_root and taxon_root if both informed.Response fields
id- the Measurement ODB id in the measurements table (local database id)basisOfRecordDWC - will be always ‘MachineObservation’ DWCmodel_type- the related object, one of ‘Individual’, ‘Location’, ‘Taxon’ or ‘Voucher’model_id- the id of the related object in the respective object table (individuals.id, locations.id, taxons.id, vouchers.id)resourceRelationshipDWC - the related object (resource) - one of ’location’,’taxon’,‘organism’,‘preservedSpecimen’resourceRelationshipIDDWC - the id of the resourceRelationshiprelationshipOfResourceDWC - will be the dwcTyperecordedByDWC - pipe “|” separated list of registered Persons abbreviationsrecordedDateDWC - the media file datescientificNameDWC - the current taxonomic identification of the individual (no authors) or “unidentified”familyDWCdwcTypeDWC - one of StillImage, MovingImage, SounddatasetName- the name of the ODB Dataset to which the record belongs to DWCaccessRights- the ODB Dataset access privacy setting - DWCbibliographicCitation- the ODB Dataset citation - DWClicense- the ODB Dataset license - DWCfile_name- the file namefile_url- the url to the file
Languages EndPoint
The
languagesendpoint interact with the Language table. Their basic usage is getting a list of registered Languages to import User Translations like Trait and TraitCategories names and descriptions.
Response fields
id- the id of the language in the languages table (a local database id)code- the language string code;name- the language name;
Locations Endpoint
The
locationsendpoints interact with the locations table. Their basic usage is getting a list of registered countries, cities, plots, etc, or importing new locations.
GET request-parameters
id=listreturn only locations having the id or ids provided (exid=1,2,3,10)adm_level=numberreturn only locations for the specified level or type:- 2 for country; 3 for first division within country (province, state); 4 for second division (e.g. municipality)… up to adm_level 10 as administrative areas (Geometry: polygon, MultiPolygon);
- 97 is the code for Environmental Layers (Geometry: polygon, multipolygon);
- 98 is the code for Indigenous Areas (Geometry: polygon, multipolygon);
- 99 is the code for Conservation Units (Geometry: polygon, multipolygon);
- 100 is the code for plots and subplots (Geometry: polygon or point);
- 101 for transects (Geometry: point or linestring)
- 999 for any ‘POINT’ locations like GPS waypoints (Geometry: point);
name=stringreturn only locations whose name matches the search string. You may use asterisk as a wildcard. Example:name=Manausorname=*Ducke*to find name that has the word Ducke;parent_id=listreturn the locations for which the direct parent is in the list (ex: parent_id=2,3)root=numbernumber is the locationidto search, returns the location for the specified id along with all of its descendants locations; example: find the id for Brazil and use its id as root to get all the locations belonging to Brazil;querytypeone of “exact”, “parent” or “closest” and must be provided withlatandlong:- when
querytype=exactwill find a point location that has the exact match of thelatandlong; - when
querytype=parentwill find the most inclusive parent location within which the coordinates given bylatandlongfall; - when
querytype=closestwill find the closest location to the coordinates given bylatandlong; It will only search for closest locations havingadm_level > 99, see above. latandlongmust be valid coordinates in decimal degrees (negative for South and West);
- when
fields=listspecify which fields you want to get with your query (see below for field names), or use options ‘all’ or ‘simple’, to get full set and the most important columns, respectivelyproject=mixed- id or name of project (may be a list) return the locations belonging to one or more Projectsdataset=mixed- id or name of a dataset (may be a list) return the locations belonging to one or more Datasets
Notice that id, search, parent and root should probably not be combined in the same query.
Response fields
id- the ODB id of the Location in the locations table (a local database id)basisOfRecordDWC - will always contain ’location’ [dwc location](DWClocationName- the location name (if country the country name, if state the state name, etc…)adm_level- the numeric value for the ODB administrative level (2 for countries, etc)levelName- the name of the ODB administrative levelparent_id- the ODB id of the parent locationparentName- the immediate parent locationNamehigherGeographyDWC - the parent LocationName ‘|’ separated (e.g. Brasil | São Paulo | Cananéia);footprintWKTDWC - the WKT representation of the location; if adm_level==100 (plots) or adm_level==101 (transects) and they have been informed as a POINT location, the respective polygon or linestring geometries, the footprintWKT will be that generated using the location’s x and y dimensions.xandy- (meters) when location is a plot (100 == adm_level) its X and Y dimensions, if a transect (101 == adm_level), x may be the length and y may be a buffer dimension around the linestring.startxandstarty- (meters) when location is a subplot (100 == adm_level with parent also adm_level==100), the X and Y start position in relation to the 0,0 coordinate of the parent plot location, which is either a Point, or the first coordinate of a Polygon geometry type;distance- only when querytype==closest, this value will be present, and indicates the distance, in meters, the locations is from your queried coordinates;locationRemarksDWC - any notes associated with this Location recorddecimalLatitudeDWC - depends on the adm_level: if adm_level<=99, the latitude of the centroid; if adm_level == 999 (point), its latitude; if adm_level==100 (plot) or 101 (transect), but is a POINT geometry, the POINT latitude, else if POLYGON geometry, then the first point of the POLYGON or the LINESTRING geometry.decimalLongitudeDWC - same as for decimalLatitudegeoreferenceRemarksDWC - will contain the explanation about decimalLatitudegeodeticDatum-DWC the geodeticDatum informed for the geometry (ODB does not treat map projections, assumes data is always is WSG84)
Persons Endpoint
The
personsendpoint interact*** with the Person table. The basic usage is getting a list of registered people (individuals and vouchers collectors, taxonomic specialists or database users).
GET request-parameters
id=listreturn only persons having the id or ids provided (exid=1,2,3,10)name=string- return people whose name matches the specified string. You may use asterisk as a wildcard. Ex:name=*ducke*abbrev = string, return people whose abbreviation matches the specified string. You may use asterisk as a wildcard.email=string, return people whose e-mail matches the specified string. You may use asterisk as a wildcard.search=string, return people whose name, abbreviation or e-mail matches the specified string. You may use asterisk as a wildcard.limitandoffsetare SQL statements to limit the amount of data when trying to download a large number of measurements, as the request may fail due to memory constraints. See Common parameters.
Response fields
id- the id of the person in the persons table (a local database id)full_name- the person name;abbreviation- the person name (this are UNIQUE values in a OpenDataBio database)email- the email, if registered or person is userinstitution- the persons institution, if registerednotes- any registered notes;biocollection- the name of the Biological Collection (Biocollections, etc) that the person is associated with; not included in simple)
Projects EndPoint
The
projectsendpoint interact with the projects table. The basic usage is getting the registered Projects.
GET request-parameters
id=listreturn only projects having the id or ids provided (exid=1,2,3,10)
Response fields
id- the id of the Project in the projects table (a local database id)fullname- project nameprivacyLevel- the access level for individuals and vouchers in ProjectcontactEmail- the project administrator emailindividuals_count- the number of individuals in the projectvouchers_count- the number of vouchers in the project
Taxons Endpoint
The
taxonsendpoint interact with the taxons table. The basic usage is getting a list of registered taxonomic names.
GET request-parameters
id=listreturn only taxons having the id or ids provided (exid=1,2,3,10)name=searchreturns only taxons with fullname (no authors) matching the search string. You may use asterisk as a wildcard.root=numberreturns the taxon for the specified id along with all of its descendantslevel=numberreturn only taxons for the specified taxon level.valid=1return only valid namesexternal=1return the Tropicos, IPNI, MycoBank, ZOOBANK or GBIF reference numbers. You need to specifyexternalrefsin the field list to return them!project=mixed- id or name of project (may be a list) return the taxons belonging to one or more Projectsdataset=mixed- id or name of a dataset (may be a list) return the taxons belonging to one or more Datasetslimitandoffsetare SQL statements to limit the amount. See Common parameters.
Notice that id, name and root should not be combined.
Response fields
id- this ODB id for this Taxon record in the taxons tablesenior_id- if invalid this ODB identifier of the valid synonym for this taxon (acceptedNameUsage) - only when taxonomicStatus == ‘invalid’parent_id- the id of the parent taxonauthor_id- the id of the person that defined the taxon for unpublished names (having an author_id means the taxon is unpublished)scientificNameDWC - the full taxonomic name without authors (i.e. including genus name and epithet for species name)scientificNameIDDWC - nomenclatural databases ids, if any external reference is stored for this Taxon recordtaxonRankDWC - the string value of the taxon ranklevel- the ODB numeric value of the taxon rankscientificNameAuthorshipDWC - the taxon authorship. For taxonomicStatus unpublished: will be a ODB registered Person namenamePublishedIn- unified bibliographic reference (i.e. either the short format or an extract of the bibtext reference assigned). This will be mostly retrieved from nomenclatural databases; Taxon linked references can be extracted with the BibReference endpoint.taxonomicStatusDWC - one of ‘accepted’, ‘invalid’ or ‘unpublished’; if invalid, fields senior_id and acceptedNameUsage* will be filledparentNameUsageDWC - the name of the parent taxon, if species, the genus, if genus, family, and so onfamilyDWC - the family name if taxonRank family or belowhigherClassificationDWC - the full taxonomic hierarchical classification, pipe separated (will include only Taxons registered in this database)acceptedNameUsageDWC - if taxonomicStatus invalid the valid scientificName for this TaxonacceptedNameUsageIDDWC - if taxonomicStatus invalid the scientificNameID ids of the valid TaxontaxonRemarksDWC - any note the taxon record may havebasisOfRecordDWC - will always be ’taxon’externalrefs- the Tropicos, IPNI, MycoBank, ZOOBANK or GBIF reference numbers
Traits Endpoint
The
traitsendpoint interact with the Trait table. The basic usage is getting a list of variables and variables categories for importing Measurements.
GET request-parameters
id=listreturn only traits having the id or ids provided (exid=1,2,3,10);name=stringreturn only traits having theexport_nameas indicated (exname=DBH)categories- if true return the categories for categorical traitslanguage=mixedreturn name and descriptions of both trait and categories in the specified language. Values may be ’language_id’, ’language_code’ or ’language_name’;bibreference=boolean- if true, include the BibReference associated with the trait in the results;limitandoffsetare SQL statements to limit the amount. See Common parameters.
Response fields
id- the id of the Trait in the odbtraits table (a local database id)type- the numeric code defining the Trait typetypename- the name of the Trait typeexport_name- the export name valuemeasurementTypeDWC - same as export_name for DWC compatibilitymeasurementMethodDWC - combine name, description and categories if apply (included in the Measurement GET API, for DWC compatibility)measurementUnit- the unit of measurement for Quantitative traitsmeasurementTypeBibkeys- the bibkeys of the bibliographic references associated with the trait definition, separated by pipe ‘|’taggedWith- the name of the tags or keywords associated with the trait definition, separated by pipe ‘|’range_min- the minimum allowed value for Quantitative traitsrange_max- the maximum allowed value for Quantitative traitslink_type- if Link type trait, the class of the object the trait links to (currently only Taxon)name- the trait name in the language requested or in the default languagedescription- the trait description in the language requested or in the default languagevalue_length- the length of values allowed for Spectral trait typesobjects- the types of object the trait may be used for, separated by pipe ‘|’categories- each category is given for Categorical and Ordinal traits, with the following fields (the categoryid,name,descriptionandrank). Ranks are meaningfull only for ORDINAL traits, but reported for all categorical traits.
Vouchers Endpoint
The
vouchersendpoints interact with the Voucher table. Their basic usage is getting data from Voucher specimens
GET parameters
id=listreturn only vouchers having the id or ids provided (exid=1,2,3,10)number=stringreturns only vouchers for the informed collector number (but is a string and may contain non-numeric codes)collector=mixedone of id or ids or abbreviations, returns only vouchers for the informed main collectordataset=list- one of id or ids list, name or names list, return all vouchers directly or indirectly related to the datasets informed.project=mixedone of ids or names, returns only the vouchers for datasets belonging to the Project informed.location=mixedone of ids or names; (1) ifindividual_tagis also requested returns only vouchers for those individuals (or use “individual=*” to get all vouchers for any individual collected at the location); (2) ifindividualandindividual_tagare not informed, then returns vouchers linked to locations and to the individuals at the locations.location_root=mixed- same as location, but include also the vouchers for the descendants of the locations informed. e.g. “location_root=Manaus” to get any voucher collected within the Manaus administrative area;individual=mixedeither a individual_id or a list of ids, or*- returns only vouchers for the informed individuals; when “individual=*” then location must be informed, see above;taxon=mixedone of ids or names, returns only vouchers for the informed taxons. This could be either vouchers referred as parent of the requested taxon or vouchers of individuals of the requested taxons.taxon_root=mixed- same as taxon, but will include in the return also the vouchers for the descendants of the taxons informed. e.g. “taxon_root=Lauraceae” to get any Lauraceae voucher;
Notice that some search fields (taxon, location, project and collector) may be specified as names - abbreviation, fullnames and emails in the case of collector - (eg, “taxon=Euterpe edulis”) or as database ids. If a list is specified for one of these fields, all items of the list must be of the same type.
Response fields
id- the Voucher ODB id in the vouchers table (local database id)basisOfRecordDWC - will be always ‘preservedSpecimen’ [dwc location](DWCoccurrenceIDDWC - a unique identifier for the Voucher record - combine organismID with biocollection infoorganismIDDWC - a unique identifier for the Individual the Voucher belongs toindividual_id- the ODB id for the Individual the Voucher belongs tocollectionCodeDWC - the Biocollection acronym where the Voucher is depositedcatalogNumberDWC - the Biocollection number or code for the VouchertypeStatusDWC - if the Voucher represent a nomenclatural typerecordedByDWC - collectors pipe “|” separated list of registered Persons abbreviations that collected the vouchersrecordedByMain- the first person in recordedBy, the main collectorrecordNumberDWC - an identifier for the Voucher, generaly the Collector Number valuerecordedDateDWC - the record date, collection datescientificNameDWC - the current taxonomic identification of the individual (no authors) or “unidentified”scientificNameAuthorshipDWC - the taxon authorship. For taxonomicStatus unpublished: will be a ODB registered Person namefamilyDWCgenusDWCidentificationQualifierDWC - identification name modifiers cf. aff. s.l., etc.identifiedByDWC - the Person identifying the scientificName of this recorddateIdentifiedDWC - when the identification was made (may be incomplete, with 00 in the month and or day position)identificationRemarksDWC - any notes associated with the identificationlocationName- the location name for the organismID the voucher belongs to (if plot the plot name, if point the point name, …)higherGeographyDWC - the parent LocationName ‘|’ separated (e.g. Brasil | Amazonas | Rio Preto da Eva | Fazenda Esteio | Reserva km37);decimalLatitudeDWC - depends on the location adm_level and the individual X and Y, or Angle and Distance attributes, which are used to calculate these global coordinates for the record; if individual has multiple locations (a monitored bird), the location closest to the voucher date is obtaineddecimalLongitudeDWC - same as for decimalLatitudeoccurrenceRemarksDWC - text note associated with this recordassociatedMediaDWC - urls to ODB media files associated with the recorddatasetName- the name of the ODB Dataset to which the record belongs to DWCaccessRights- the ODB Dataset access privacy setting - DWCbibliographicCitation- the ODB Dataset citation - DWClicense- the ODB Dataset license - DWC
Jobs Endpoint
The
jobsendpoints interact with the UserJobs table. The basic usage is getting a list of submitted data import jobs, along with a status message and logs. You can also get data from jobs produced using thesave_job=1parameter, or export jobs created using the web interface (with the csv option only)
GET parameters
status=stringreturn only jobs for the specified status: “Submitted”, “Processing”, “Success”, “Failed” or “Cancelled”;id=list- the job id or ids ;get_file- ifget_file=1, then you can get the data file saved by the job. This needs also a singleidparameter. Useful, when getting data with thesave_job=1option.
Response fields
id- the job idstatus- the status of the jobdispatcher- the type of the job, e.g, ImportTaxons;log- the job log messages, usually indicating whether the resources were successfully imported, or whether errors occurred; others.
Possible errors
This should be an extensive list of error codes that you can receive while using the API. If you receive any other error code, please file a bug report!
- Most of the time will be related to memory, if you are trying to get a large dataset, for example. See the get common parameters
- Error 401 - Unauthenticated. Currently not implemented. You may receive this error if you attempt to access some protected resources but didn’t provide an API token.
- Error 403 - Unauthorized. You may receive this error if you attempt to import or edit some protected resources, and either didn’t provide an API token or your user does not have enough privileges.
- Error 404 - The resource you attempted to see is not available. Note that you can receive this code if your user is not allowed to see a given resource.
- Error 413 - Request Entity Too Large. You may be attempting to send a very large import, in which case you might want to break it down in smaller pieces.
- Error 429 - Too many attempts. Wait one minute and try again.
- Error 500 - Internal server error. This indicates a problem with the server code. Please file a bug report with details of your request.
3.3 - POST data
-
The OpenDataBio R package is a client for this API.
-
Importing data from files through the web-interface require specifying the POST parameters here specified
-
Batch imports of Bibliographic References and MediaFiles are possible only through the web interface.
-
Authentication token is required for all POST
POST Individuals
Request fields allowed when importing individuals:
collector=mixed- required - persons ‘id’, ‘abbreviation’, ‘full_name’, ’email’; if multiple persons, separate values in your list with pipe|or;because commas may be present within names. Main collector is the first on the list;tag=string- required - the individual number or code (if the individual identifier is as MainCollector+Number, this is the field for Number);dataset=mixed- required - name or id of the Dataset;date=YYYY-MM-DD or array- the date the individual was recorded/tagged, for historical records you may inform an incomplete string in the form “1888-05-NA” or “1888-NA-NA” when day and/or month are unknown. You may also inform as an array in the form “date={ ‘year’ : 1888, ‘month’: 5}”. OpenDataBio deals with incomplete dates, see the IncompleteDate Model. At leastyearis required.notes- any annotation for the Individual, plain text or data in JSON;
Location fields (one or multiple locations may be informed for the individual). Possible fields are:
location- the Individual’s location name or id required if longitude and latitude are not informedlatitudeandlongitude- geographical coordinates in decimal degrees; required if location is not informedaltitude- the Individual location elevation (altitude) in meters above see level. Must be a integer value;location_notes- any note for the individual location, plain text or data in JSON;location_date_time- if different than the individual’s date, a complete date or a date+time value for the individual first location. Mandatory for multiple locations;x- if location is of Plot type, the x coordinate of the individual in the location;y- if location is of Plot type, the y coordinate of the individual in the location;distance- if location is of POINT type, the individual distance in meters from the location;angle- if location is of POINT type, the individual azimuth (angle) from the location;
Identification fields. Identification is not mandatory, and may be informed in two different ways: (1) self identification - the individual may have its own identification; or (2), other identification - the identification is the same as that of another individual (for example, from an individual having a voucher in some biocollection).
- For (self) identification at least taxon and identifier must be informed. The list of possible fields are:
taxon=mixed- name or id of the identified taxon, e.g. ‘Ocotea delicata’ or its ididentifier=mixed- persons responsible for the taxonomic identification. persons ‘id’, ‘abbreviation’, ‘full_name’, ’email’; if multiple persons, separate values in your list with pipe|or;because commas may be present within names.identification_dateoridentification_date_year,identification_date_month, and/oridentification_date_day- complete or incomplete. If empty, the individual’s date is used;modifier- name or number for the identification modifier. Possible values ’s.s.’=1, ’s.l.’=2, ‘cf.’=3, ‘aff.’=4, ‘vel aff.’=5, defaults to 0 (none).identification_notes- any identification notes, plain text or data in JSON;identification_based_on_biocollection- the biocollection name or id if the identification is based on a reference specimen deposited in an biocollectionidentification_based_on_biocollection_id- only fill ifidentification_based_on_biocollectionis present;
- If the identification is other:
identification_individual- id or fullname (organimsID) of the Individual having the identification.
If the Individual has Vouchers with the same Collectors, Date and CollectorNumber (Tag) as those of the Individual, the following fields and options allow to store the vouchers while importing the Individual record (alternatively, you may import voucher after importing individuals using the Voucher EndPoint. Vouchers for the individual may be informed in two ways:
- As separate string fields:
biocollection- A string with a single value or a comma separated list of values. Values may be theidoracronymvalues of the Biocollection Model. Ex: “{ ‘biocollection’ : ‘INPA;MO;NY’}” or “{ ‘biocollection’ : ‘1,10,20’}”;biocollection_number- A string with a single value or a comma separated list of values with the BiocollectionNumber for the Individual Voucher. If a list, then must have the same number of values asbiocollection;biocollection_type- A string with a single numeric code value or a comma separated list of values for Nomenclatural Type for the Individual Vouchers. The default value is 0 (Not a Type). See nomenclatural types list.
- AS a single field
biocollectioncontaining an array with each element having the fields above for a single Biocollection: “{ { ‘biocollection_code’ : ‘INPA’, ‘biocollection_number’ : 59786, ‘biocollection_type’ : 0}, { ‘biocollection_code’ : ‘MG’, ‘biocollection_number’ : 34567, ‘biocollection_type’ : 0} }”
POST Individual-locations
The individual-locations endpoint allows importing multiple locations for registered individuals. Designed for occurrences of organisms that move and have multiple locations.
Possible fields are:
individual- the Individual’s id requiredlocation- the Individual’s location name or id required OR longitude+latitudelatitudeandlongitude- geographical coordinates in decimal degrees; required if location is not informedaltitude- the Individual location elevation (altitude) in meters above see level;location_notes- any note for the individual location, plain text or data in JSON;location_date_time- if different than the individual’s date, a complete date or a date+time (hh:mm:ss) value for the individual location. requiredx- if location is of Plot type, the x coordinate of the individual in the location;y- if location is of Plot type, the y coordinate of the individual in the location;distance- if location is of POINT type (or latitude and longitude are informed), the individual distance in meters from the location;angle- if location is of POINT type, the individual azimuth (angle) from the location
POST Locations
The locations endpoints interact with the locations table. Use to import new locations.
Attention
ODB Locations are stored with a parent-child relationship, assuring validations and facilitating queries. Parents will be guessed using the location geometry. If parent is not informed, the imported location must be completely contained by a registered parent (using sql ST_WITHIN function to detect parent). However, if a parent is informed, the importation may also test if the geometry fits a buffered version of the parent geometry, thus ignoring minor geometries overlap and shared borders. Countries can be imported without parent relations. Any other location must be registered within at least a ‘country’ as parent. If the record is marine, and falls outside of a registered country polygon, a ‘ismarine’ argument must be indicated to accept the non-spatial parent relationship.
Subplots - a plot location within a plot location - is the only situation in which a geometry is not needed. If not informed, the geometry will be calculated based on the parent plot geometry and the subplot startx and starty coordinates.
Make sure your geometry projection is EPSG:4326 WGS84. Use this standard!
Available POST fields:
name- the location name - required (parent+name must be unique in the database)adm_level- must be numeric, see location get api - required- geometry use either: required
geomfor a WKT representation of the geometry, POLYGON, MULTIPOLYGON, POINT OR LINESTRING allowed;latandlongfor latitude and longitude in decimal degrees (use negative numbers for south/west).
altitude- in metersdatum- defaults to ‘EPSG:4326-WGS 84’ and your are strongly encourage of importing only data in this projection. You may inform a different projection here;parent- either the id or name of the parent location. The API will detect the parent based on the informed geometry and the detected parent has priority if informed is different. However, only when parent is informed, validation will also test whether your location falls within a buffered version of the informed parent, allowing to import locations that have a parent-child relationship but their borders overlap somehow (either shared borders or differences in georeferencing);- when location is plot (
adm_level=100), optional fields are:xandyfor the plot dimensions in meters(defines the Cartesian coordinates)startxandstartyfor start position of a subplot in relation to its parent plot location;
notes- any note you wish to add to your location, plain text or data in JSON;azimuth- apply only for Plots and Transects when registered with a POINT geometry - azimuth will be used to build the geometry. For plots the point coordinate refer to the 0,0 vertice of the plot polygon that will be build clockwise starting from the informed point, the azimuth and the y dimension. For transects, the informed point coordinates are the start point and a linestring will be build using this azimuth and x dimension.ismarine- to permit the importation of location records that not fall within any register parent location you may add ismarine=1. Note, however, that this allows you to import misplaced locations. Only use if your location is really a marine location that fall outside any Country border;
alternatively: you may just submit a single column named geojson containing a Feature record, with its geometry and having as ‘properties’ at least tags name and adm_level (or admin_level). See geojson.org. This is usefull, for example, to import country political boundaries (https://osm-boundaries.com/).
POST Measurements
The measurements endpoint allows to import measurements.
The following fields are allowed in a post API:
dataset=number- the id of the dataset where the measurement should be placed requireddate=YYYY-MM-DD- the observation date for the measurement, must be passed as YYYY-MM-DD requiredobject_type=string- either ‘Individual’,‘Location’,‘Taxon’ or ‘Voucher’, i.e. the object from where the measurement was taken requiredobject_id=number- the id of the measured object, either (individuals.id, locations.id, taxons.id, vouchers.id) requiredperson=mixedpersons responsible for the measurements. You may inform ‘id’, ‘abbreviation’, ‘full_name’ or ’email’. If multiple persons, separate values in your list with pipe|or;because commas may be present within names. requiredtrait_id=number or string- either the id or export_name for the measurement. requiredvalue=number, string list- this will depend on the trait type, see tutorial required, optional for trait type LINKlink_id=number- the id of the linked object for a Trait of type Link required if trait type is Link DEPRECATED REPLACED BY locationlocation or location_id- the id or name of the Location of a measurement related to a Taxon. Only Taxons can also have a location associated with them. This replaces the Link-type Trait logic.bibreference=number- the id of the BibReference for the measurement. Should be use when the measurement was taken from a publicationnotes- any note you whish. In same cases this is a usefull place to store measurement related information. For example, when measuring 3 leaves of a voucher, you may indicate here to which leaf the measurement belongs, leaf1, leaf2, etc. allowing to link measurements from different traits by this field. Plain text or data in JSON;duplicated- by default, the import API will prevent duplicated measurements for the same trait, object and date; specifyingduplicated=#, where # is the stored number of records+1. For example, there is already one record, you must informduplicated=2if there are two, a third can be stored usingduplicated=3.parent_measurement = number only- the ‘id’ of another measurement which is the parent of the measurement being imported. This creates a relationship between these measurements. The ‘id’ will be validated and must be from a measurement belonging to the same object, same date and different variable. E.g. leaf width may be linked to a measurement of leaf length.
POST Persons
The persons endpoint interact with the Person table. The following fields are allowed when importing persons using the post API:
full_name- person full name, requiredabbreviation- abbreviated name, as used by the person in publications, as collector, etc. (if left blank, a standard abbreviation will be generated using the full_name attribute – abbreviation must be unique within a ODB installation);email- an email address,institution- to which institution this person is associated;biocollection- name or acronym of the Biocollection to which this person is associated.
POST Taxons
Use to import new taxon names.
The POST API requires ONLY the full name of the taxon to be imported, i.e. for species or below species taxons the complete name must be informed (e.g. Ocotea guianensis or Licaria cannela aremeniaca). The script will validate the name retrieving the remaining required info from the nomenclatural databases using their API services. It will search GBIF and Tropicos if the case and retrieve taxon info, their ids in these repositories and also the full classification path and senior synonyms (if the case) up to when it finds a valid record name in this ODB database. So, unless you are trying to import unpublished names, just submit the name parameter of the list below.
Possible fields:
name- taxon full name required, e.g. “Ocotea floribunda” or “Pagamea plicata glabrescens”level- may be the numeric id or a string describing the taxonRank recommended for unpublished namesparent- the taxon’s parent full name or id - note - if you inform a valid parent and the system detects a different parent through the API to the nomenclatural databases, preference will be given to the informed parent; required for unpublished namesbibreference- the bibliographic reference in which the taxon was published;author- the taxon author’s name;author_idorperson- the registered Person name, abbreviation, email or id, representing the author of unpublished names - required for unpublished namesvalid- boolean, true if this taxon name is valid; 0 or 1mobot- Tropicos.org id for this taxonipni- IPNI id for this taxonmycobank- MycoBank id for this taxonzoobank- ZOOBANK id for this taxongbif- GBIF nubKey for this taxon
POST Traits
When entering few traits, it is strongly recommended that you enter traits one by one using the Web Interface form, which reduces the chance of duplicating trait definitions.
The traits endpoint interact with the Trait table. The POST method allows you to batch import traits into the database and is designed for transferring data to OpenDataBio from other systems, including Trait Ontologies.
- As noted under the Trait Model description, it is important that one really checks whether a needed Trait is not already in the DataBase to avoid multiplication of redundant traits. The Web Interface facilitates this process. Through the API, OpenDataBio only checks for identical
export_name, which must be unique within the database. Note, however, that Traits should also be as specific as possible for detailed metadata annotations. - Traits use User Translations for names and descriptions, allowing a multiple-languages
Fields allowed for the traits/ post API:
export_name=string- a short name for the Trait, which will be used during data exports, are more easily used in trait selection inputs in the web-interface and also during data analyses outside OpenDataBio. Export names must be unique and have no translation. Short and CamelCase export names are recommended. Avoid diacritics (accents), special characters, dots and even white-spaces. requiredtype=number- a numeric code specifying the trait type. See the Trait Model for a full list. requiredobjects=list- a list of the Core objects the trait is allowed to be measured for. Possible values are ‘Individual’, ‘Voucher’, ‘Location’ and/or ‘Taxon’, singular and case sensitive. Ex: “{‘object’: ‘Individual,Voucher’}”; requiredname=json- see translations below; requireddescription=json- see translations below; required- Trait specific fields:
unit=string- required for quantitative traits only (the unit o measurement). This must be either a code or a name (in any language) of a unit already stored in the database. Units can only be define through the web interface.range_min=number- optional for quantitative traits. specify the minimum value allowed for a Measurement.range_max=number- optional for quantitative. maximum allowed value for the trait.categories=json- required for categorical and ordinal traits; see translations belowwavenumber_minandwavenumber_max- required for spectral traits = minimum and maximum WaveNumber within which the ‘value_length’ absorbance or reflectance values are equally distributed. May be informed inrange_minandrange_max, priority for prefix wavenumber over range if both informed.value_length- required for spectral traits = number of values in spectrumlink_type- required for Link traits - the class of link type, fullname or basename: eg. ‘Taxon’ or ‘App\Models\Taxon’.
bibreference=mix- the id(s) or bibkey(s) of a BibReference already stored in the database, separated by ‘|’ or ‘;’parent- id or export_name of another Trait to which the current trait depends on. If you indicate a trait here, this means you add a RESTRICTION on the validation of the measurements. Adding a Measurement for the current trait will DEPEND on the database having a measurement for the trait here indicated, for the same object and same date. Example, you create a trait called POM (point of measurement) for recording the height on a tree where you measure a DBH (diameter at breast height). Adding DBH as a trait on which POM depends upon, means you can only add POM if there is a DBH value for the same tree on the same date.
Translations
-
Fields
name,descriptionmust have the following structure to account for User Translations. They should be a list with the language as ‘keys’. For example anamefield may be informed as:- using the Language code as keys:
[ {"en": "Diâmetro na altura do peito"," pt-br": "Diâmetro a Altura do Peito"} ]- or using the Language ids as keys:
[ {"1":"Diâmetro à altura do peito","2":"Diâmetro a Altura do Peito"} ]- or using the Language names as keys:
[ {"English":"Diameter at Breast Height","Portuguese": "Diâmetro a Altura do Peito"} ] -
Alternatively, you can add the information as separate parameters. Instead of
nameyou can usename.LANGUAGE_CODIGO_ou_ID, for examplename.enorname.1for the name in English andname.pt-brorname.2for the name in Portuguese. Likewise fordescription:description.enordescription.1, etc. -
Field
categoriesmust include for each category+rank+lang the following fields:lang=mixed- the id, code or name of the language of the translation, requiredname=string- the translated category name required (name+rank+lang must be unique)rank=number- the rank for ordinal traits; for non-ordinal, rank is important to indicate the same category across languages, so may just use 1 to number of categories in the order you want. requireddescription=string- optional for categories, a definition of the category.- Example for categories:
[ {"lang":"en","rank":1,"name":"small","description":"smaller than 1 cm"}, {"lang":"pt-br","rank":1,"name":"pequeno","description":"menor que 1 cm"} {"lang":"en","rank":1,"name":"big","description":"bigger than 10 cm"}, {"lang":"pt-br","rank":1,"name":"grande","description":"maior que 10 cm"}, ] -
Valid languages may be retrieved with the Language API.
POST Vouchers
The vouchers endpoints interact with the Voucher table.
The following fields are allowed in a post API:
individual=mixed- the numeric id or organismID of the Individual the Voucher belongs to required;biocollection=mixed- the id, name or acronym of a registered Biocollection the Voucher belongs to required;biocollection_type=mixed- the name or numeric code representing the kind of nomenclature type the Voucher represents in the Biocollection. If not informed, defaults to 0 = ‘Not a Type’. See nomenclature types for a full list of options;biocollection_number=mixed- the alpha numeric code of the voucher in the biocollection;number=string- the main collector number -only if different from the tag value of the Individual the voucher belongs to;collector=mixed- either ids or abbreviations of persons. When multiple values are informed the first is the main collector. Only if different from the Individual collectors list;date=YYYY-MM-DD or array- needed only if, with collector and number, different from Individual values. Date may be an IncompleteDate Model.dataset=number- inherits the project the Individual belongs too, but you may provide a different project if needednotes=string- any text note to add to the voucher, plain text or data in JSON;
Notes field
The notes field of any model is for plain text or text formatted as a JSON object containing structured data. The Json option allows you to store custom structured data in any model that has the notes field. You can, for example, store some secondary fields from original sources as notes when importing data, but you can store any additional data that is not provided by the OpenDataBio database framework. This data will not be validated nor searchable by OpenDataBio and the standardization of tags and values is up to you. Json notes will be imported and exported as JSON text and will be presented in the interface as a formatted table; URLs in your Json will be presented as links in this table.
3.4 - Update data - PUT
Attention
Only the endpoints listed below can be updated using the API and only the listed PUT fields can be updated on each endpoint. Field values are as explained for the POST API endpoints, except that in all cases you must also provide theID of the record to be updated.
| Endpoint | Description | PUT Fields |
|---|---|---|
| individuals | Atualizar Indivíduos | (id or individual_id),collector, tag, dataset, date, notes , taxon , identifier , identification_date , modifier, identification_notes , identification_based_on_biocollection, identification_based_on_biocollection_id , identification_individual |
| individual-locations | Atualizar Localidades de Indivíduos | (id or individual_location_id), individual, (location or latitude + longitude), altitude, location_notes, location_date_time, x, y, distance, angle |
| locations | Atualizar Localidades | (id or location_id), name, adm_level, (geom or lat+long) , parent, altitude, datum, x, y , startx, starty, notes, ismarine |
| measurements | Atualizar Medições | (id or measurement_id), dataset, date, object_type, object_type, person, trait_id, value, link_id, bibreference, notes, duplicated,parent_measurement |
| persons | Atualizar Pessoas | (id or person_id),full_name, abbreviation, email, institution, biocollection |
| vouchers | Atualizar Vouchers | (id or voucher_id),individual, biocollection, biocollection_type, biocollection_number, number, collector, date, dataset, notes |
4 - Concepts
If you want help development, read carefully the OpenDataBio data model concept before start collaborating.
To facilitate the understanding of the concepts, as include many tables and complex relationships, the OpenDataBio data model is divided in the four categories listed below.
4.1 - Core Objects
Core objects are: Location, Voucher, Individual and Taxon. These entities are considered “Core” because they may have Measurements, i.e. you may register values for any custom Trait.
-
The Individual object refer to Individual organism that have been observed once (an occurrence) or has been tagged for monitoring, such as tree in a permanent plot, a banded bird, a radio-tracked bat. Individuals may have one or more Vouchersin a BioCollection, and one or multiple Locations, and will have a taxonomic Identification. Any attribute measured or taken for individual organism may be associated with this object through the Measurement Model model.
-
The Voucherobject is for records of specimens from Individuals deposited in a Biological Collection. The taxonomic Identification and the Location of a Voucher is that of the Individual it belongs to. Measurements may be linked to a Voucher when you want to explicitly register the data to that particular sample (e.g. morphological measurements; a molecular marker from an extraction of a sample in a tissue collection). Otherwise you could just record the Measurement for the Individual the Voucher belongs to. The voucher model is also available as special type of Trait, the
LinkType, making it possible to record counts for the voucher’s Taxon at a particular Location. -
The Location object contains spatial geometries, like points and polygons, and include
plotsandtransectsas special cases. An Individual may have one location (e.g. a plant) or more locations (e.g. a monitored animal). Plots and Transect locations may be registered as a spatial geometry or only point geometry, and may have Cartesian dimensions (meters) registered. Individuals may also have Cartesian positions (X and Y or Angle and Distance) relative to their Location, allowing to account for traditional mapping of individuals in sampling units. Ecological relevant measurements, such as soil or climate data are examples of measurements that may be linked to locations Measurement. -
The Taxon object in addition to its use for the Identification of Individuals, may receive Measurements, allowing the organization of secondary, published data, or any kind of information linked to a Taxonomic name. A BibReference may be included to indicate the data source. Moreover, the Taxon model is available as special type of Trait, the
LinkType, making it possible to record counts for Taxons at a particular Location.
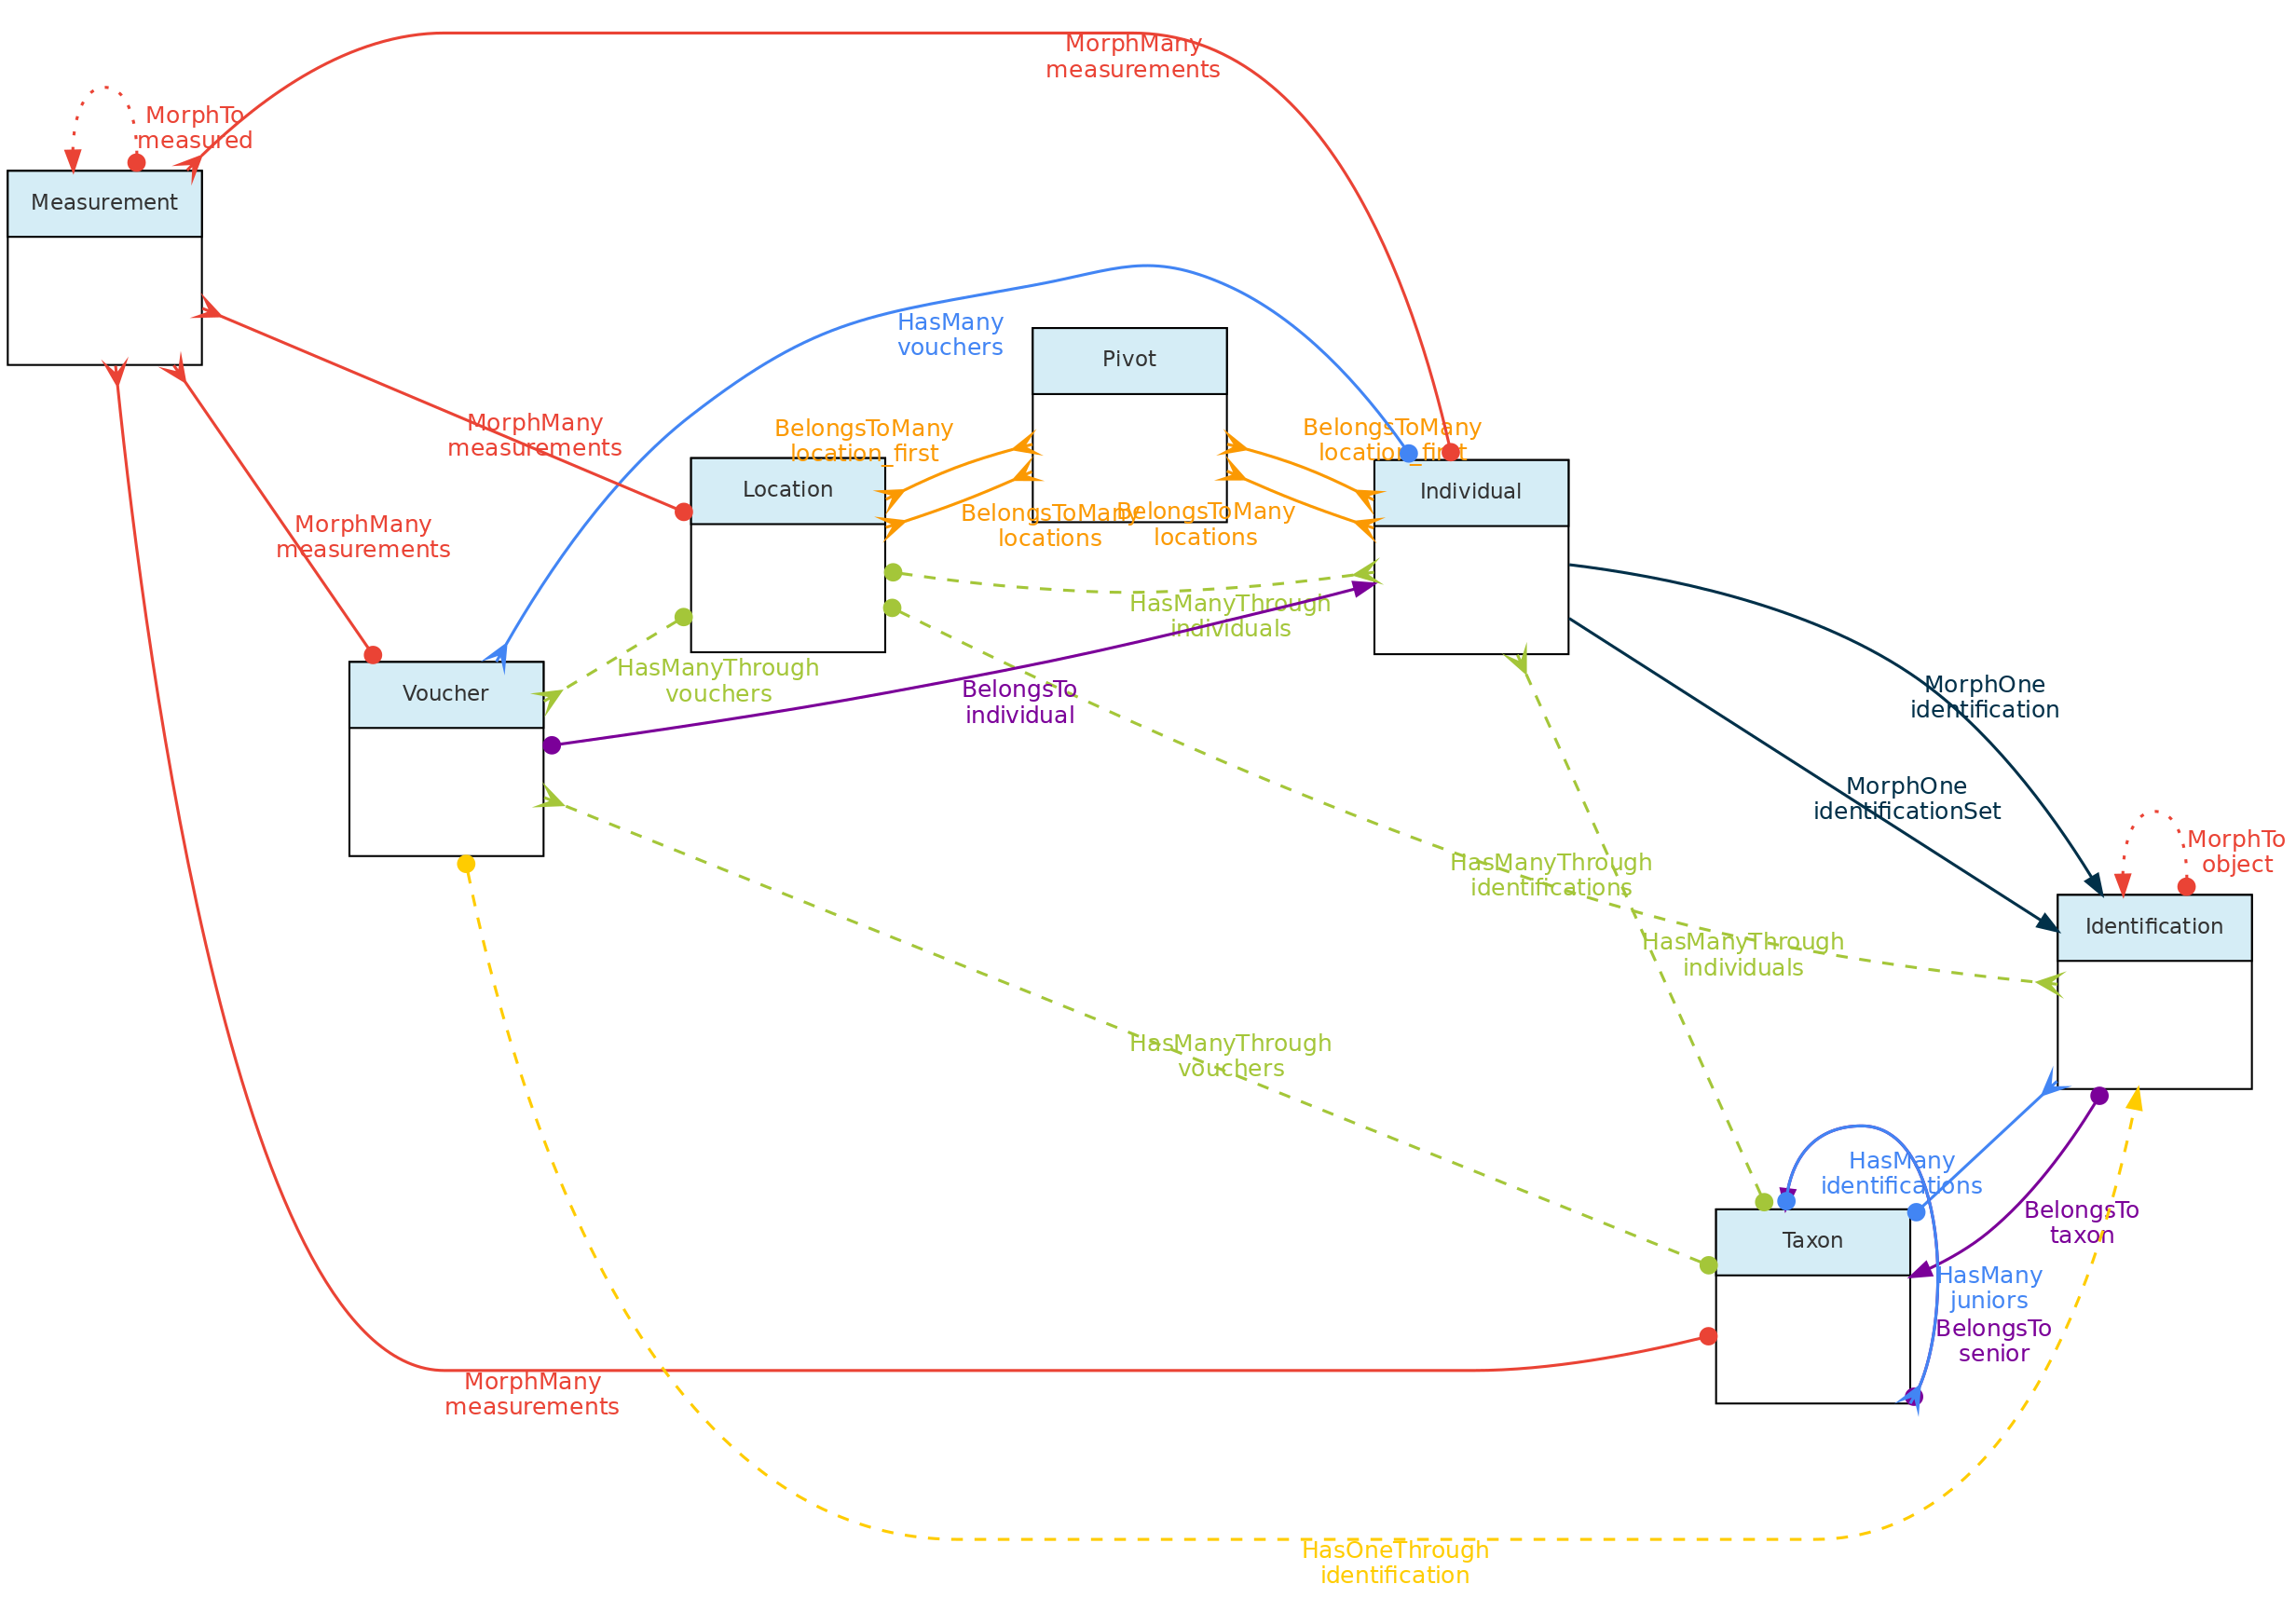
This figure show the relationships among the Core objects and with the Measurement Model. The Identification Model is also included for clarity. Solid links are direct relationships, while dashed links are indirect relationships (e.g. Taxons has many Vouchers through Individuals, and have many Individuals through identifications). The red solid lines link the Core objects with the Measurement model through polymorphic relationships. The dotted lines on the Measurement model just allow access to the measured core-object and to the models of link type traits.
Location Model
The Locations table stores data representing real world locations. They may be countries, cities, conservation units, or any spatial polygon, point or linestring on the surface of Earth. These objects are hierarchical and have a parent-child relationship implemented using the Nested Set Model for hierarchical data of the Laravel library Baum and facilite both validation and queries.
Special location types are plots and transects, which together with point locations allow different sampling methods used in biodiversity studies. These Location types may also be linked a parent location and in addition also to three additional types of location that may span different administrative boundaries, such as Conservation Units, Indigenous Territories and any Environmental layer representing vegetation classes, soil classes, etc…with defined spatial geometries.
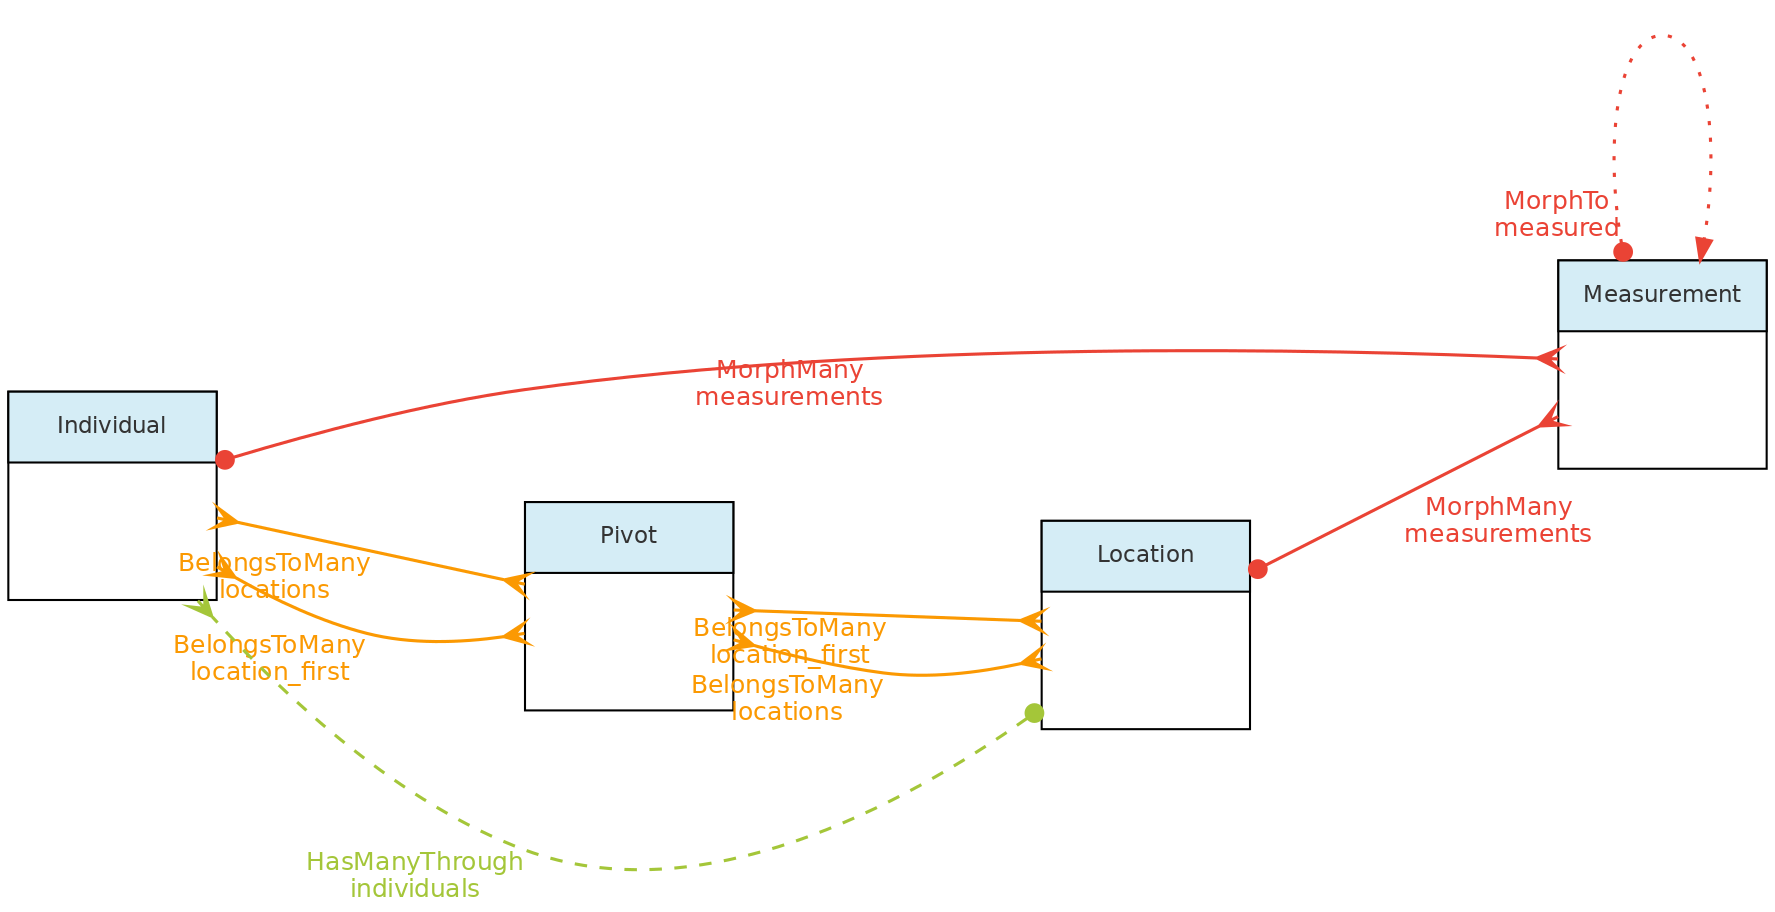 This figure shows the relationships of the
 Location model throught the methods implemented in the shown classes. The pivot table linking Location to Individual allow an individual to have multiple locations and each location for the individual to have specific attributes like date_time, altitude, relative_position and notes.
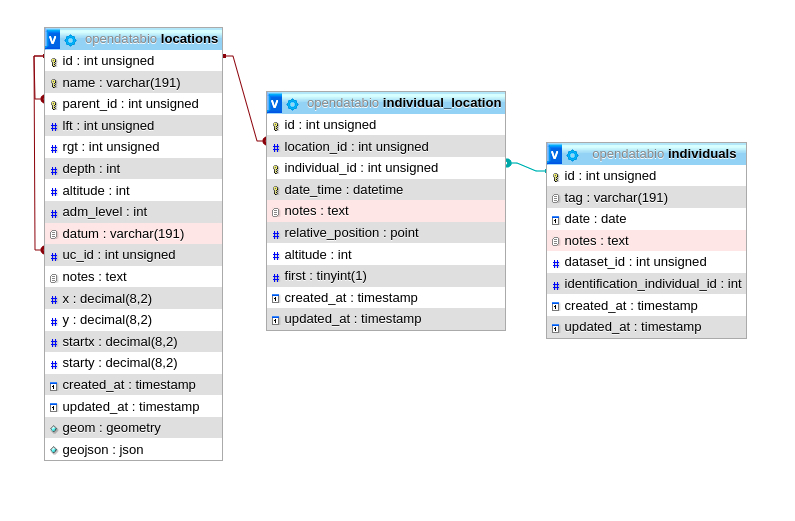 The same tables related with the Location model with the direct and non-polymoprhic relationships indicated.
Location Table Columns
- Columns
parent_idtogether withrgt,lftanddephare used to define the Nested Set Model to query ancestors and descendants in a fast way. Onlyparent_idis specified by the user, the other columns are calculated by the Baum library trait from the id+parent_id values that define the hierarchy. The same hierarchical model is used for the Taxon Model, but for Locations there is a spatial constraint, i.e. a children must fall within a parent geometry. - The
adm_levelcolumn indicate the administrative level, or type, of a location. By default, the followingadm_levelare configured in OpenDataBio:2for country,3for first division within country (province, state),4for second division (e.g. municipality),… up toadm_level=10as administrative areas (country code is 2 to allow standardization with OpenStreeMaps, which is recommended to follow if your installation will include data from different countries). The administrative levels may be configured in an OpenDataBio before importing any data to the database, see the installation guide for details on that.99is the code for Conservation Units - a conservation unit is alocationthat may be linked to multiple other locations (any location may belong to a single UC). Thus, one Location may have as parent a city and as uc_id the conservation unit where it belongs.98is the code for Indigenous Territories - same properties as Conservation Units, but treated separately only because some CUs and TIs may largely overlap as is the case the Amazon region97ise the code for Environmental layers - same properties as Conservation Units and Indigenous Territories, i.e., may be linked as additional location to any Point, Plot or Transect, and thehence, their related individuals. Store polygons and multipolygon geometries representing environmental classes, such as vegetation units, biomes, soil classes, etc…100is the code forplotsand subplots - plot locations may be registered with Point or with a Polygon geometry, and must also have an associated Cartesian dimensions in meters. If it is a point location, the geometry is defined by ODB from the dimensions with NorthEast orientation from the point informed. Cartesian dimensions of a plot location can also be combined with cartesian positions of subplots (i.e. a plot location whose parent is also a plot location) and/or of individuals within such plots, allowing individuals and subplots to be mapped within aplotsubplot location without geometry specifications. In other words, if the spatial geometry of the plot is unknown, it may have as geometry a single GPS point rather than a polygon, plus itsxandydimensions. A subplot is location plot inside a location plot and must consist of a point marking the start of the subplot plus its X and Y cartesian dimensions. If the geometry of the start of the subplot is unknown, it may be stored as a relative position to parent plot using thestartxandstarty.101for transects - like plots, transects may be registered having a LineString geometry or simply a single Latitude and Longitude coordinates and a dimension. Thexcartesian dimension for transects represent the length in meters and is used to create a linestring (North oriented) when only a point is informed. Theydimension is used to validate individuals as belonging to transect location, and represents the maximum distance from the line that and individual must fall to be detected in that location.999for ‘POINT’ locations like GPS waypoints - this is for registration of any point in space
- Column
datummay record the geometry datum property, if known. If left blank, the location is considered to be stored using WGS84 datum. However, there is no built-in conversor from other types of data, so the maps displayed may be incorrect if different datum’s are used. Strongly recommended to project data as WSG84 for standardization. - Column
geomstores the location geometry in the database, allowing spatial queries in SQL language, such asparent autodetection. The geometry of a location may bePOINT,POLYGON,MULTIPOLYGONorLINESTRINGand must be formatted using Well-Known-Text geometry representation of the location. When a POLYGON is informed, the first point within the geometry string is privileged, i.e. it may be used as a reference for relative markings. For example, such point will be the reference for thestartxandstartycolumns of a subplot location. So forplotandtransectgeometries, it matters which point is listed first in the WKT geometry
Data access Full users may register new locations, edit locations details and remove locations records that have no associated data. Locations have open access!
Individual Model
The Individual object represents a record for an individual organism. It may be a single time-space occurrence of an animal, plant or fungi, or an individual monitored through time, such as a plant in a permanent forest plot, or an animal in capture-recapture or radio-tracking experiment.
An Individual may have one or more Vouchersrepresenting physical samples of the individual stored in one or more Biological Collection and it may have one or more Locations, representing the place or places where the individual has been recorded.
Individual objects may also have a self taxonomic Identification or its taxonomic identity may depend on that of another individual (non-self identification). The Individual identification is inherited by all the Vouchers registered for the Individual. Hence Vouchers do not have their separate identification.
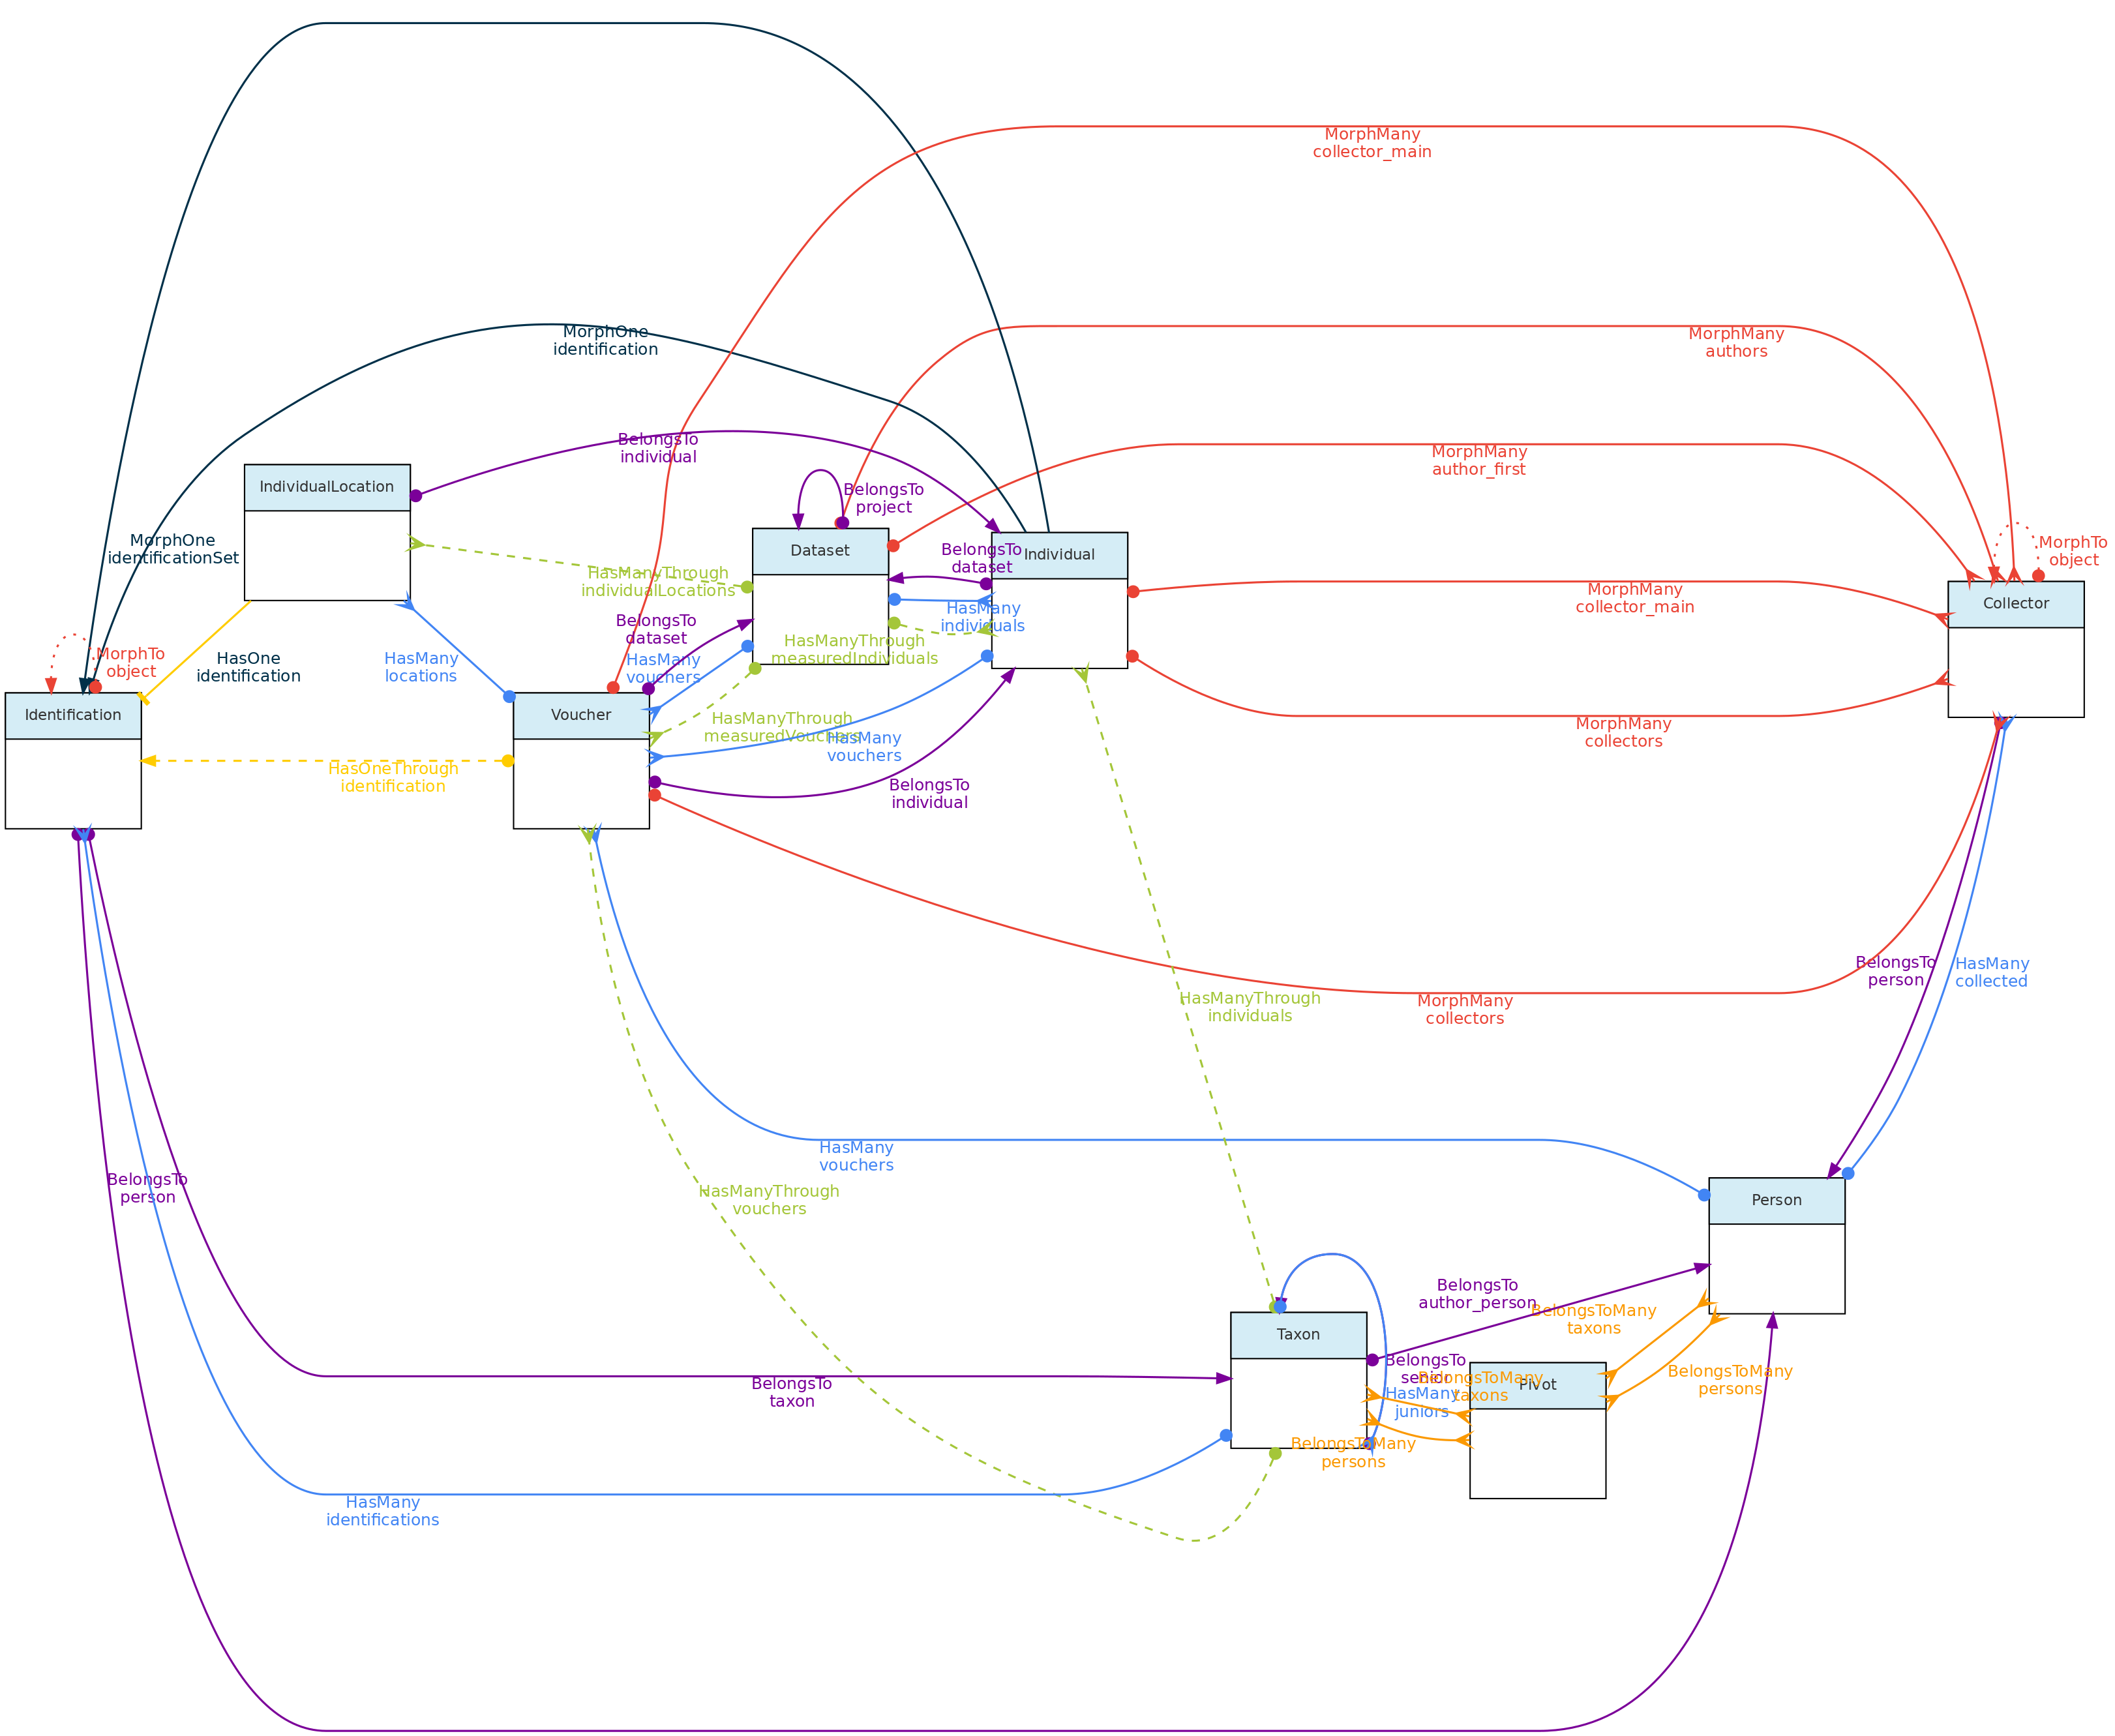 This figure shows the Individual Model and the models it relates to, except the Measurement and Location models, as their relationships with Individuals is shown elsewhere in this page. Lines linking models indicate the
 methods or functions implemented in the classes to access the relationships. Dashed lines indicate indirect relationships and the colors the different types of Laravel Eloquent methods.
 The Individual model direct and non-polymoprhic relationships.
Individual Table Columns
- A Individual record must specify at least one Location where it was registered, the
dateof registration, the local identifiertag, and thecollectorsof the record, and thedataset_idthe individual belongs to. - The Location may be any location registered, regardless of level, allowing to store historical records whose georeferencing is just an administrative location. Individual locations are stored in the
individual_locationpivot table, having columnsdate_time,altitude,notesandrelative_positionfor the individual location records. - The column
relative_positionstores the Cartesian coordinates of the Individual in relation to its Location. This is only for individuals located in locations of typeplot,transectorpoint. For example, a Plot location with dimensions 100x100 meters (1ha) may have an Individual withrelative position=POINT(50 50), which will place the individual in the center of the location (this is shown graphically in the web-interface), as is defined by thexandycoordinates of the individual. If the location is a subplot, then the position within the parent plot may also be calculated (this was designed with ForestGeo plots in mind and is a column in the Individual GET API. If the location is a POINT, the relative_position may be informed asangle(= azimuth) anddistance, attributes frequently measured in sampling methods. If the location is a TRANSECT, the relative_position places the individual in relation to the linestring, thexbeing the distance along the transect from the first point, and theythe perpendicular distance where the individual is located, also accounting for some sampling methods; - The
datefield in the Individual, Voucher, Measurement and Identification models may be an Incomplete Date, i.e., only the year or year+month may be recorded. - The Collector table represents collectors for an Individual or Voucher, and is linked with the Person Model. The collector table has a polymorphic relationship with the Voucher and Individual objects, defined by columns
object_idandobject_type, allowing multiple collectors for each individual or voucher record. The main_collector indicated is just the first collector listed for these entities. - The
tagfield is a user code or identifier for the Individual. It may be the number written on the aluminum tag of a tree in a forest plot, the number of a bird-band, or thecollector numberof a specimen. The combination ofmain_collector+tag+first_locationis constrained to be unique in OpenDataBio. - The taxonomic identification of an Individual may be defined in two ways:
- for self identifications an Identification record is created in the identifications table, and the column
identification_individual_idis filled with the Individual ownid - for non-self identifications, the id of the Individual having the actual Identification is stored in column
identification_individual_id. - Hence, the Individual class contain two methods to relate to the Identification model: one that sets self identifications and another that retrieves the actual taxonomic identifications by using column
identification_individual_id.
- for self identifications an Identification record is created in the identifications table, and the column
- Individuals may have one or more Vouchersdeposited in a Biocollection.
Data access Individuals belong to Datasets, so Dataset access policy apply to the individuals in it. Only project collaborators and administrators may insert or edit individuals in a dataset, even if dataset is of public access.
Taxon Model
The general idea behind the Taxon model is to present tools for easily incorporating valid taxonomic names from Online Taxonomic Repositories (currently Tropicos.org and GBIF are implemented), but allowing for the inclusion of names that are not considered valid, either because they are still unpublished (e.g. a morphotype), or the user disagrees with published synonymia, or the user wants to have all synonyms registered as invalid taxons in the system. Moreover, it allows one to define a custom clade level for taxons, allowing one to store, in addition to taxonomic rank categories, any node of the tree of life. Any registered Taxon can be used in Individual identifications and Measurements may be linked to taxonomic names.
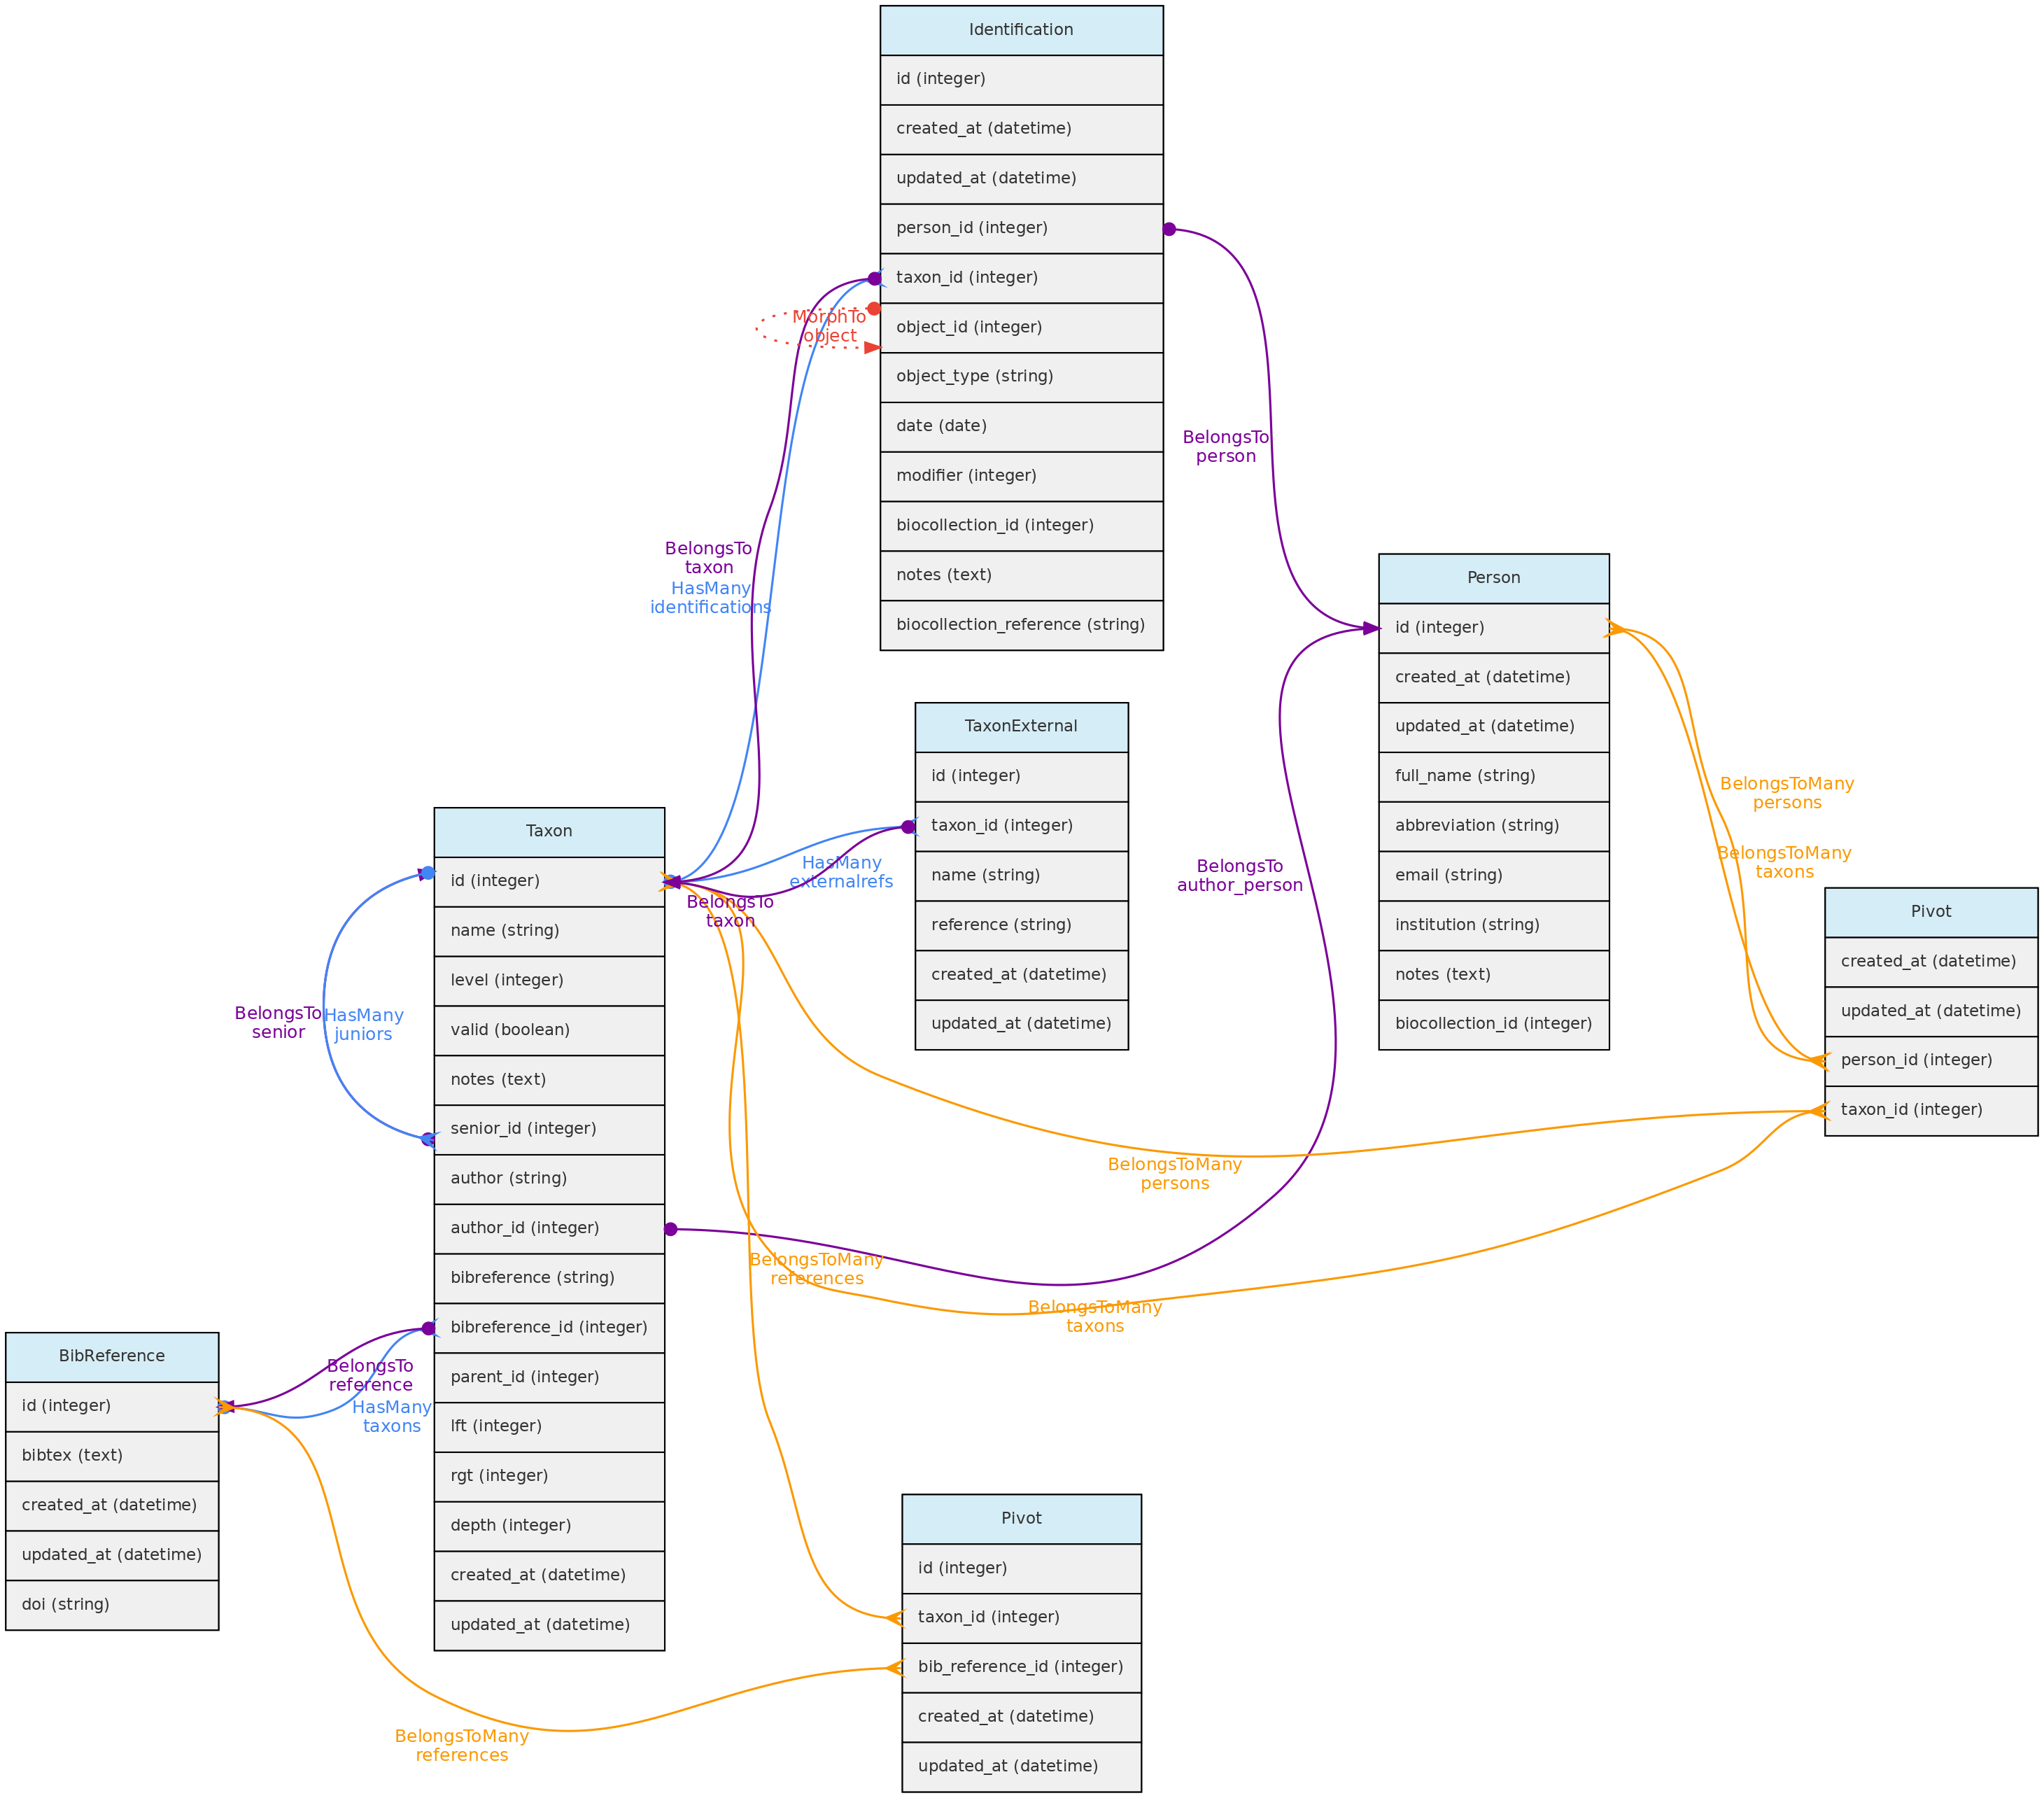 Taxon model and its relationships. Lines linking tables indicate the
 methods implemented in the shown classes, with colors indicating different Eloquent relationships
Taxon table explained
- Like, Locations, the Taxon model has a parent-child relationship, implemented using the Nested Set Model for hierarchical data of the Laravel library Baum that allows to query ancestors and descendants. Hence, columns
rgt,lftanddephof the taxon table are automatically filled by this library upon data insertion or update. - For both, Taxon
authorand Taxonbibreferencethere are two options:- For published names, the string authorship retrieved by the external taxon APIs will be placed in the
author=stringcolumn. For unpublished names, author is a Person and will be stored in theauthor_idcolumn. - Only published names may have relation to BibReferences. The
bibreferencestring field of the Taxon table stores the strings retrieved through the external APIs, while thebibreference_idlinks to a BibReference object. These are used to store the Publication where the Taxon Name is described and may be entered in both formats. - In addition, a Taxon record may also have many other BibReferences through a pivot table (
taxons_bibreference), permitting to link any number of bibliographic references to a Taxon name.
- For published names, the string authorship retrieved by the external taxon APIs will be placed in the
- Column
levelrepresents the taxonomic rank (such as order, genera, etc). It is numerically coded and standardized following the IAPT general rules, but should accommodate also animal related taxon level categories. See the available codes in the Taxon API for the list of codes. - Column
parent_idindicates the parent of the taxon, which may be several levels above it. The parent level should be strictly higher than the taxon level, but you do not need to follow the full hierarchy. It is possible to register a taxon without parents, for example, an unpublished morphotype for which both genera and family are unknown may have anorderas parent. - Names for the taxonomic ranks are translated according to the system defined
localethat also translates the web interface (currently only Portuguese and English implemented). - The
namefield of the taxon table contain only the specific part of name (in case of species, the specific epithet), but the insertion and display of taxons through the API or webinterface should be done with the fullname combination. - It is possible to include synonyms in the Taxon table. To do so, one must fill in the
seniorrelationship, which is the id of the accepted (valid) name for aninvalidTaxon. Ifsenior_idis filled, then the taxon is ajuniorsynonym and must be flagged as invalid. - When inserting a new published taxon, only the
nameis required. The name will be validated and the author, reference and synonyms will be retrieved using the following API services:- GBIF BackBone Taxonomy - this will be the first check, from which links to Tropicos and IPNI may also be retrieved if registering a plant name.
- Tropicos - if not found on GBIF, ODB will search the name on the Missouri Botanical Garden nomenclature database.
- IPNI - the International Individual Names Index is another database used to validate individual names (Temporarily disabled)
- MycoBank - used to validate a name if not found by the Tropicos nor IPNI apis, and used to validate names for Fungi. Temporarily disabled
- ZOOBANK - when GBIF, Tropicos, IPNI and MycoBank fails to find a name, then the name is tested against the ZOOBANK api, which validates animal names. Does not provide taxon publication, however.
- If a Taxon name is found in the Nomenclatural databases, the respective ID of the repository is stored in the
taxon_externaltables, creating a link between the OpenDataBio taxon record and the external nomenclatural database. - A Person may be defined as one or more taxon specialist through a pivot table. So, a Taxon object may have many taxonomic specialist registered in OpenDataBio.
Data access: Full users are able to register a new taxon and edit existing records if they have not been used for Identification of Measurements. Currently it is impossible to remove a taxon from the database. Taxon list have public access.
Voucher Model
The Voucher model is used to store records of specimens or samples from Individuals deposited in Biological Collections. Therefore, the only mandatory information required to register a Voucher are individual, biocollection and whether the specimen is a nomenclature type (which defaults to non-type if not informed).
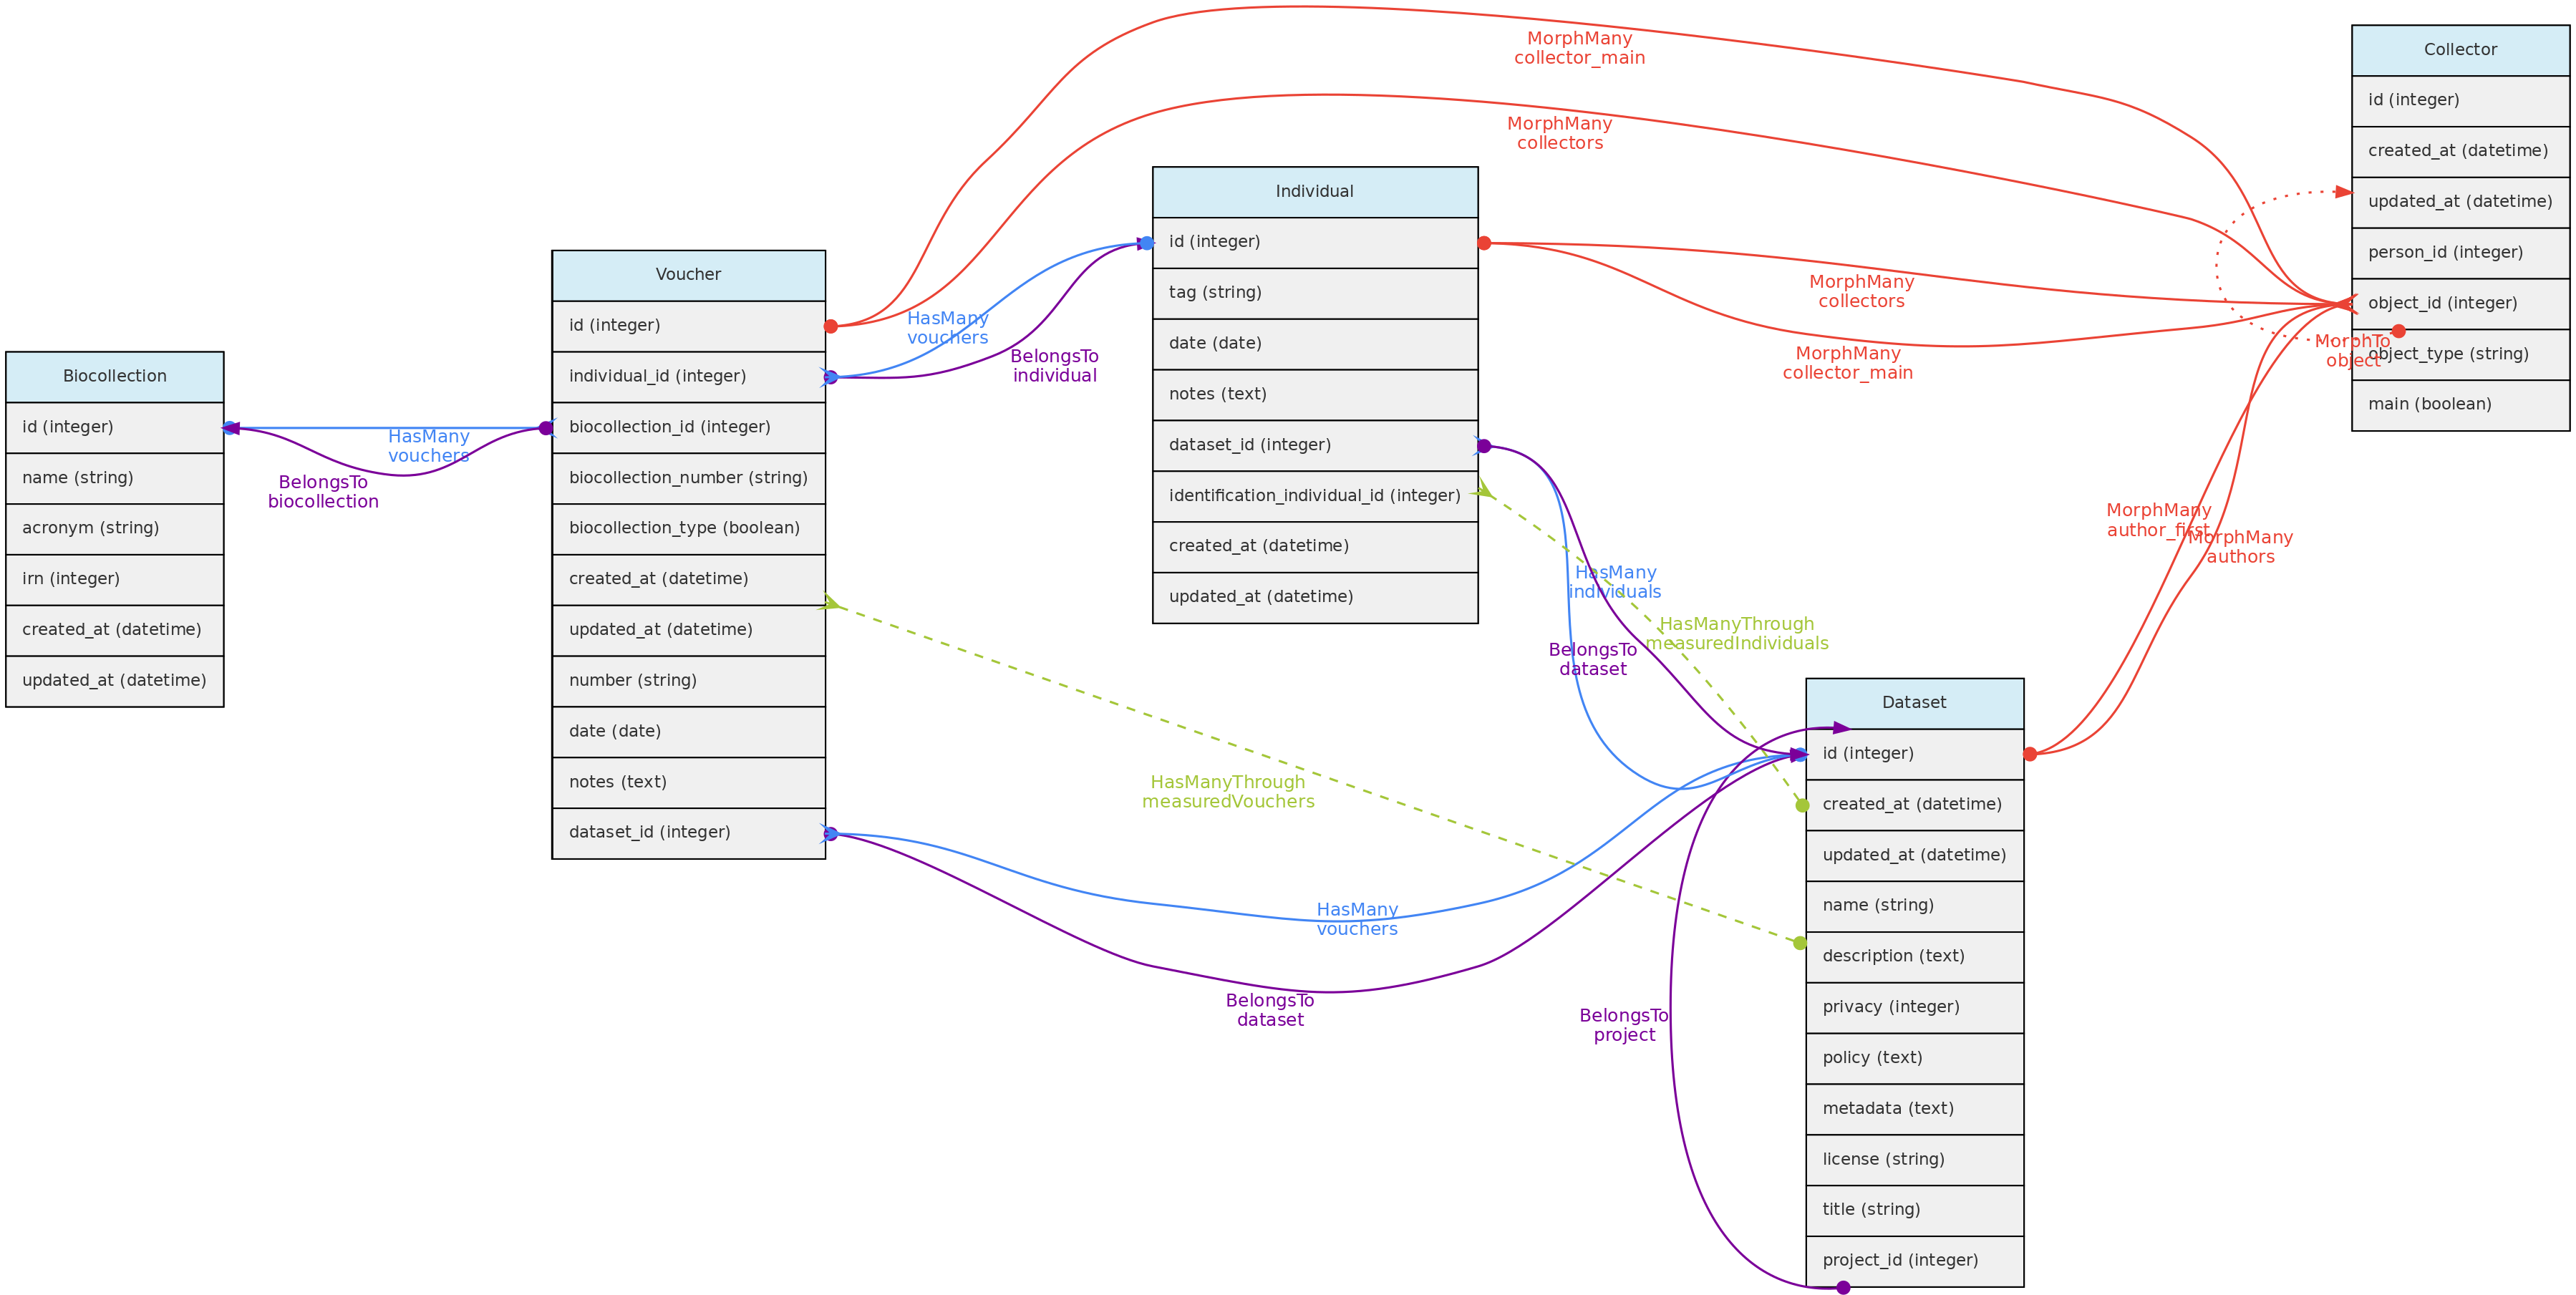 Voucher model and its relationships. Lines linking tables indicate the
 methods implemented in the shown models, with colors indicating different Eloquent relationships. Not that Identification nor Location are show because Vouchers do not have their own records for these two models, they are just inherited from the Individual the Voucher belongs to
Vouchers table explained
- A Voucher belongs to an Individual and a Biocollection, so the
individual_idand thebiocollection_idare mandatory in this table; biocollection_numberis the alpha-numeric code of the Voucher in the BioCollection, it may be ’null’ for users that just want to indicate that a registered Individual have Vouchers in a particular Bicollection, or to registered Vouchers for biocollections that do not have an identifier code;biocollection_type- is a numeric code that specify whether the Voucher in the BioCollection is a nomenclatural type. Defaults to0(Not a Type);1for just ‘Type’, a generic form, and other numbers for other nomenclature type names (see the API Vouchers Endpoint for a full list of options).collectors, one or multiple, are optional for Vouchers, required only if they are different from the Individual collectors. Otherwise the Individual collectors are inherited by the Voucher. Like for Individuals, these are implemented through a polymorphic relationship with the collectors table and the first collector is the main_collector for the voucher, i.e. the one that relates tonumber.number, this is the collector number, but like collectors, should only be filled if different from the Individual’stagvalue. Hence,collectors,numberanddateare useful for registering Vouchers for Individuals that have Vouchers collected at different times by different people.datefield in the Individual and Voucher models may be an incomplete date. Only required if different from that of the Individual the Voucher belongs to.dataset_idthe Voucher belongs to a Dataset, which controls the access policy;notesany text annotation for the Voucher.- The Voucher model interacts with the BibReference model, permitting to link multiple citations to Vouchers. This is done with a pivot
voucher_bibreferencetable.
Data access Vouchers belong to Datasets, so Dataset access policy apply to the Vouchers in it. Vouchers may have a different Project than their Individuals. If the Voucher dataset policy is open access and that of the Individual project is not, then access to voucher data will be incomplete, so Voucher’s dataset should have the same or less restricted access policy than the Individual dataset. Only Dataset collaborators and administrators may insert or edit vouchers in a dataset, even if the dataset is of public access.
4.2 - Trait Objects
Measurement Model
The Measurements table stores the values for traits measured for core objects. Its relationship with the core objects is defined by a polymorphic relationship using columns measured_id and measured_type. These MorphTo relations are illustrated and explained in the core objects page.
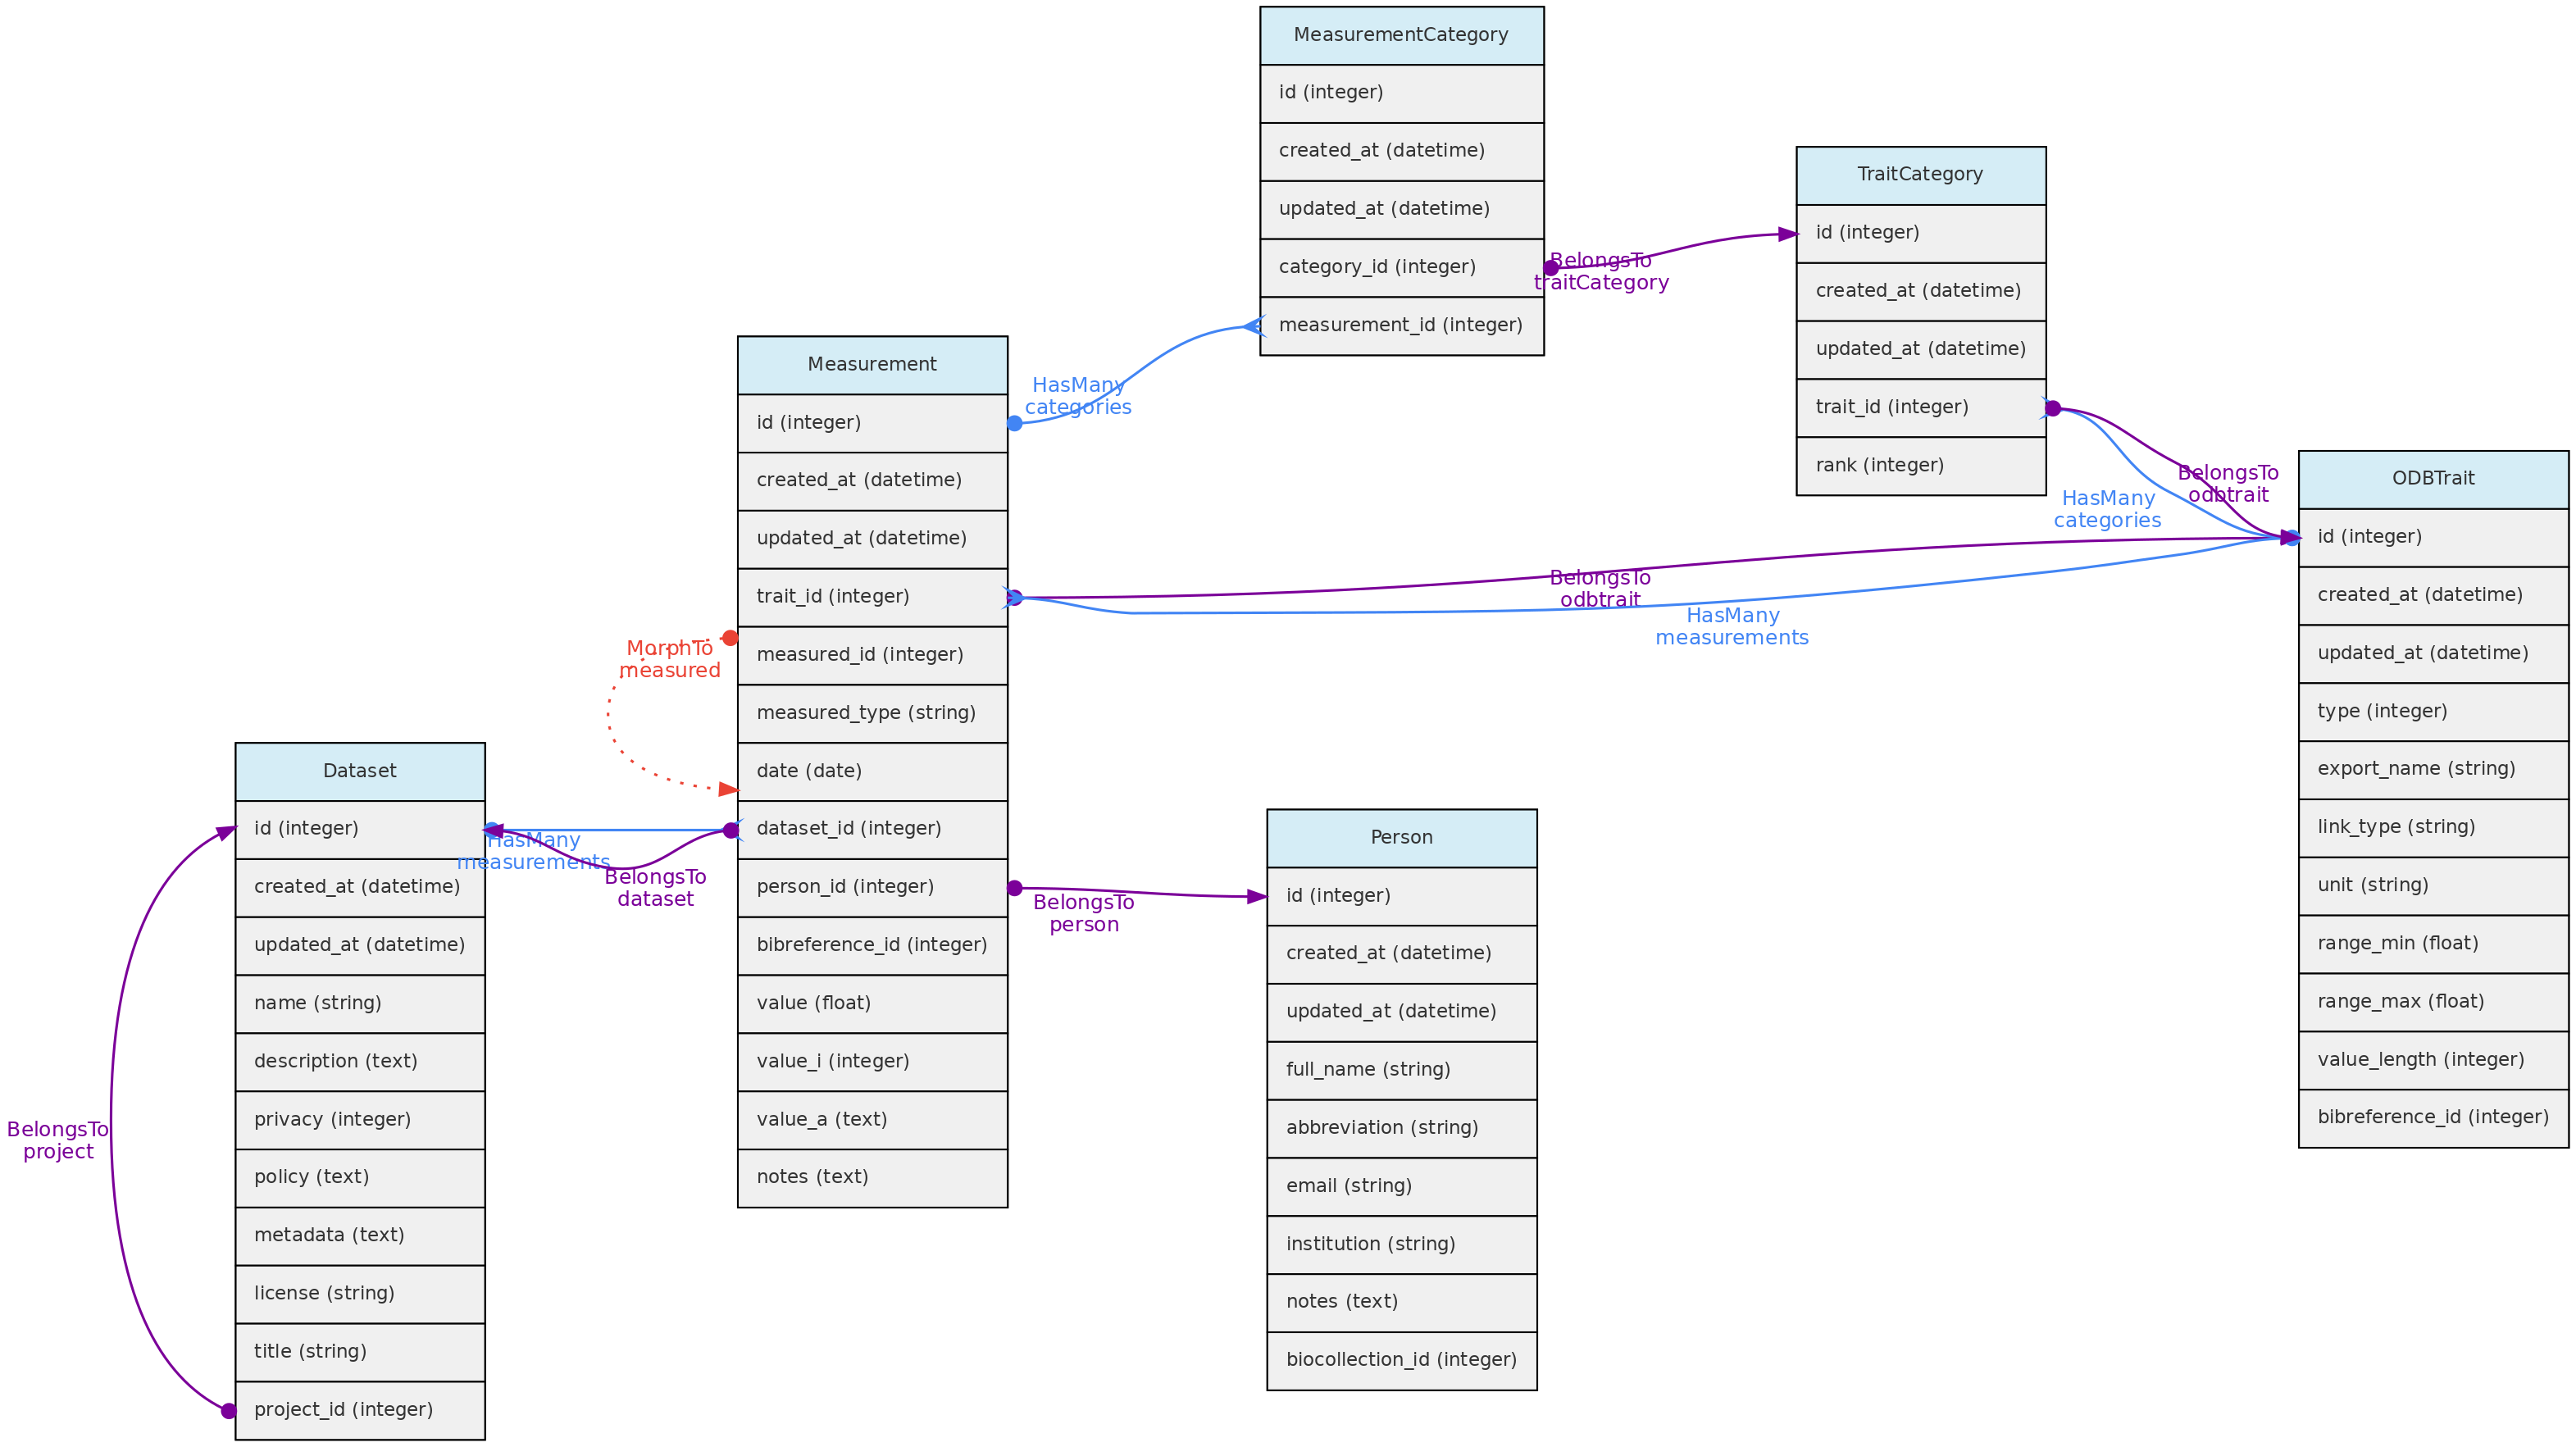
- Measurements must belong to a Dataset - column
dataset_id, which controls measurement access policy - A Person must be indicated as a measurer (
person_id); - The
bibreference_idcolumn may be used to link measurements extracted from publications to its Bibreference source; - The value for the measured trait (
trait_id) will be stored in different columns, depending on trait type:value- this float column will store values for Quantitative Real traits;value_i- this integer column will store values for Quantitative Integer traits; and is an optional field for Link type traits, allowing for example to store counts for a species (a Taxon Link trait) in a location.value_a- this text column will store values for Text, Color and Spectral trait types.
- Values for Categorical and Ordinal traits are stored in the
measurement_categorytable, which links measurements to trait categories. date- measurement date is mandatory in all cases
Data access Measurements belong to Datasets, so Dataset access policy apply to the measurements in it. Only dataset collaborators and administrators may insert or edit measurements in a dataset, even if the dataset is of public access.
Trait Model
The ODBTrait table represents user defined variables to collect Measurements for one of the core object, either Individual, Voucher, Location or Taxon.
These custom traits give enormous flexibility to users to register their variables of interest. Clearly, such flexibility has a cost in data standardization, as the same variable may be registered as different Traits in any OpenDataBio installation. To minimize redundancy in trait ontology, users creating traits are warned about this issue and a list of similar traits is presented in case found by trait name comparison.
Traits have editing restrictions to avoid data loss or unintended data meaning change. So, although the Trait list is available to all users, trait definitions may not be changed if somebody else also used the trait for storing measurements.
Traits are translatable entities, so their name and description values can be stored in multiple languages (see User Translations. This is placed in the user_translations table through a polymorphic relationship.
The Trait definition should be as specific as needed. The measurement of tree heights using direct measurement or a clinometer, for example, may not be easily converted from each other, and should be stored in different Traits. Thus, it is strongly recommended that the Trait definition field include information such as measurement instrument and other metadata that allows other users to understand whether they can use your trait or create a new one.
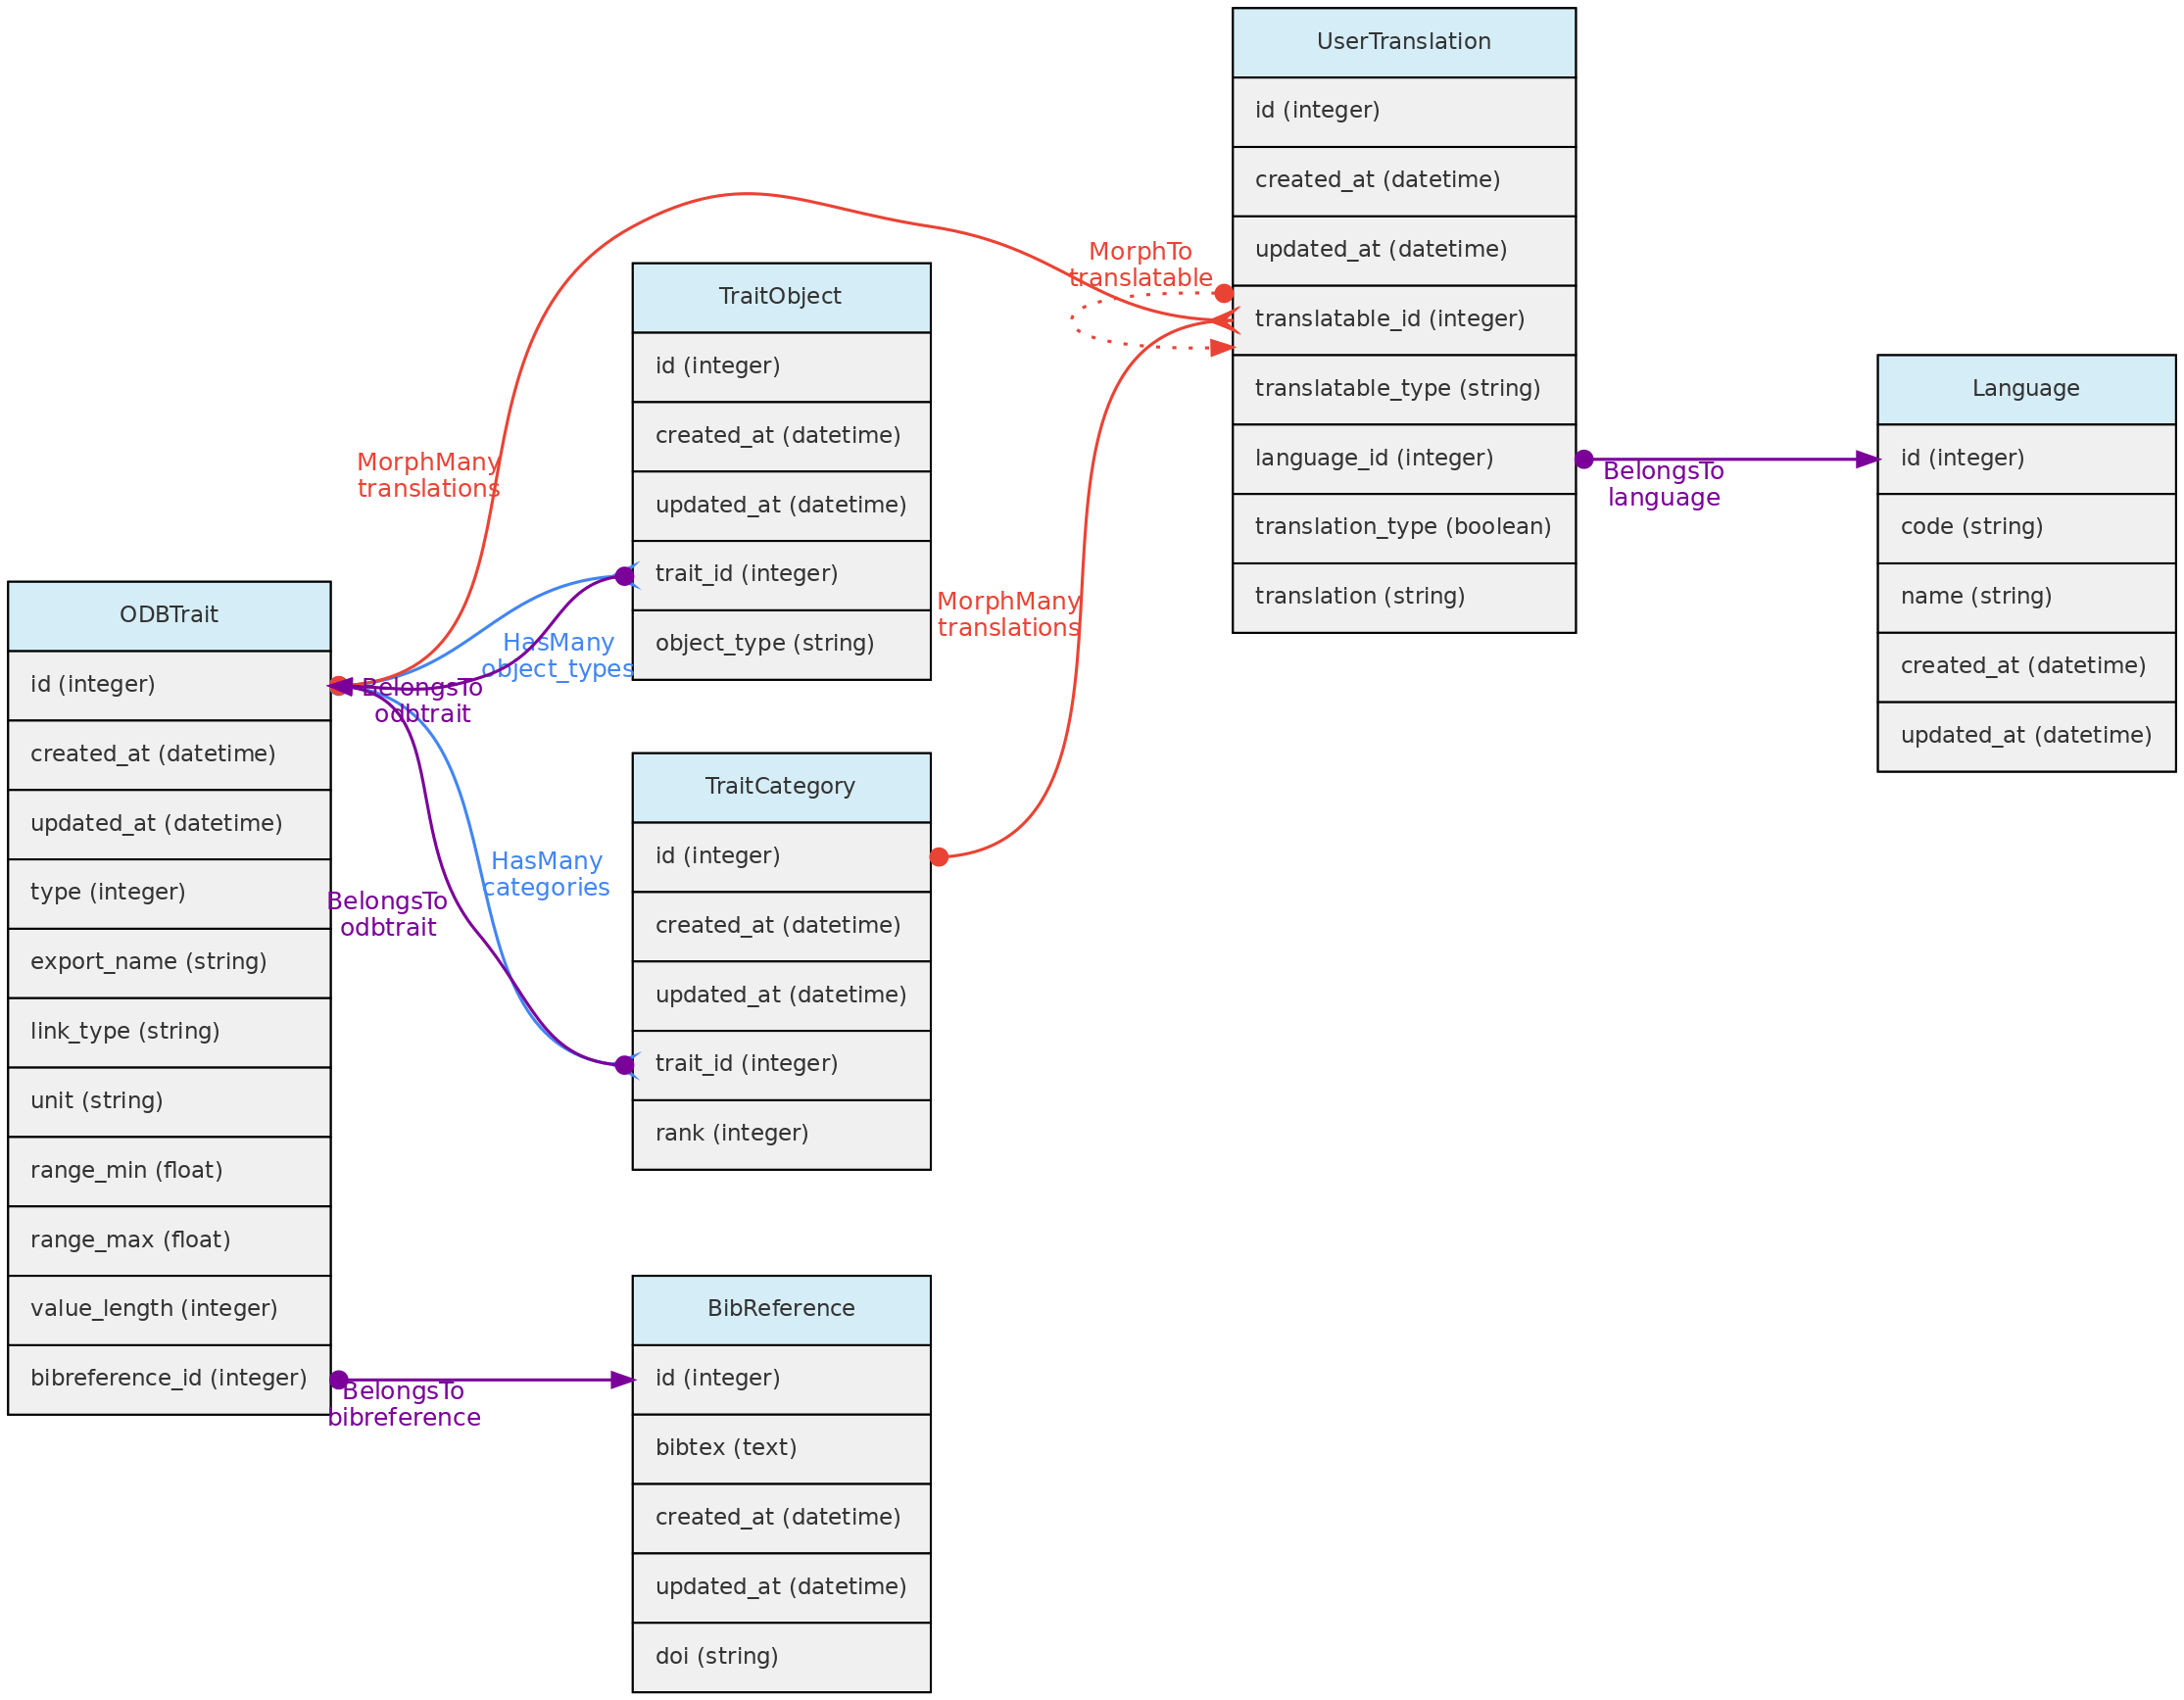
- The Trait definition must include an
export_namefor the trait, which will be used during data exports and are more easily used in trait selection inputs in the web-interface. Export names must be unique and have no translation. Short and camelCase or PascalCase export names are recommended. - The following trait types are available:
- Quantitative real - for real numbers;
- Quantitative integer - for counts;
- Categorical - for one selectable categories;
- Categorical multiple - for many selectable categories;
- Categorical ordinal - for one selectable ordered categories (semi-quantitative data);
- Text - for any text value;
- Color - for any color value, specified by the hexadecimal color code, allowing renderizations of the actual color.
- Link - this is a special trait type in OpenDataBio to link to database object. Currently, only link to Taxons and Voucher are allowed as a link type traits. Use ex: if you want to store species counts conducted in a location, you may create a Taxon link type Trait or a Voucher link type Trait if the taxon has vouchers. A measurement for such trait will have an optional
valuefield to store the counts. This trait type may also be used to specify the host of a parasite, or the number of predator insects. - Spectral - this is designed to accommodate Spectral data, composed of multiple absorbance or reflectance values for different wavenumbers.
- GenBank - this stores GenBank accessions numbers allowing to retrieve molecular data linked to individuals or vouchers stored in the database through the GenBank API Service.
- The Traits table contains fields that allow measurement value validation, depending on trait type:
range_maxandrange_min- if defined for Quantitative traits, measurements will have to fit the specified range;value_length- mandatory for Spectral Traits only, validate the length (number of values) of a spectral measurement;link_type- if trait is Link type, the measurementvalue_imust be an id of the link type object;- Color traits are validated in the measurement creation process and must conform to a color hexadecimal code. A color picker is presented in the web interface for measurement insertion and edition;
- Categorical and ordinal traits will be validated for the registered categories when importing measurements through the API;
- Column
unitdefines the measurement unit for the Trait. There is no way to prevent measurements values imported with a distinct unit. Quantitative traits requiredunitdefinition. - Column
bibreference_idis the key of a single BibReference that may be linked to trait definition. - The
trait_objectstable stores the type of core object (Taxon, Location, Voucher) that the trait can have a measurement for;
Data access A Trait name, definition, unit and categories may not be updated or removed if there is any measurement of this trait registered in the database. The only exceptions are: (a) it is allowed to add new categories to categorical (not ordinal) traits; (b) the user updating the trait is the only Person that has measurements for the trait; (c) the user updating the trait is an Admin of all the datasets having measurements using trait.
Forms
A Form is an organized group of Traits, defined by a User in order to create a custom form that can be filled in for entering measurements through the web interface. A Form consists of a group of ordered Traits, which can be marked as “mandatory”. Related entities are the Report and the Filter.
This is still experimental and needs deeper testing
4.3 - Data Access Objects
Datasets control data access and represents a dynamic data publication, with a version defined by last edition date. Datasets may contain Measurements, Individuals, Vouchers and/or Media Files.
Projects are just groups of Datasets and Users, representing coohorts of users with common accessibility to datasets whose privacy are set to be controlled by a Project.
BioCollections - This model serves to create a reusable list of acronyms of Biological Collections to record Vouchers. However, you can optionally manage a collection of Vouchers and their Individuals, in parallel to the access control provided by Datasets. Control is only for editing and entering Voucher records. In this case, the BioCollection is managed by the system.
Projects and BioCollections must have at least one User defined as administrator, who has total control over the dataset or project, including granting the following roles to other users: administrator, collaborator or viewer:
- Collaborators are able to insert and edit objects, but are not able to delete records nor change the dataset or project configuration.
- Viewers have read-only access to the data that are not of open access.
- Only Full Users and SuperAdmins may be assigned as administrators or collaborators. Thus, if a user who was administrator or collaborator of a dataset is demoted to “Registered User”, she or he will become a viewer.
- Only Super-admins can enable a BioCollection to be administered by the system.
Biocollections
The Biocollection model has two functions: (1) to provide a list of acronyms for registering Vouchers of any Biological Collection; (2) to manage the data of Biological Collections, facilitating the registration of new data (any user enters their data using the validations carried out by the software and requests the collection’s curators through the interface to register the data, which is done by authorized users for the BioCollection. Upon data registration, the BioCollection controls the editing of the data of the Vouchers and the related Individuals. Option (2) needs to be implemented by a Super-Administrator user, who can enable a BioCollection to be administered by the system, implementing the ODBRequest request model so that users can request data, samples, or records and changes to the data.
The Biocollection object may be a formal Biocollection, such as those registered in the Index Herbariorum (http://sweetgum.nybg.org/science/ih/), or any other Biological Collection, formal or informal.
The Biocollection object also interacts with the Person model. When a Person is linked to an Biocollection it will be listed as a taxonomic specialist.
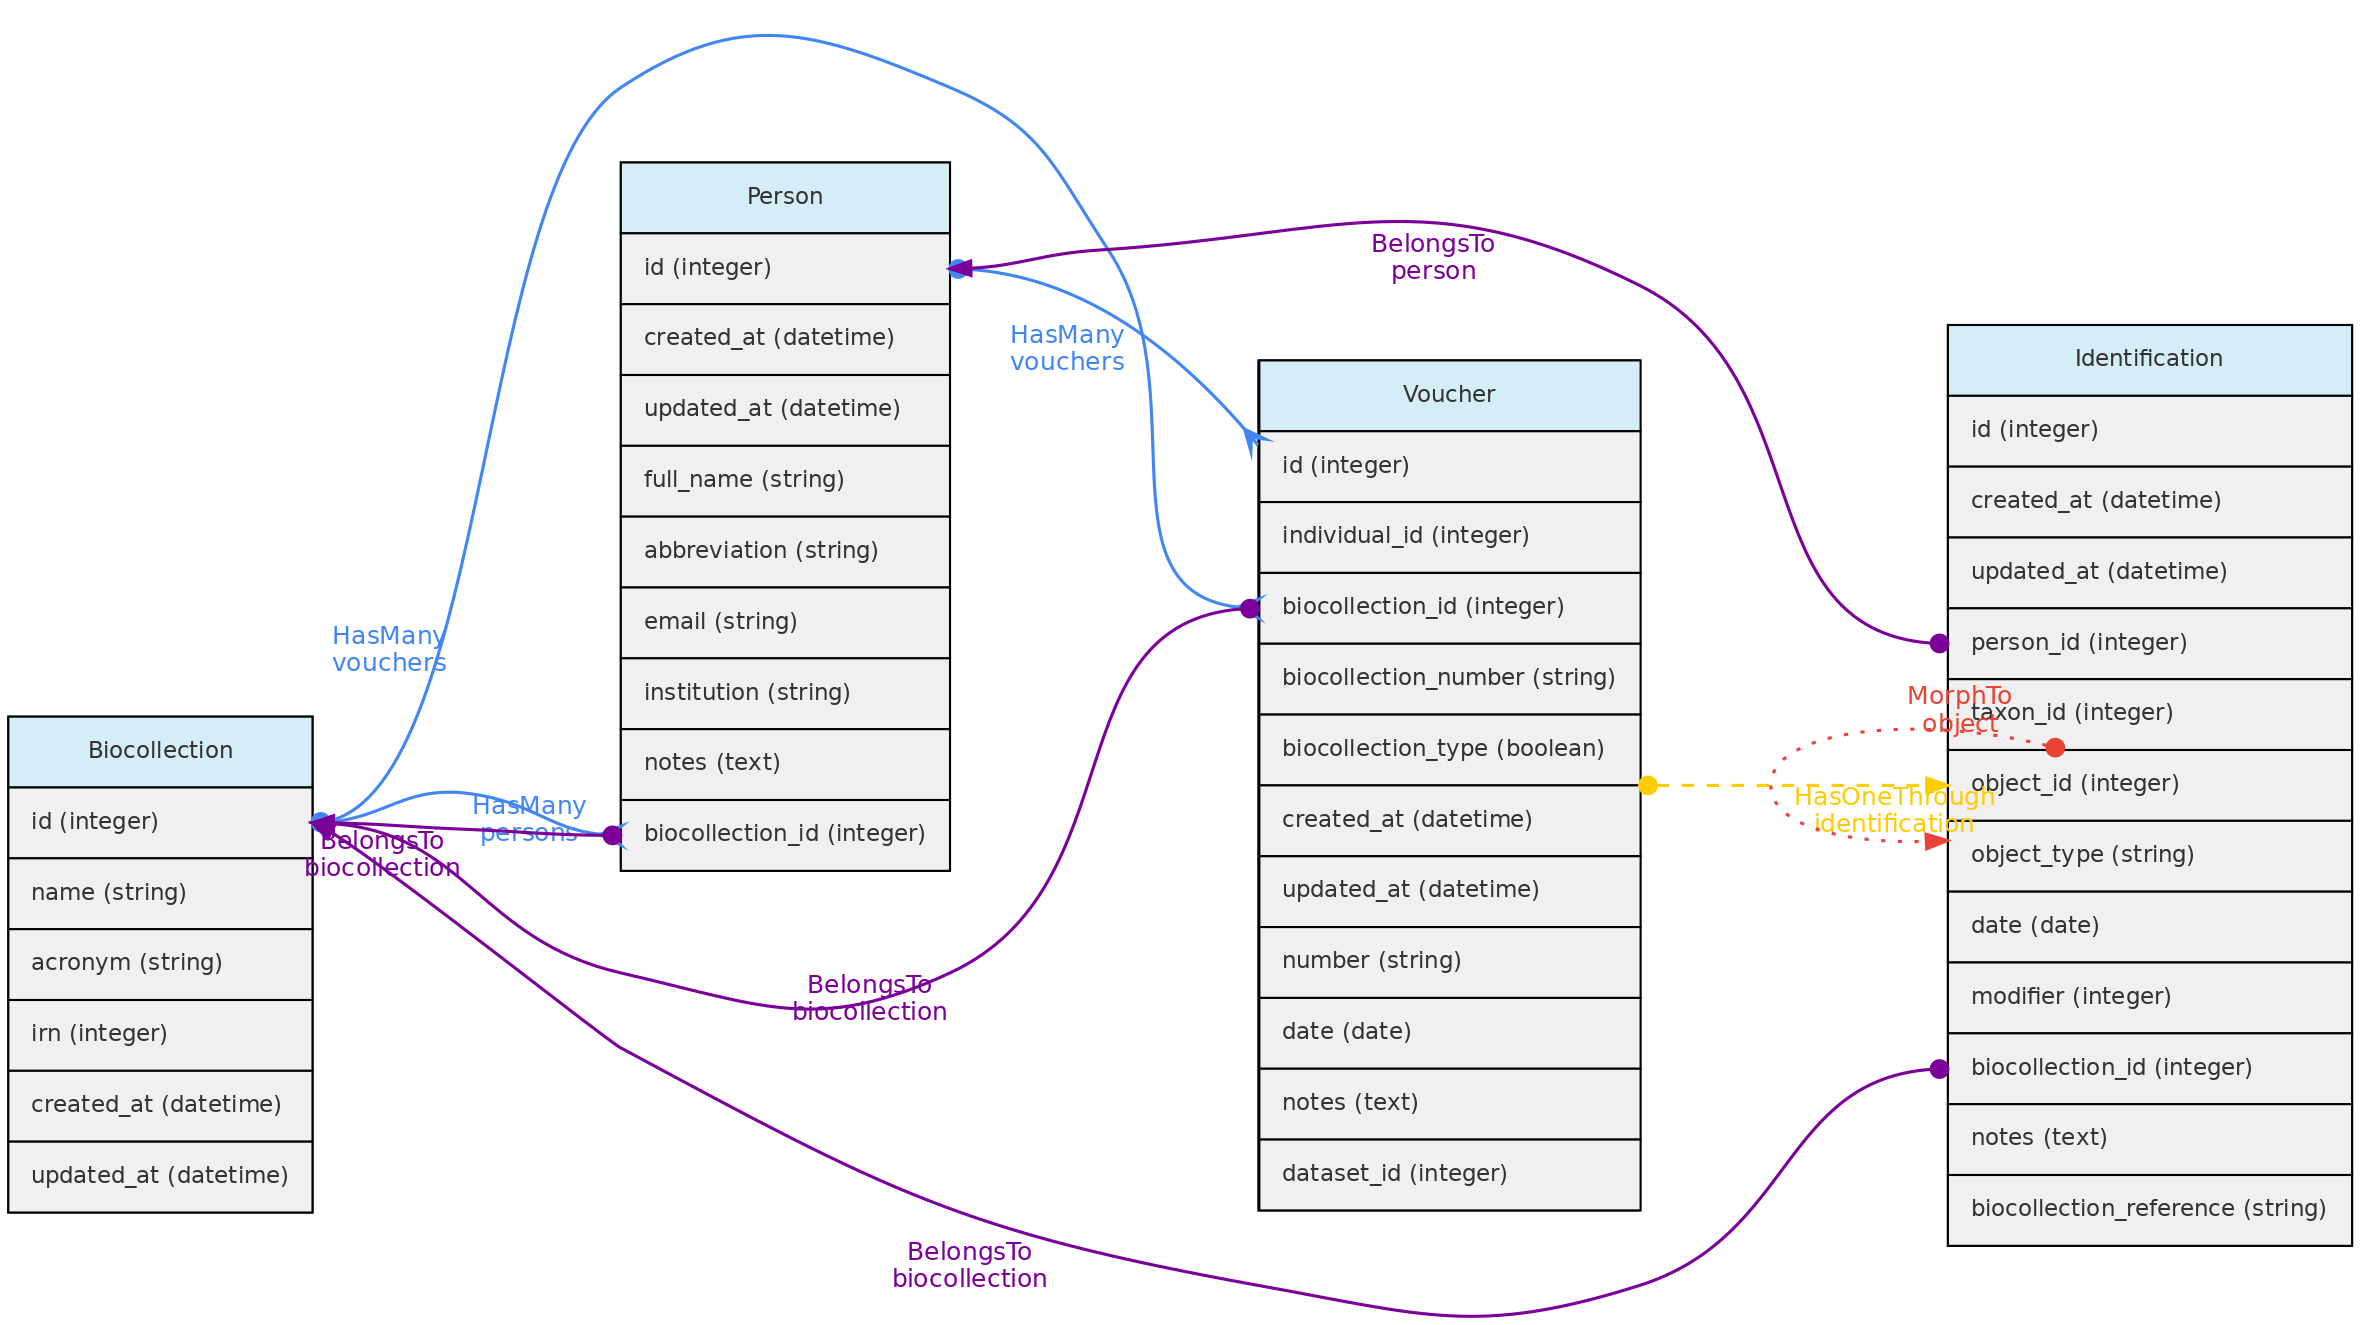
Data access - Full users can register BioCollections, but only super administrator can make a BioCollection manageable by the system. Removing BioCollections can be done if there are no Vouchers attached and if it is not administered by the system. If manageable, the model interacts with Users, which can be administrators (curators, anything can) or collaborators (can enter and edit data, but cannot delete records). Data from other Datasets can be part of the BioCollection, allowing users to have their complete data, but editing control of records is by the BioCollection authorized users.
Datasets
DataSets are groups of Measurements, Individuals, Vouchers and/or Media Files, and may have one or more Users administrators, collaborators or viewers. Administrators may set the privacy level to public access, restricted to registered users or restricted to authorized users or restricted to project users. This control access to the data within a dataset as exemplified in diagram below:
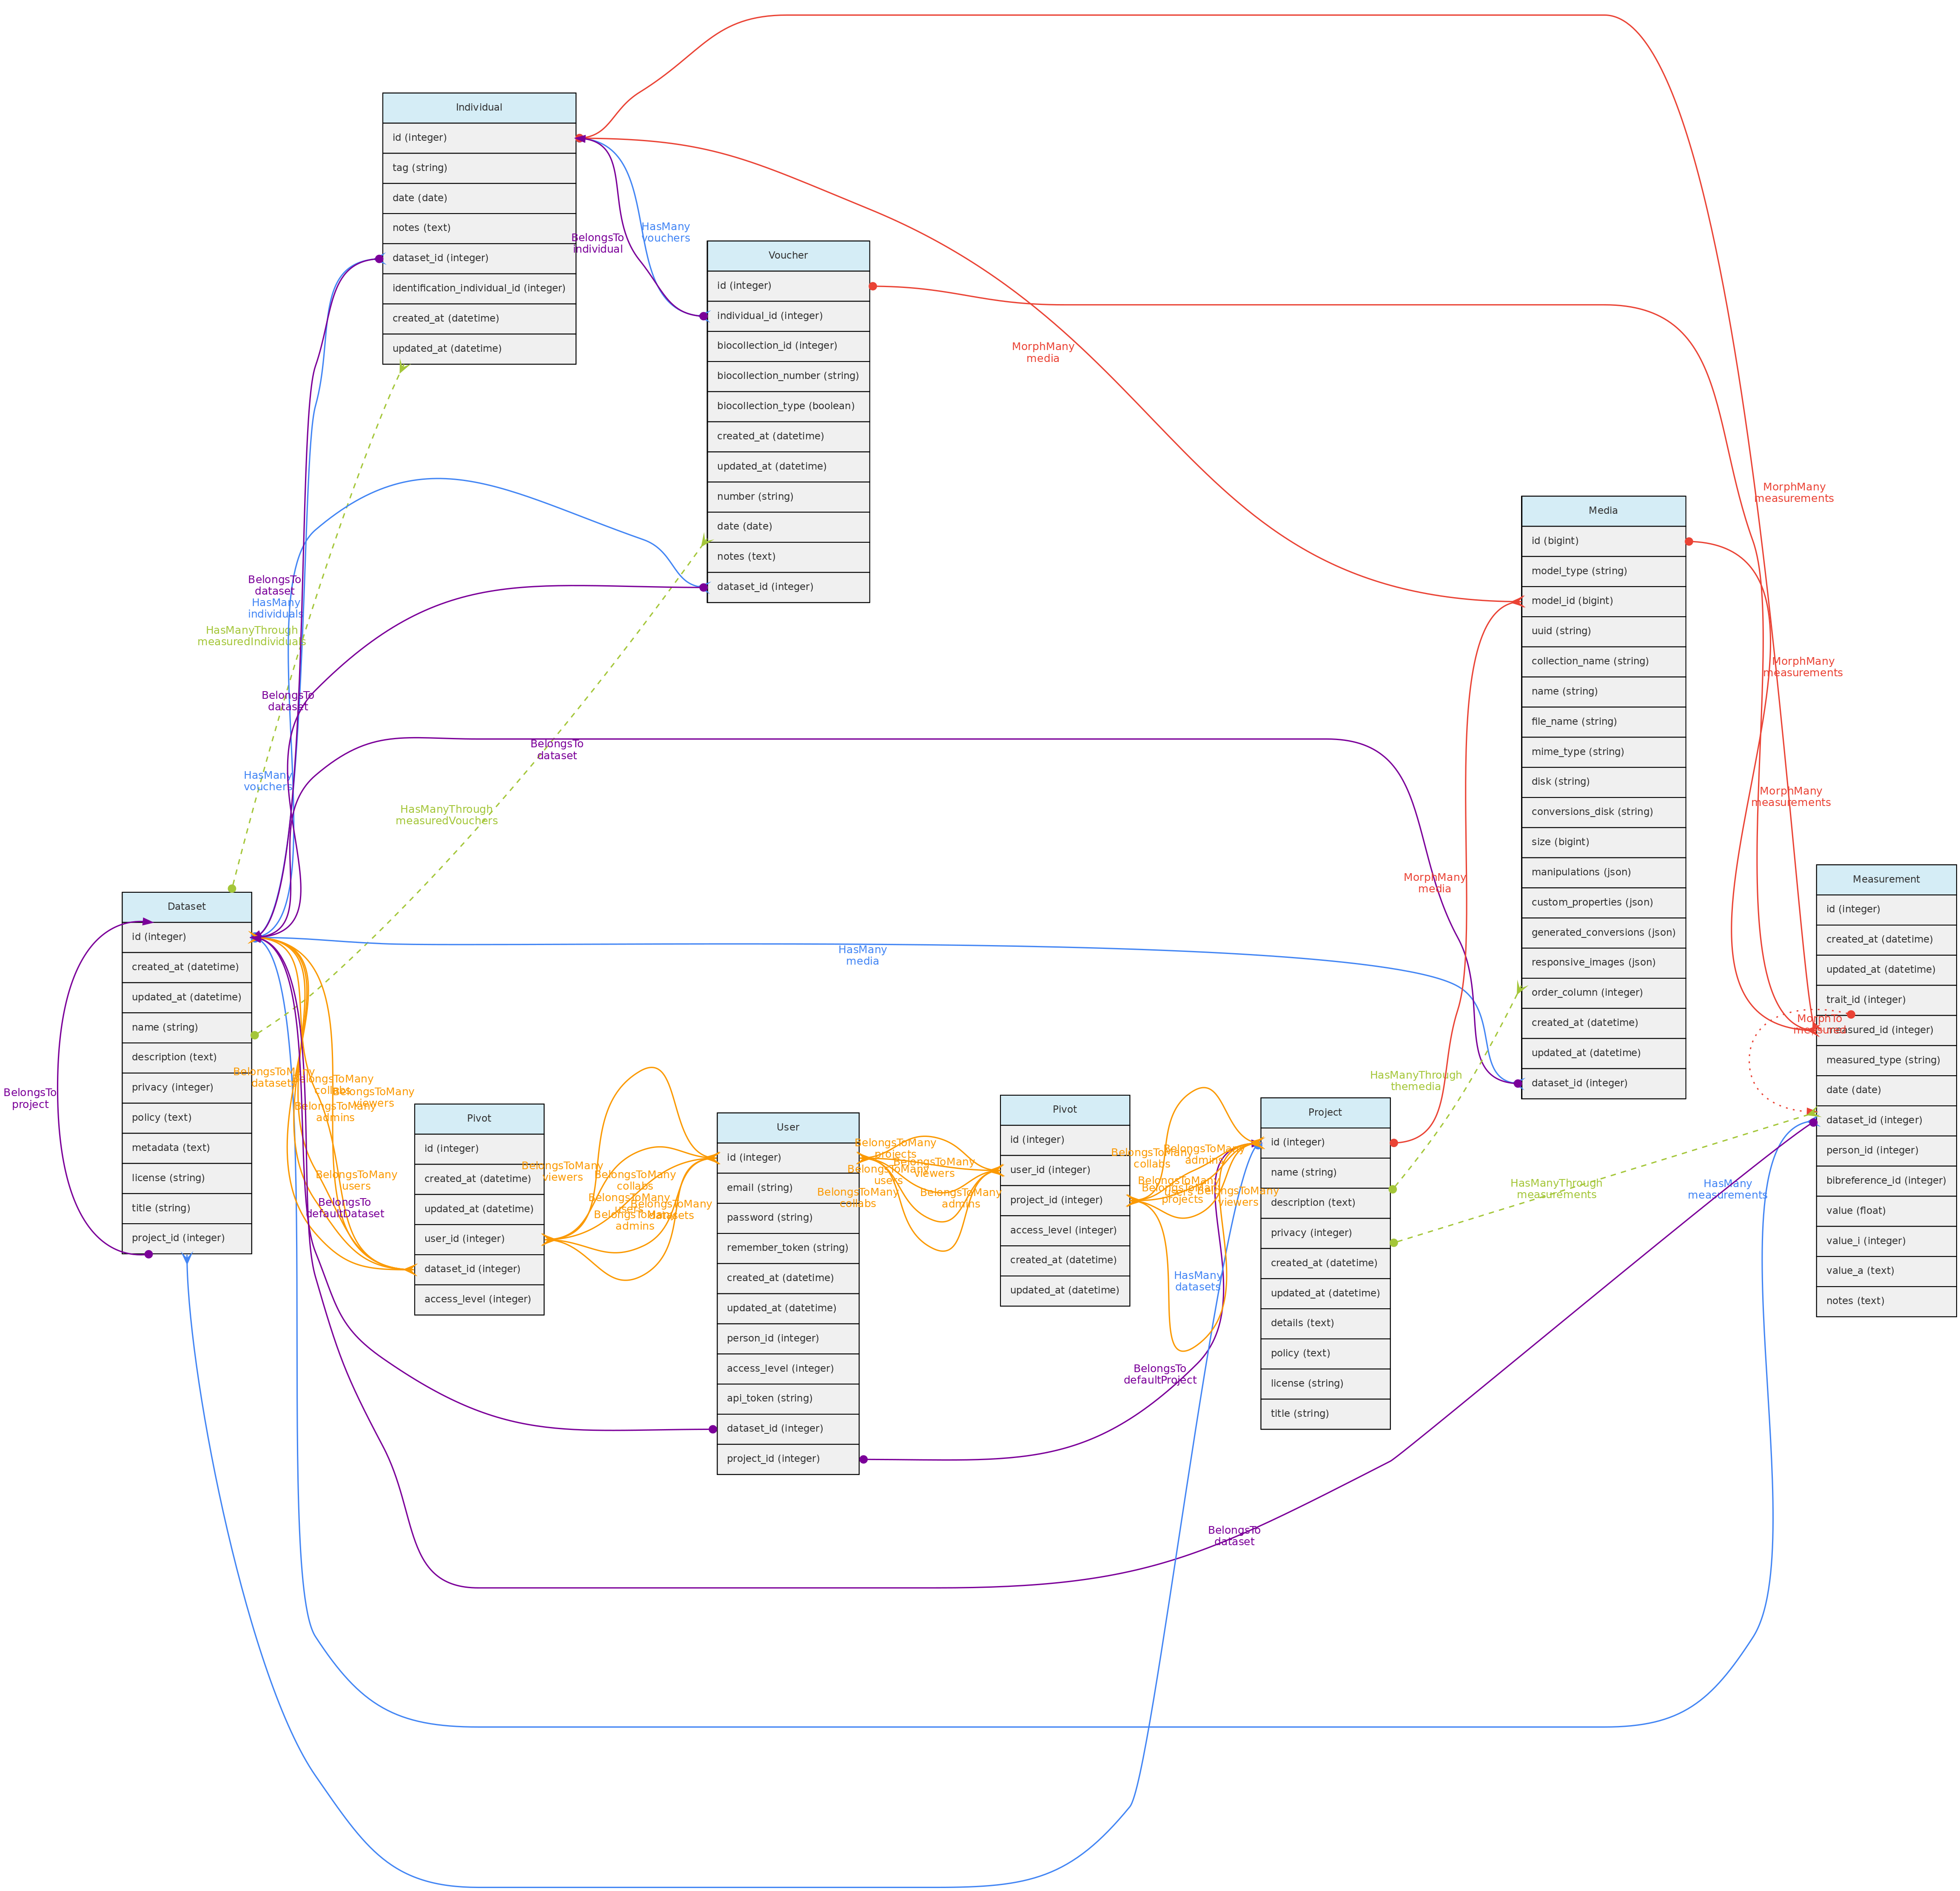
Datasets may also have many Bibliographic References, which together with fields policy, metadata permits to annotate the dataset with relevant information for data sharing:
* Link any publication that have used the dataset and optionally indicate that they are of mandatory citation when using the data;
* Define a specific data policy when using the data in addition to the a CreativeCommons.org public license;
* Detail any relevant metadata in addition to those that are automatically retrieved from the database like the definitions of the Traits measured.
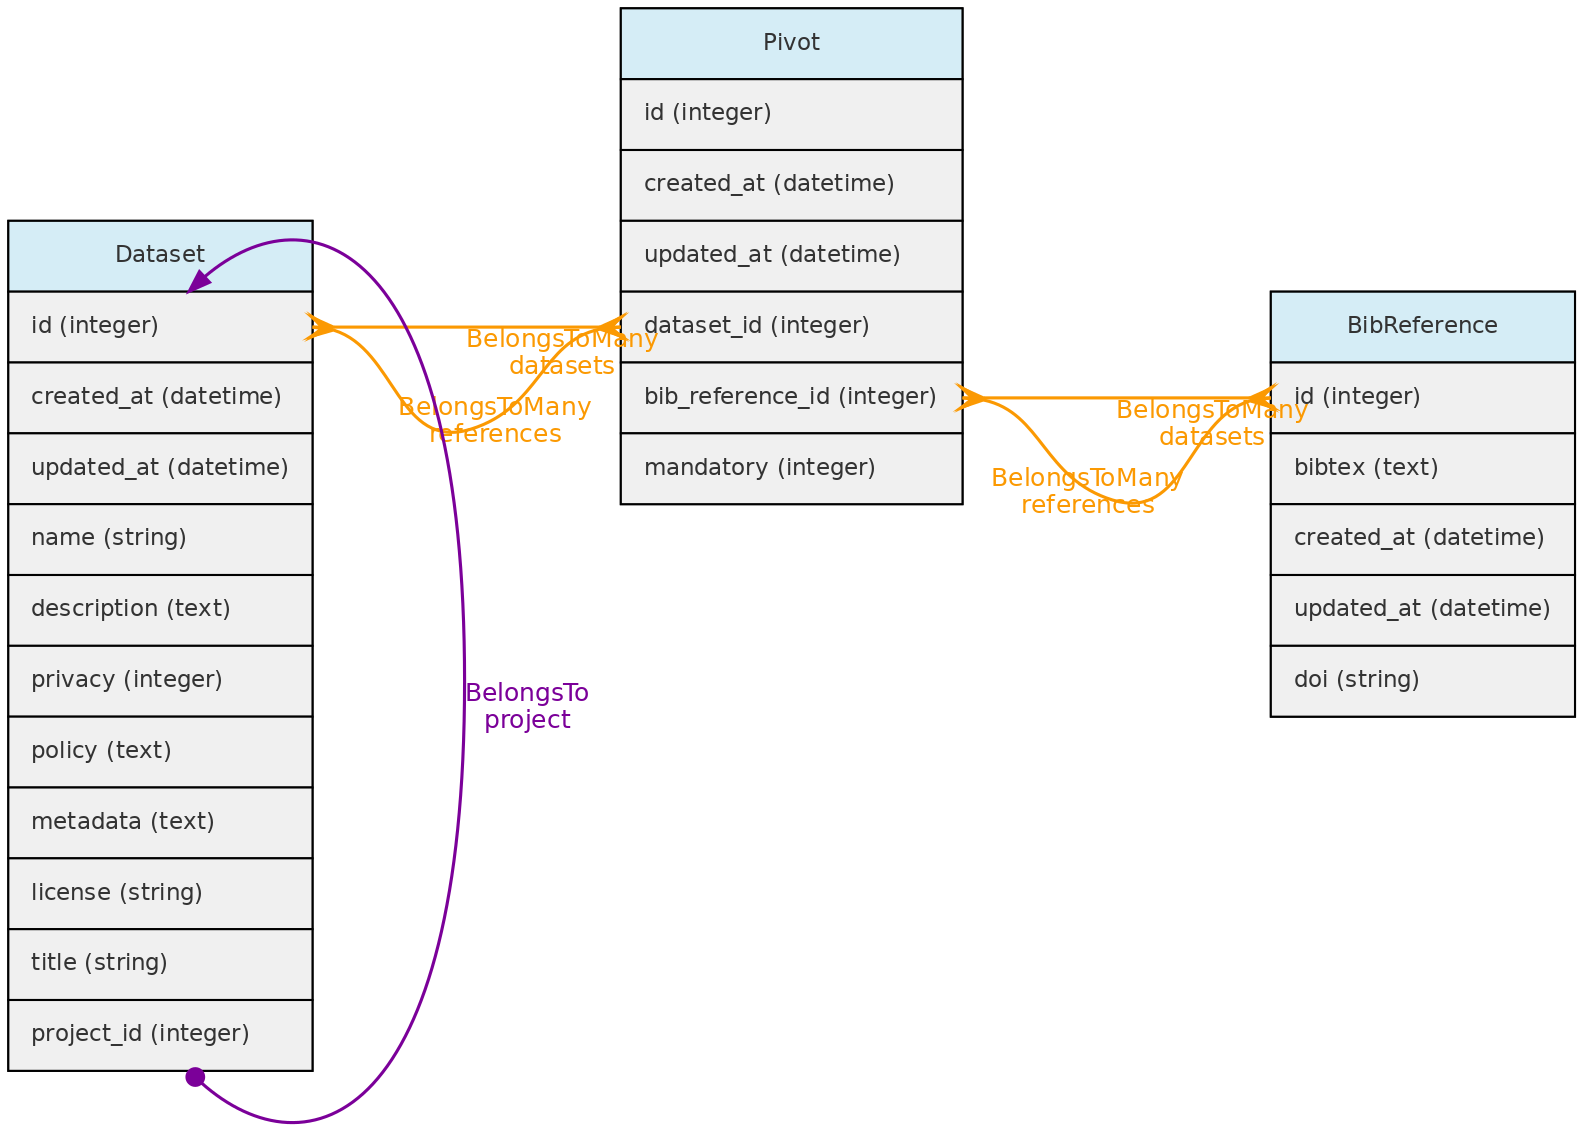
Projects
Projects are just groups of Datasets and interacts with Users, having administrators, collaborators or viewers. These users may control all datasets within the Project having a restricted to project users access policy.

Users
The Users table stores information about the database users and administrators. Each User may be associated with a default Person. When this user enters new data, this person is used as the default person in forms. The person can only be associated to a single user.
There are three possible access levels for a user:
* Registered User (the lowest level) - have very few permissions
* Full User - may be assigned as administrators or collaborators to Projects and Datasets;
* SuperAdmin (the highest level). - superadmins have have access to all objects, regardless of project or dataset configuration and is the system administrator.
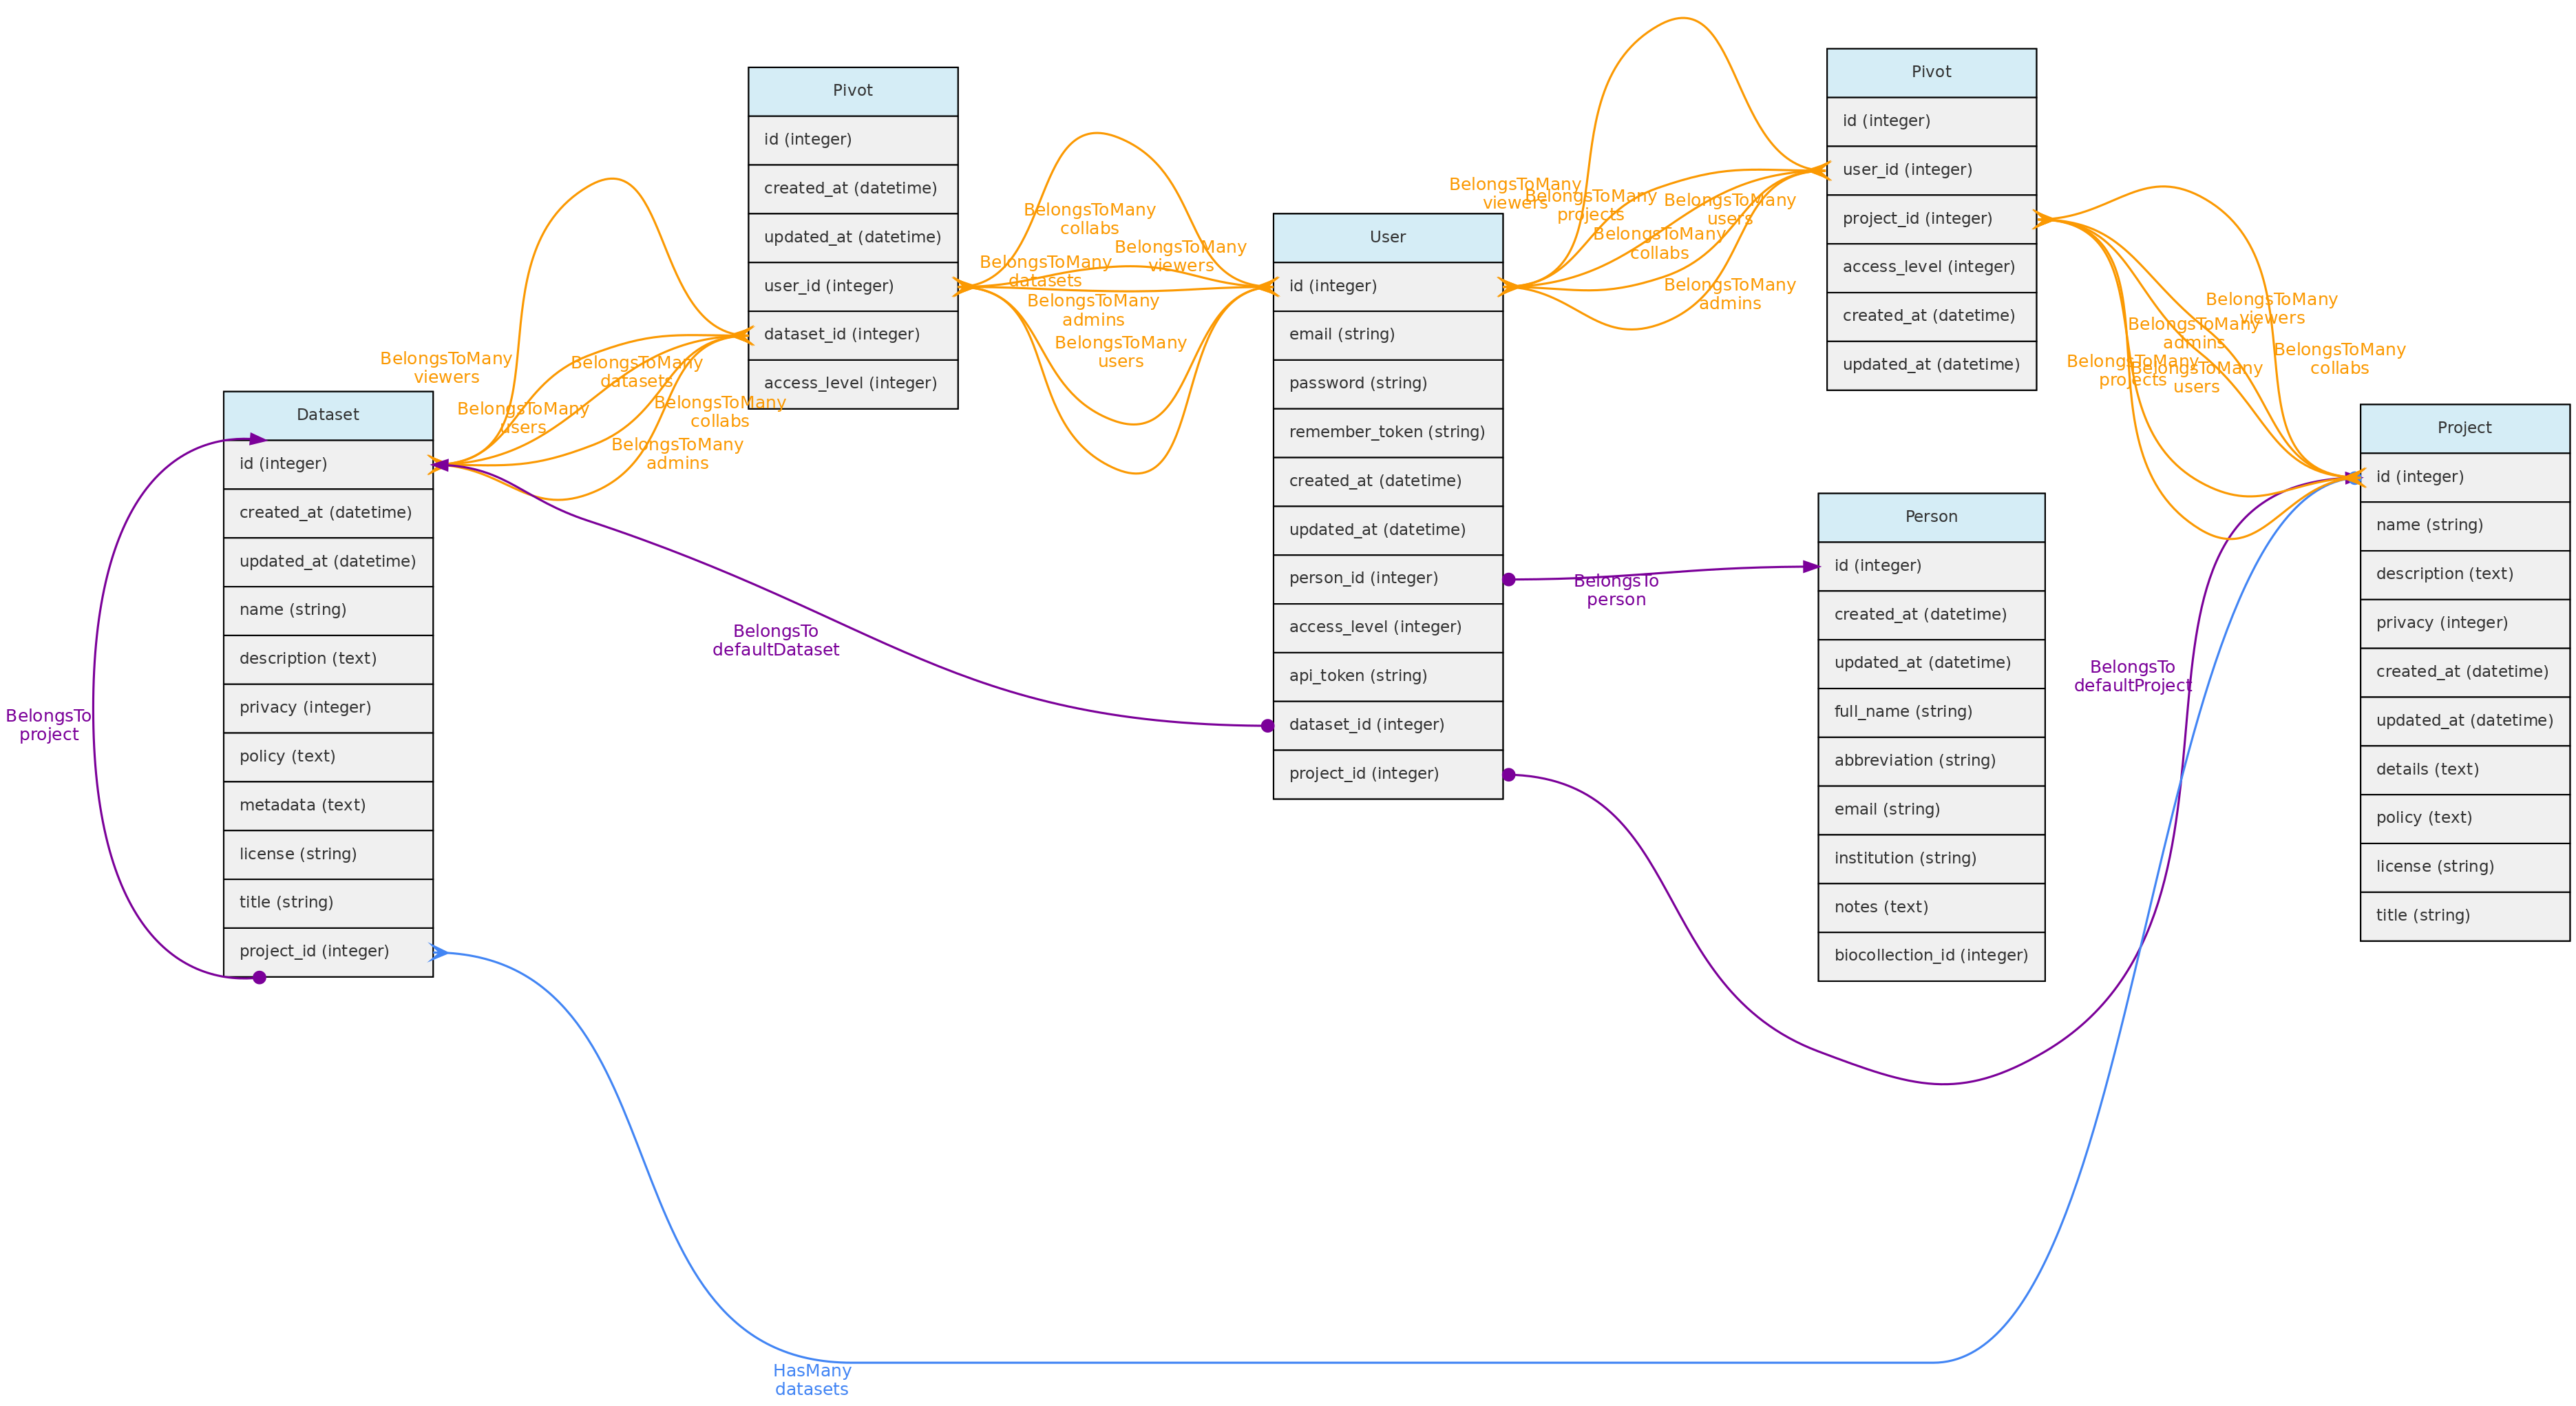
Each user is assigned to the registered user level when she or he registers in an OpenDataBio system. After that, a SuperAdmin may promote her/him to Full User or SuperAdmin. SuperAdmins also have the ability to edit other users and remove them from the database.
Every registered user is created along with a restricted Project and Dataset, which are referred to as her user Workspace. This allows users to import individual and voucher data before incorporating them into a larger project. [TO IMPLEMENT: export batches of objects from one project to another].
Data Access:users are created upon registration. Only administrators can update and delete user records.
User Jobs
The UserJob table is used to store temporarily background tasks, such as importing and exporting data. Any user is allowed to create a job; cancel their own jobs; list jobs that have not been deleted. The Job table contains the data used by the Laravel framework to interact with the Queue. The data from this table is deleted when the job runs successfully. The UserJob entity is used to keep this information, along with allowing for job logs, retrying failed jobs and canceling jobs that have not yet finished.
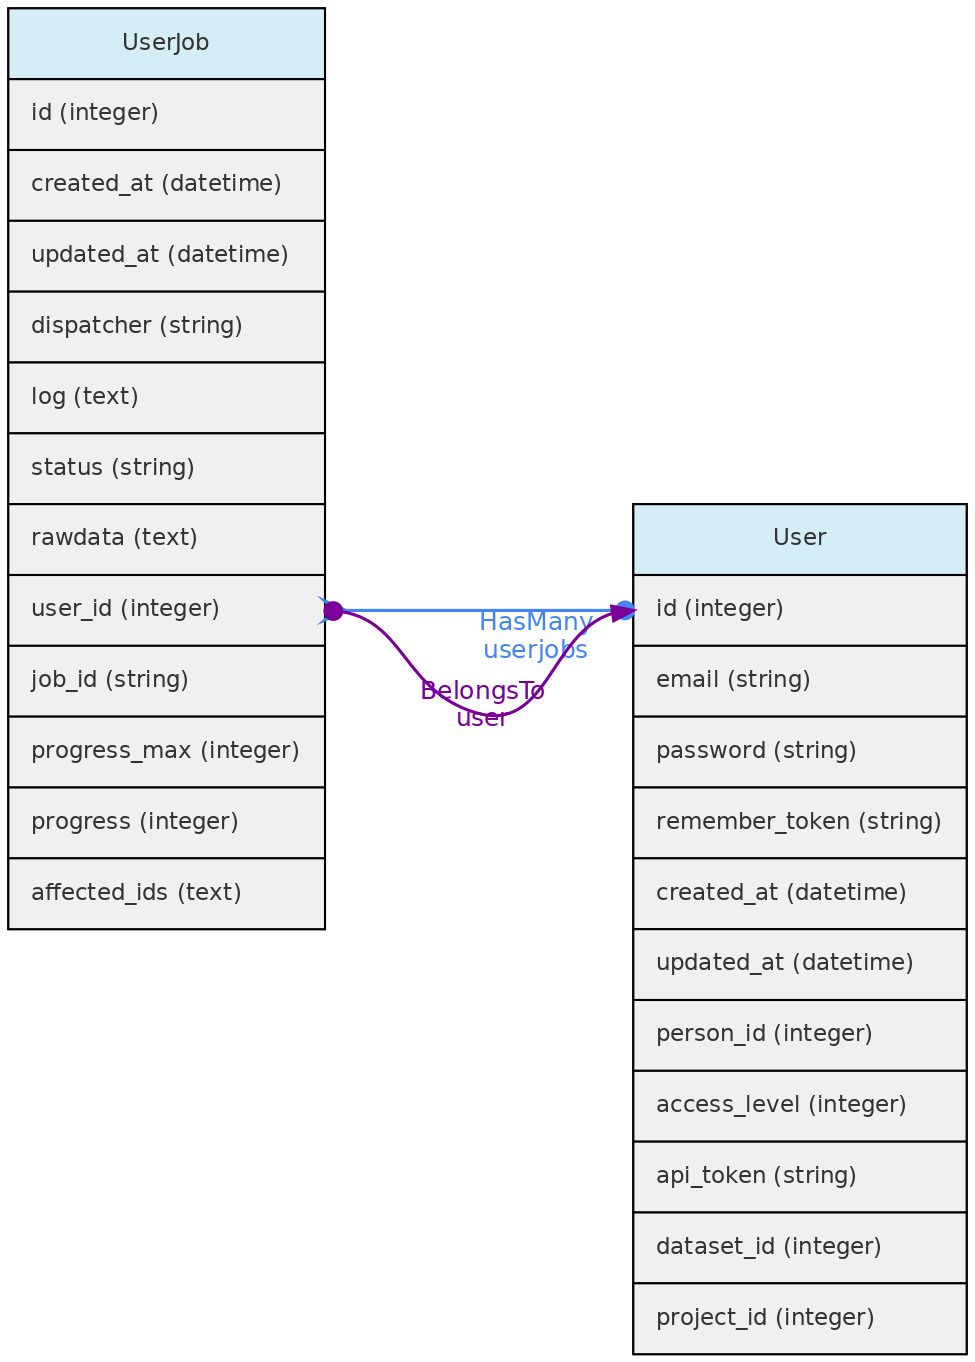
Data Access: Each registered user can see, edit and remove their own UserJobs.
4.4 - Auxiliary Objects
BibReference Model
The BibReference table contains basically BibTex formatted references stored in the bibtex column. You may easily import references into OpenDataBio by just specifying the doi, or simply uploading a bibtex record. These bibliographic references may be used to:
- Store references for Datasets - with the option of defining references for which citation is mandatory when using the dataset in publications; but all references that have used the dataset may be linked to the dataset; links are done with a Pivot table named
dataset_bibreference; - Store the references for Taxons:
- to specify the reference in which the Taxon name was described, currently mandatory in some Taxonomic journals like PhytoTaxa. This description reference is stored in the
bibreference_idof the Taxons table. - to register any reference to a Taxon name, which are then linked through a pivot table named
taxons_bibreference.
- to specify the reference in which the Taxon name was described, currently mandatory in some Taxonomic journals like PhytoTaxa. This description reference is stored in the
- Link a Measurement to a published source;
- Indicate the source of a Trait definition.
- Indicate mandatory citations for a Dataset, or link references using the data to a Dataset
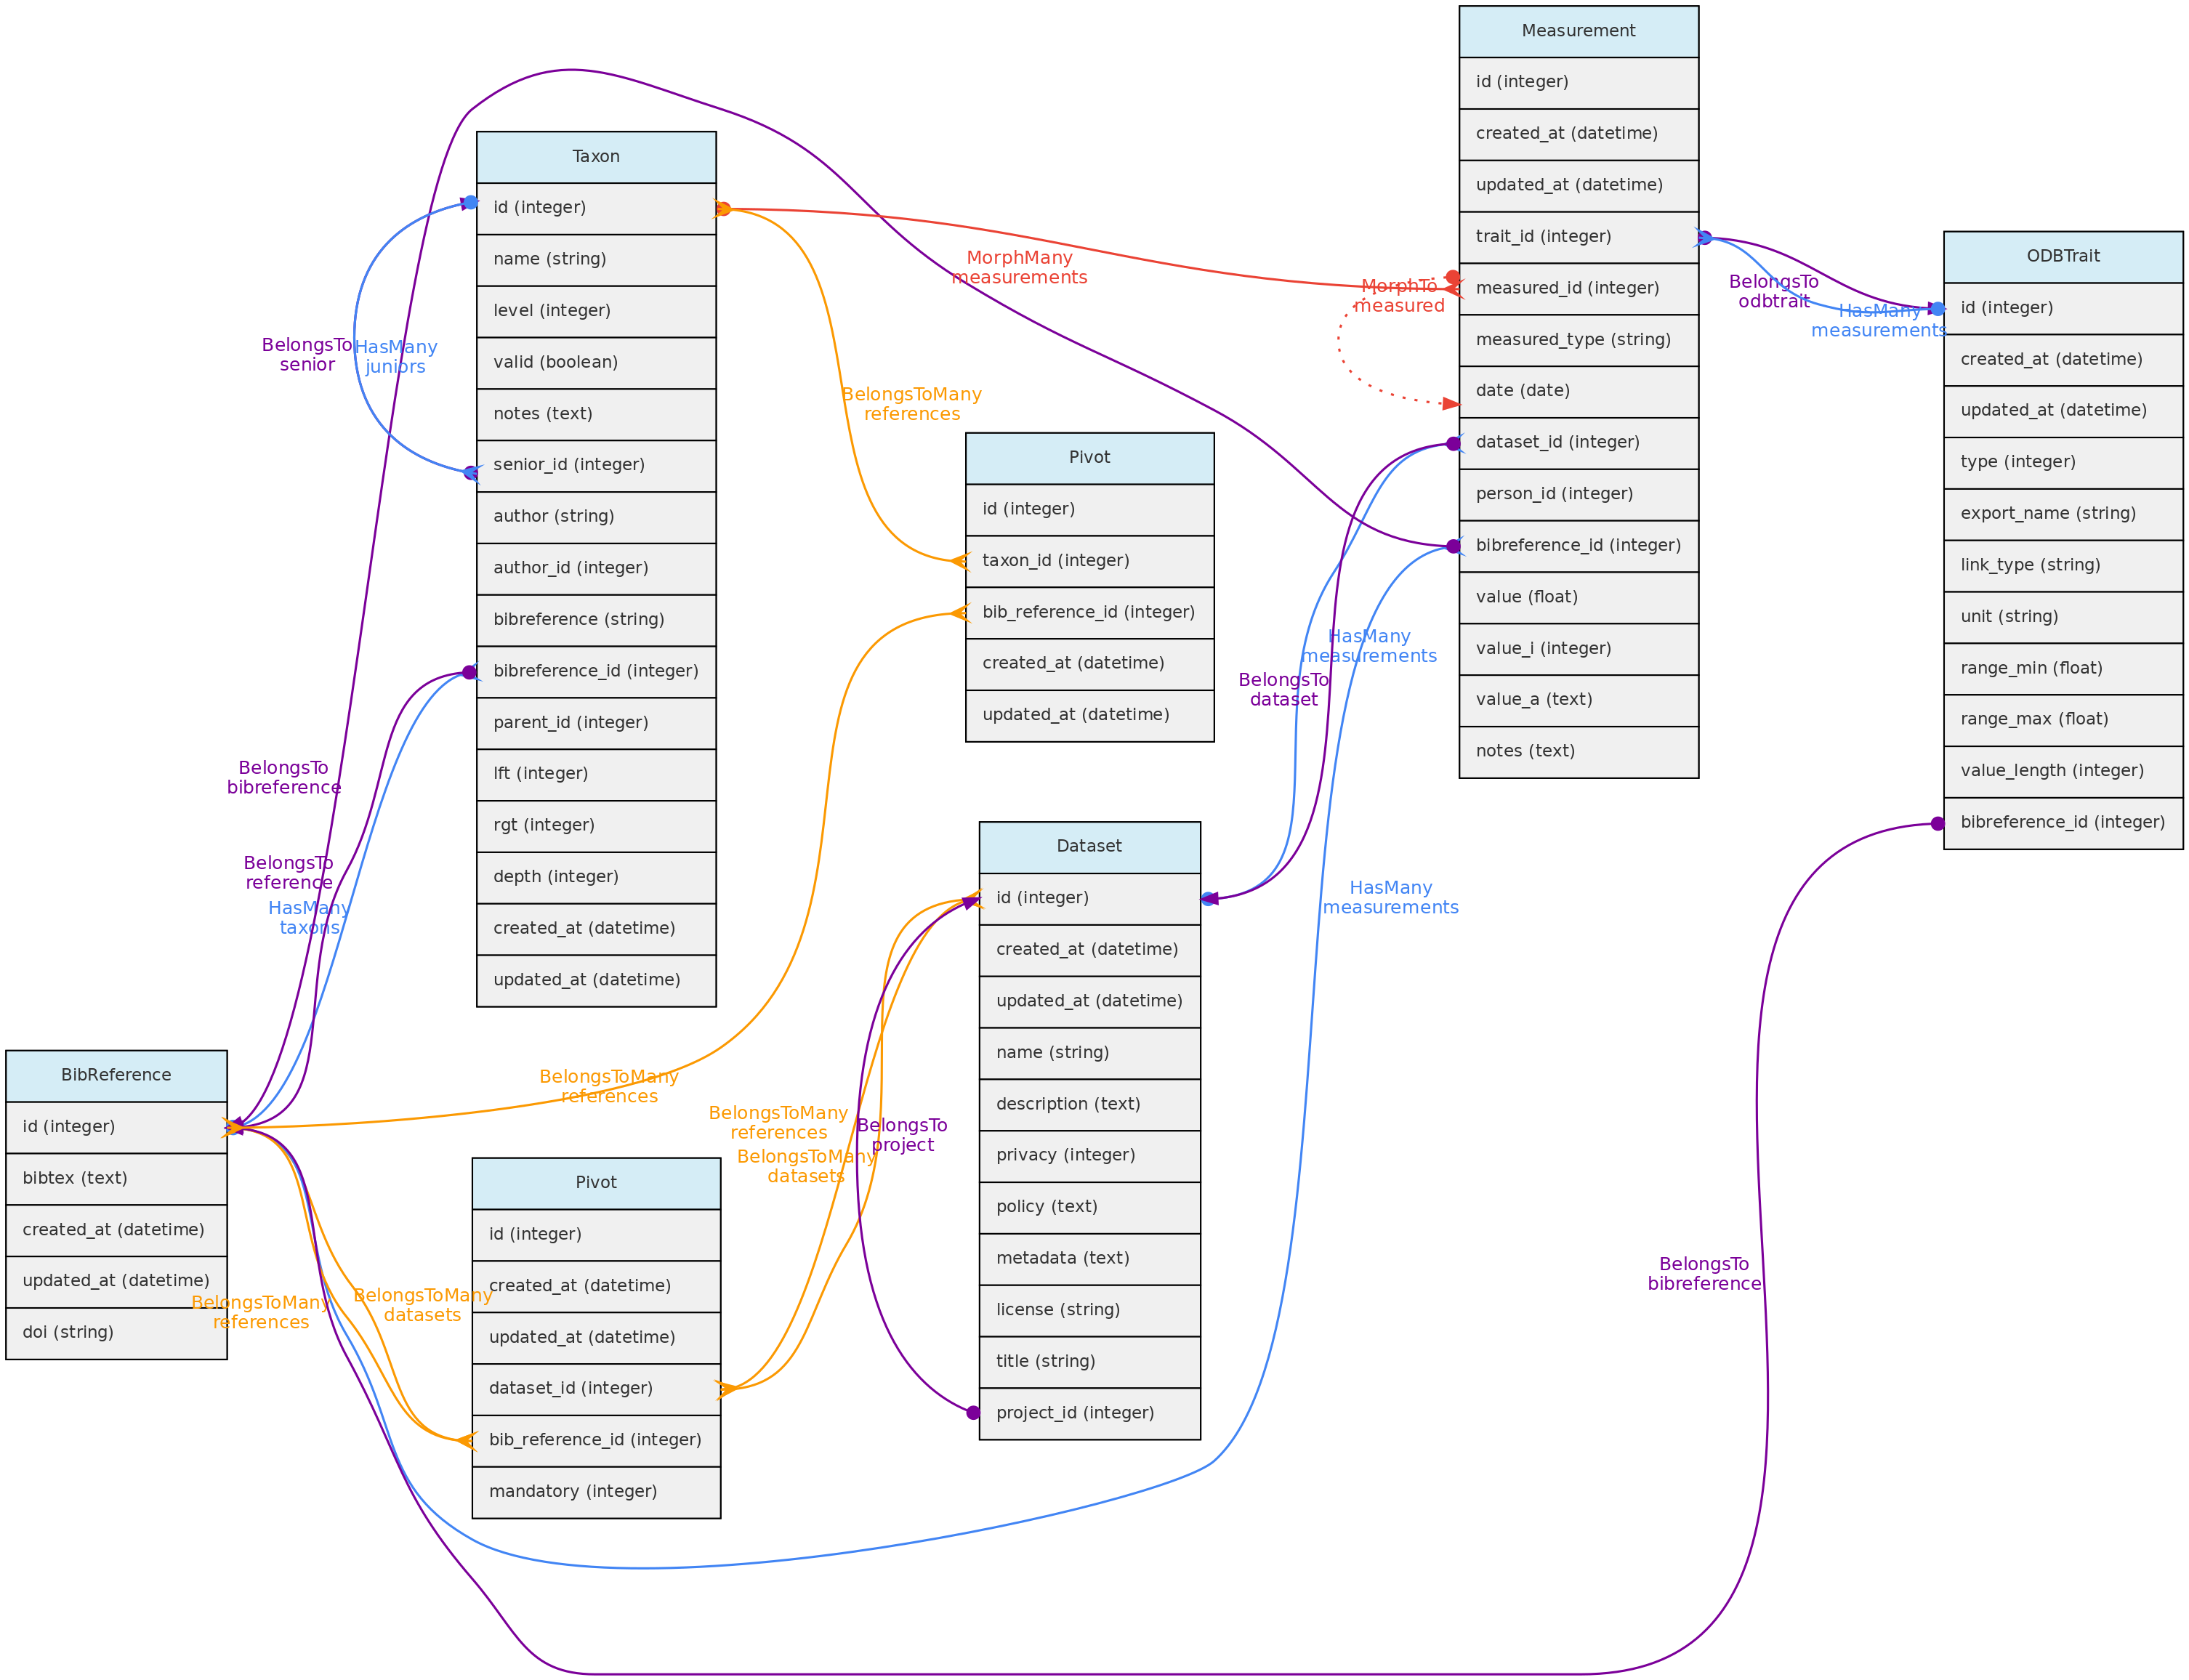 BibReference model and its relationships. Lines linking tables indicate the
 methods implemented, with colors indicating different Eloquent relationships.
Bibreferences table
- The BibtexKey, authors and other relevant fields are extracted from the
bibtexcolumn. - The Bibtexkey must be unique in the database, and a helper function is be provided to standardize it with format
<von? last name> <year> <first word of title>. The “von part” of the name is the “von”, “di”, “de la”, which are part of the last name for some authors. The first word of the title ignores common stop-words such as “a”, “the”, or “in”. - DOIs for a BibReference may be specified either in the relevant BibTex field or in a separate text input, and are stored in the
doifield when present. An external API finds the bibliographic record when a user informs thedoi.
**Data access** [full users](/en/docs/concepts/data-access/#user) may register new references, edit references details and remove reference records that have no associated data. BibReferences have public access!
Identification Model
The Identification table represents the taxonomic identification of Individuals.
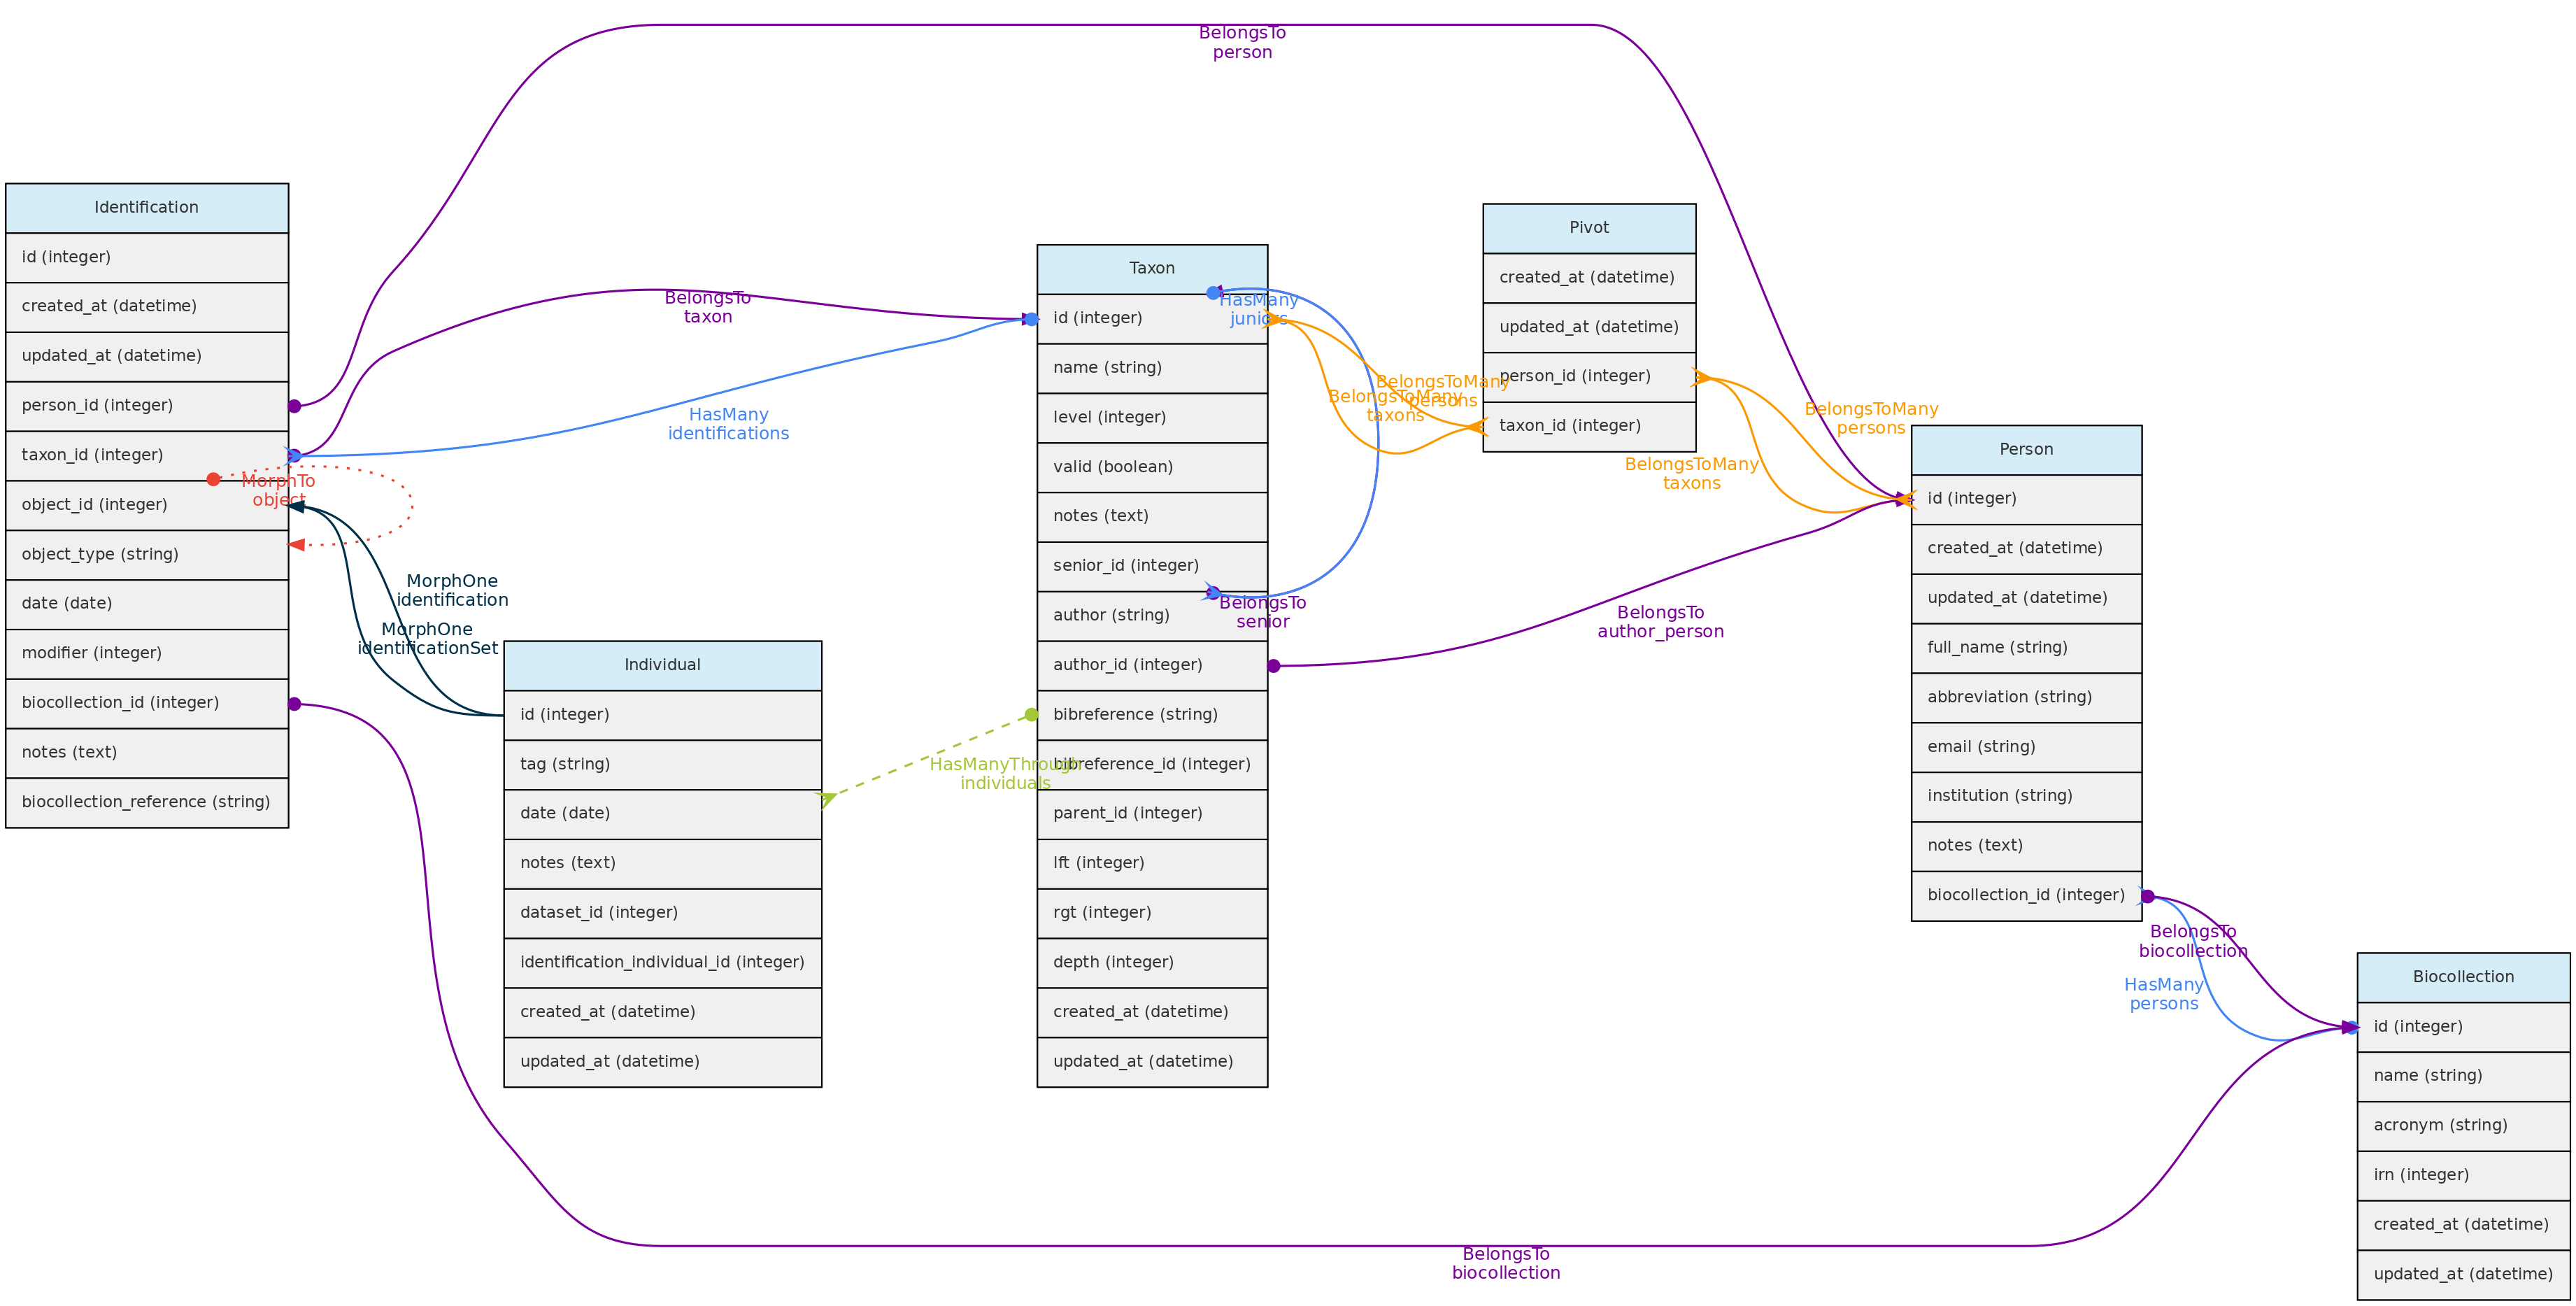 Identification model and its relationships. Lines linking tables indicate the
 methods implemented, with colors indicating different Laravel Eloquent relationships
Identifications table
- The Identification model includes several optional fields, but in addition to
taxon_id,person_id, the Person responsible for the identification, and the identificationdateare mandatory.
- The
datevalue may be an Incomplete Date, e.g. only the year or year+month may be recorded.
- The following fields are optional:
modifier- is a numeric code appending a taxonomic modifier to the name. Possible values ’s.s.’=1, ’s.l.’=2, ‘cf.’=3, ‘aff.’=4, ‘vel aff.’=5, defaults to 0 (none).notes- a text of choice, useful for adding comments to the identification.biocollection_idandbiocollection_reference- these fields are to be used to indicate that the identification is based upon comparison to a voucher deposited in a Biological Collection and creates a link between the Individual identified and the BioCollection specimen from which the identification is based upon.biocollection_idstores the Biocollection id, andbiocollection_referencethe unique identifier of the specimen compared, i.e. would be the equivalent of thebiocollection_numberof the Voucher model, but this reference does not need to be from a voucher registered in the database.
- The relationship with the Individual model is defined by a polymorphic relationship using fields
object_typeandobject_id[This could be replaced by an ‘individual_id’ in the identification table. The polymorphic relation inherited from a previous development version, kept because the Identification model may be used in the future to link Identifications to Measurements]. - Changes in identifications are audited for tracking change history
Data access: identifications are attributes of Individuals and do not have independent access!
Person Model
The Person object stores persons names, which may or may not be a User directly involved with the database. It is used to store information about people that are:
* collectors of Vouchers, Individuals and MediaFiles
* taxonomic determinators or identifiers of individuals;
* measurer of Measurements;
* authors for unpublished Taxon names;
* taxonomic specialists - linked with Taxon model by a pivot table named person_taxon;
* dataset authors - defining authors for the dynamic publication of datasets;
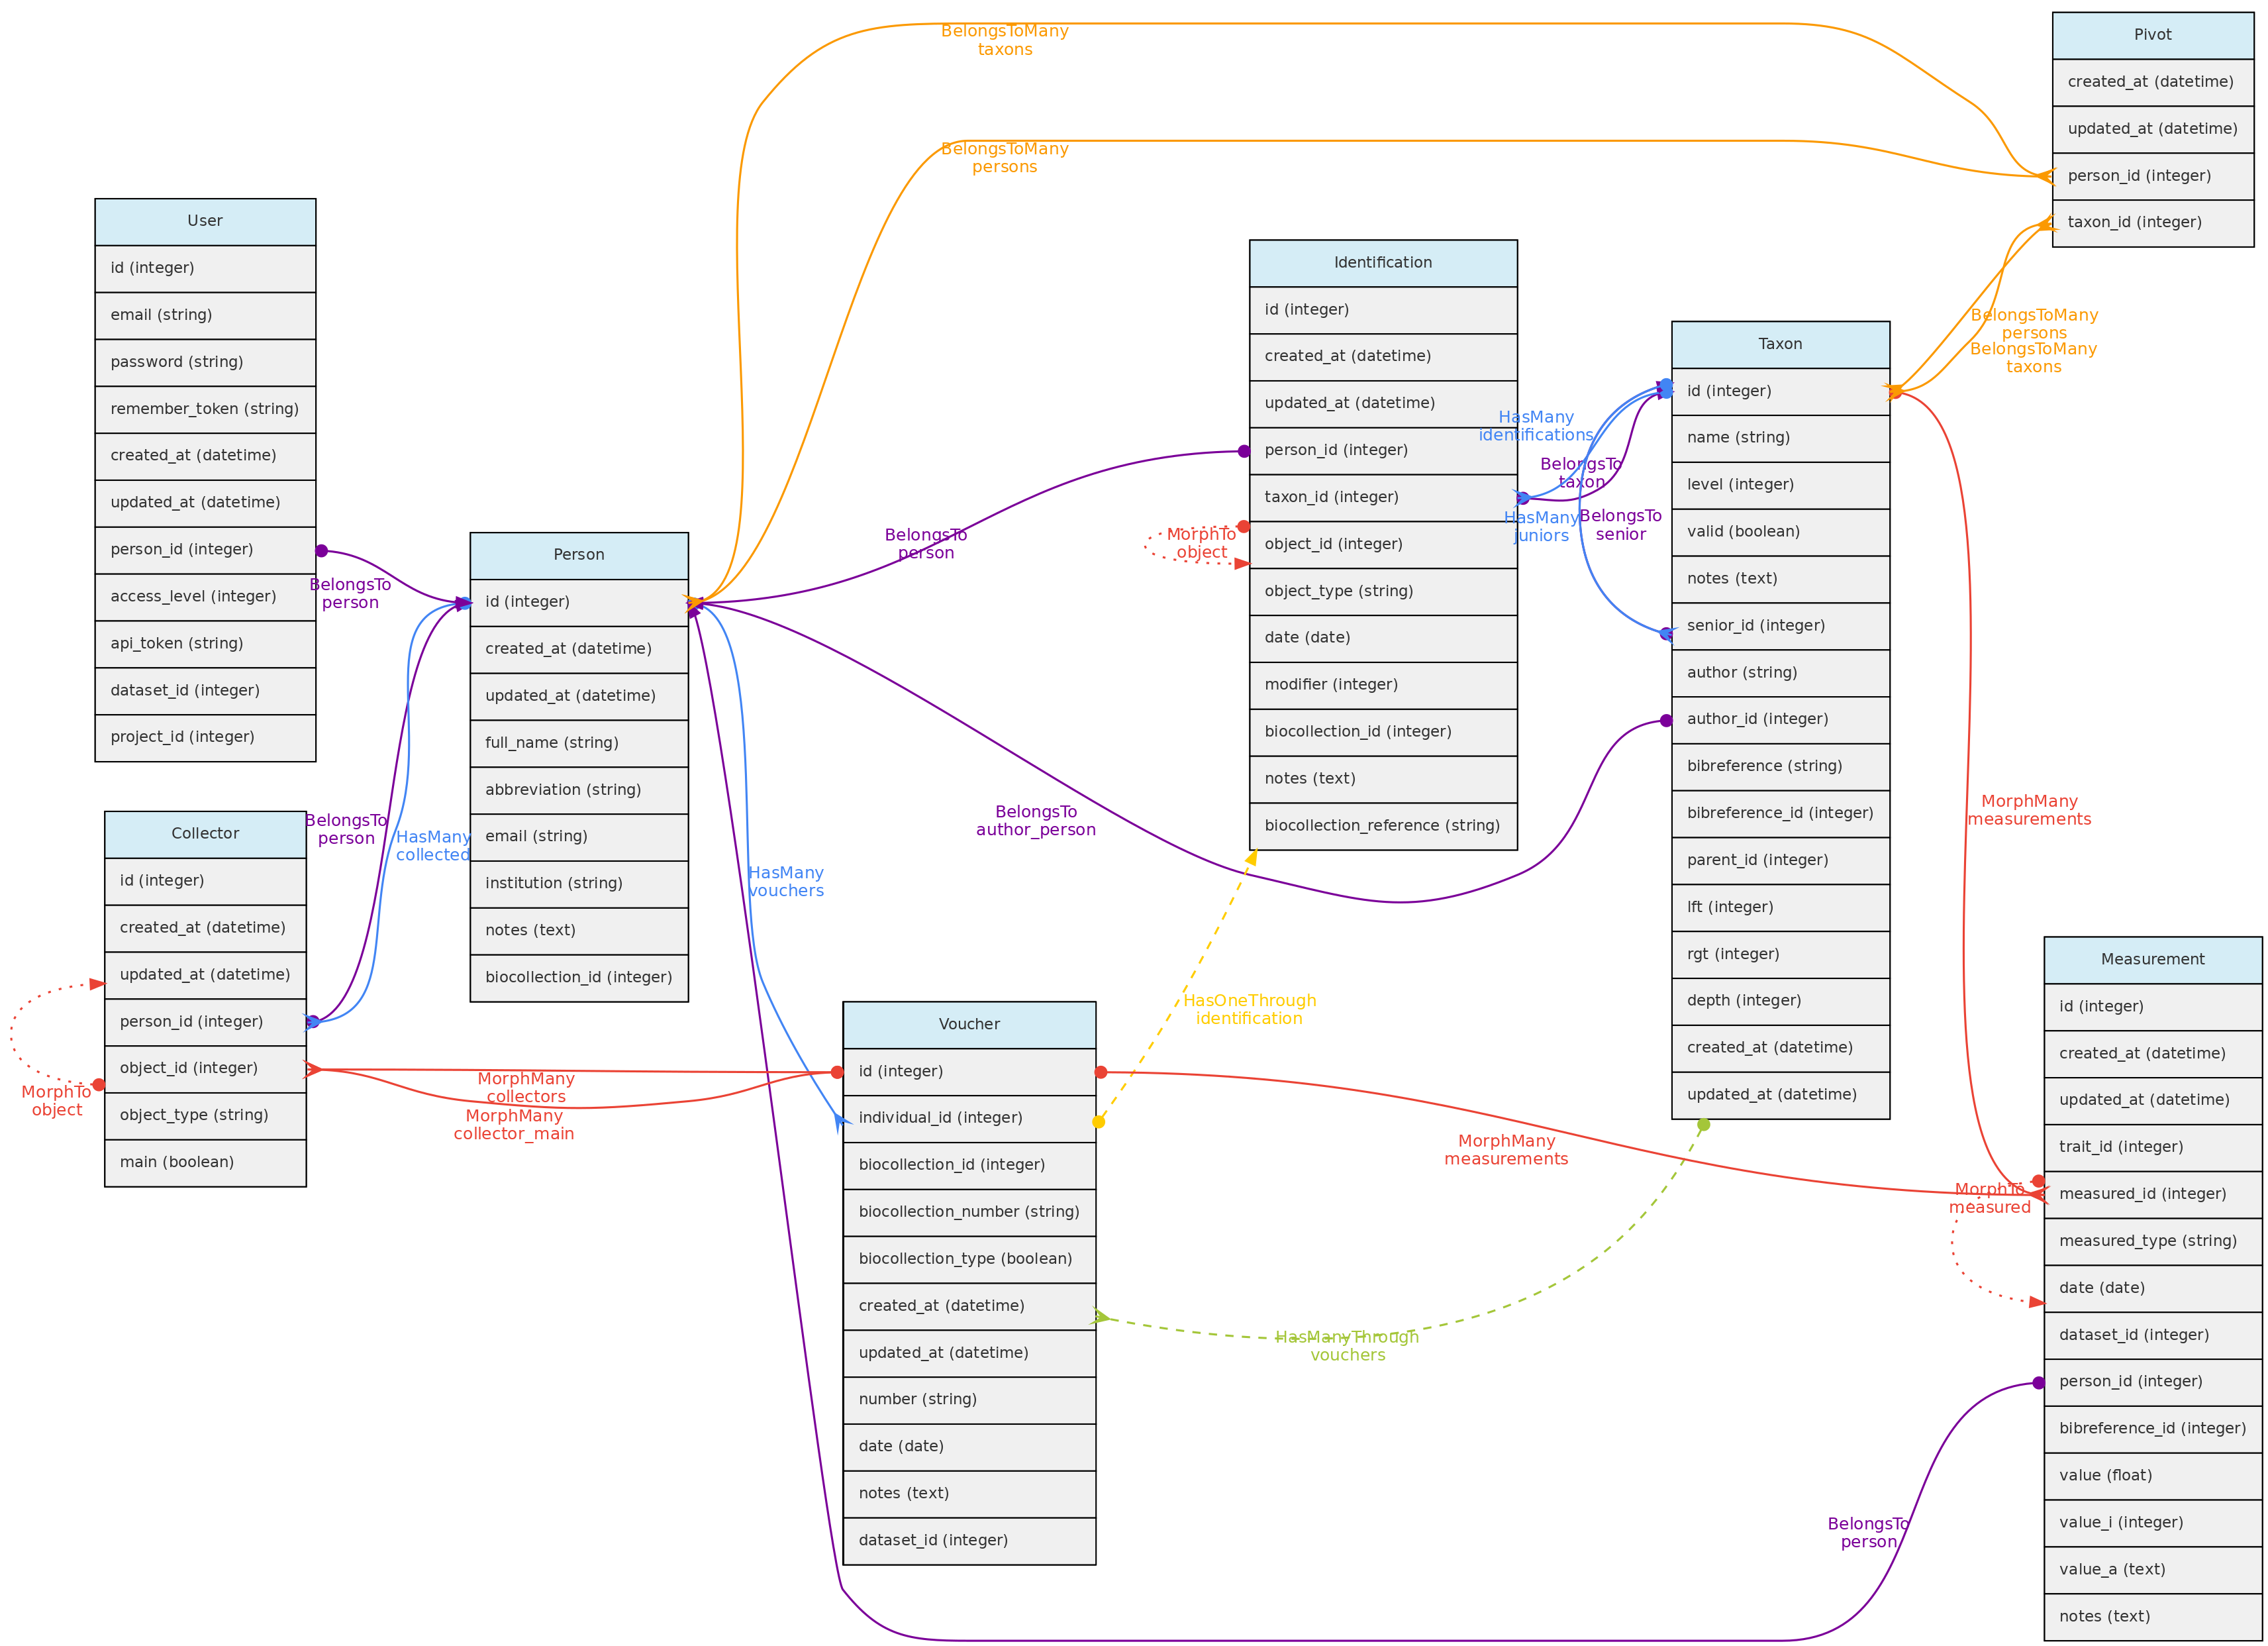 Person model and its relationships. Lines linking tables indicate the
 methods implemented, with colors indicating different types of Laravel Eloquent methods, solid lines the direct and dashed the indirect relationships
Persons table
- mandatory columns are the person
full_nameandabbreviation; - when registering a new person, the system suggests the name
abbreviation, but the user is free to change it to better adapt it to the usual abbreviation used by each person. The abbreviation must be unique in the database, duplicates are not allowed in the Persons table. Therefore, two persons with the exact same name must be differentiated somehow in theabbreviationcolumn. - The
biocollection_idcolumn of the Persons table is used to list to which Biocollection a person is associated, which may be used when the Person is also a taxonomic specialist. - Additionally, the
emailandinstitutionthe person belongs to may also be informed. - Each user can be linked to a Person by the
person_idin the User table. This person is then used the ‘default’ person when the user is logged into the system.
**Data access** [full users](/en/docs/concepts/data-access/#user) may register new persons and edit the persons they have inserted and remove persons that have no associated data. Admins may edit any Person. Persons list have public access.
Media Model
Media files are similar to measurements in that they might be associated with any core object. Media files may be images (jpeg, png, gif, tif), video or audio files and can be made freely accessible or placed in a Dataset with a defined access policy. A CreativeCommons.org license must be assigned to them. Media files may be tagged, i.e. you may define keywords to them, allowing to query them by Tags. For example, an individual image may be tagged with ‘flowers’ or ‘fruits’ to indicate what is in the image, or a tag that informs about image quality.
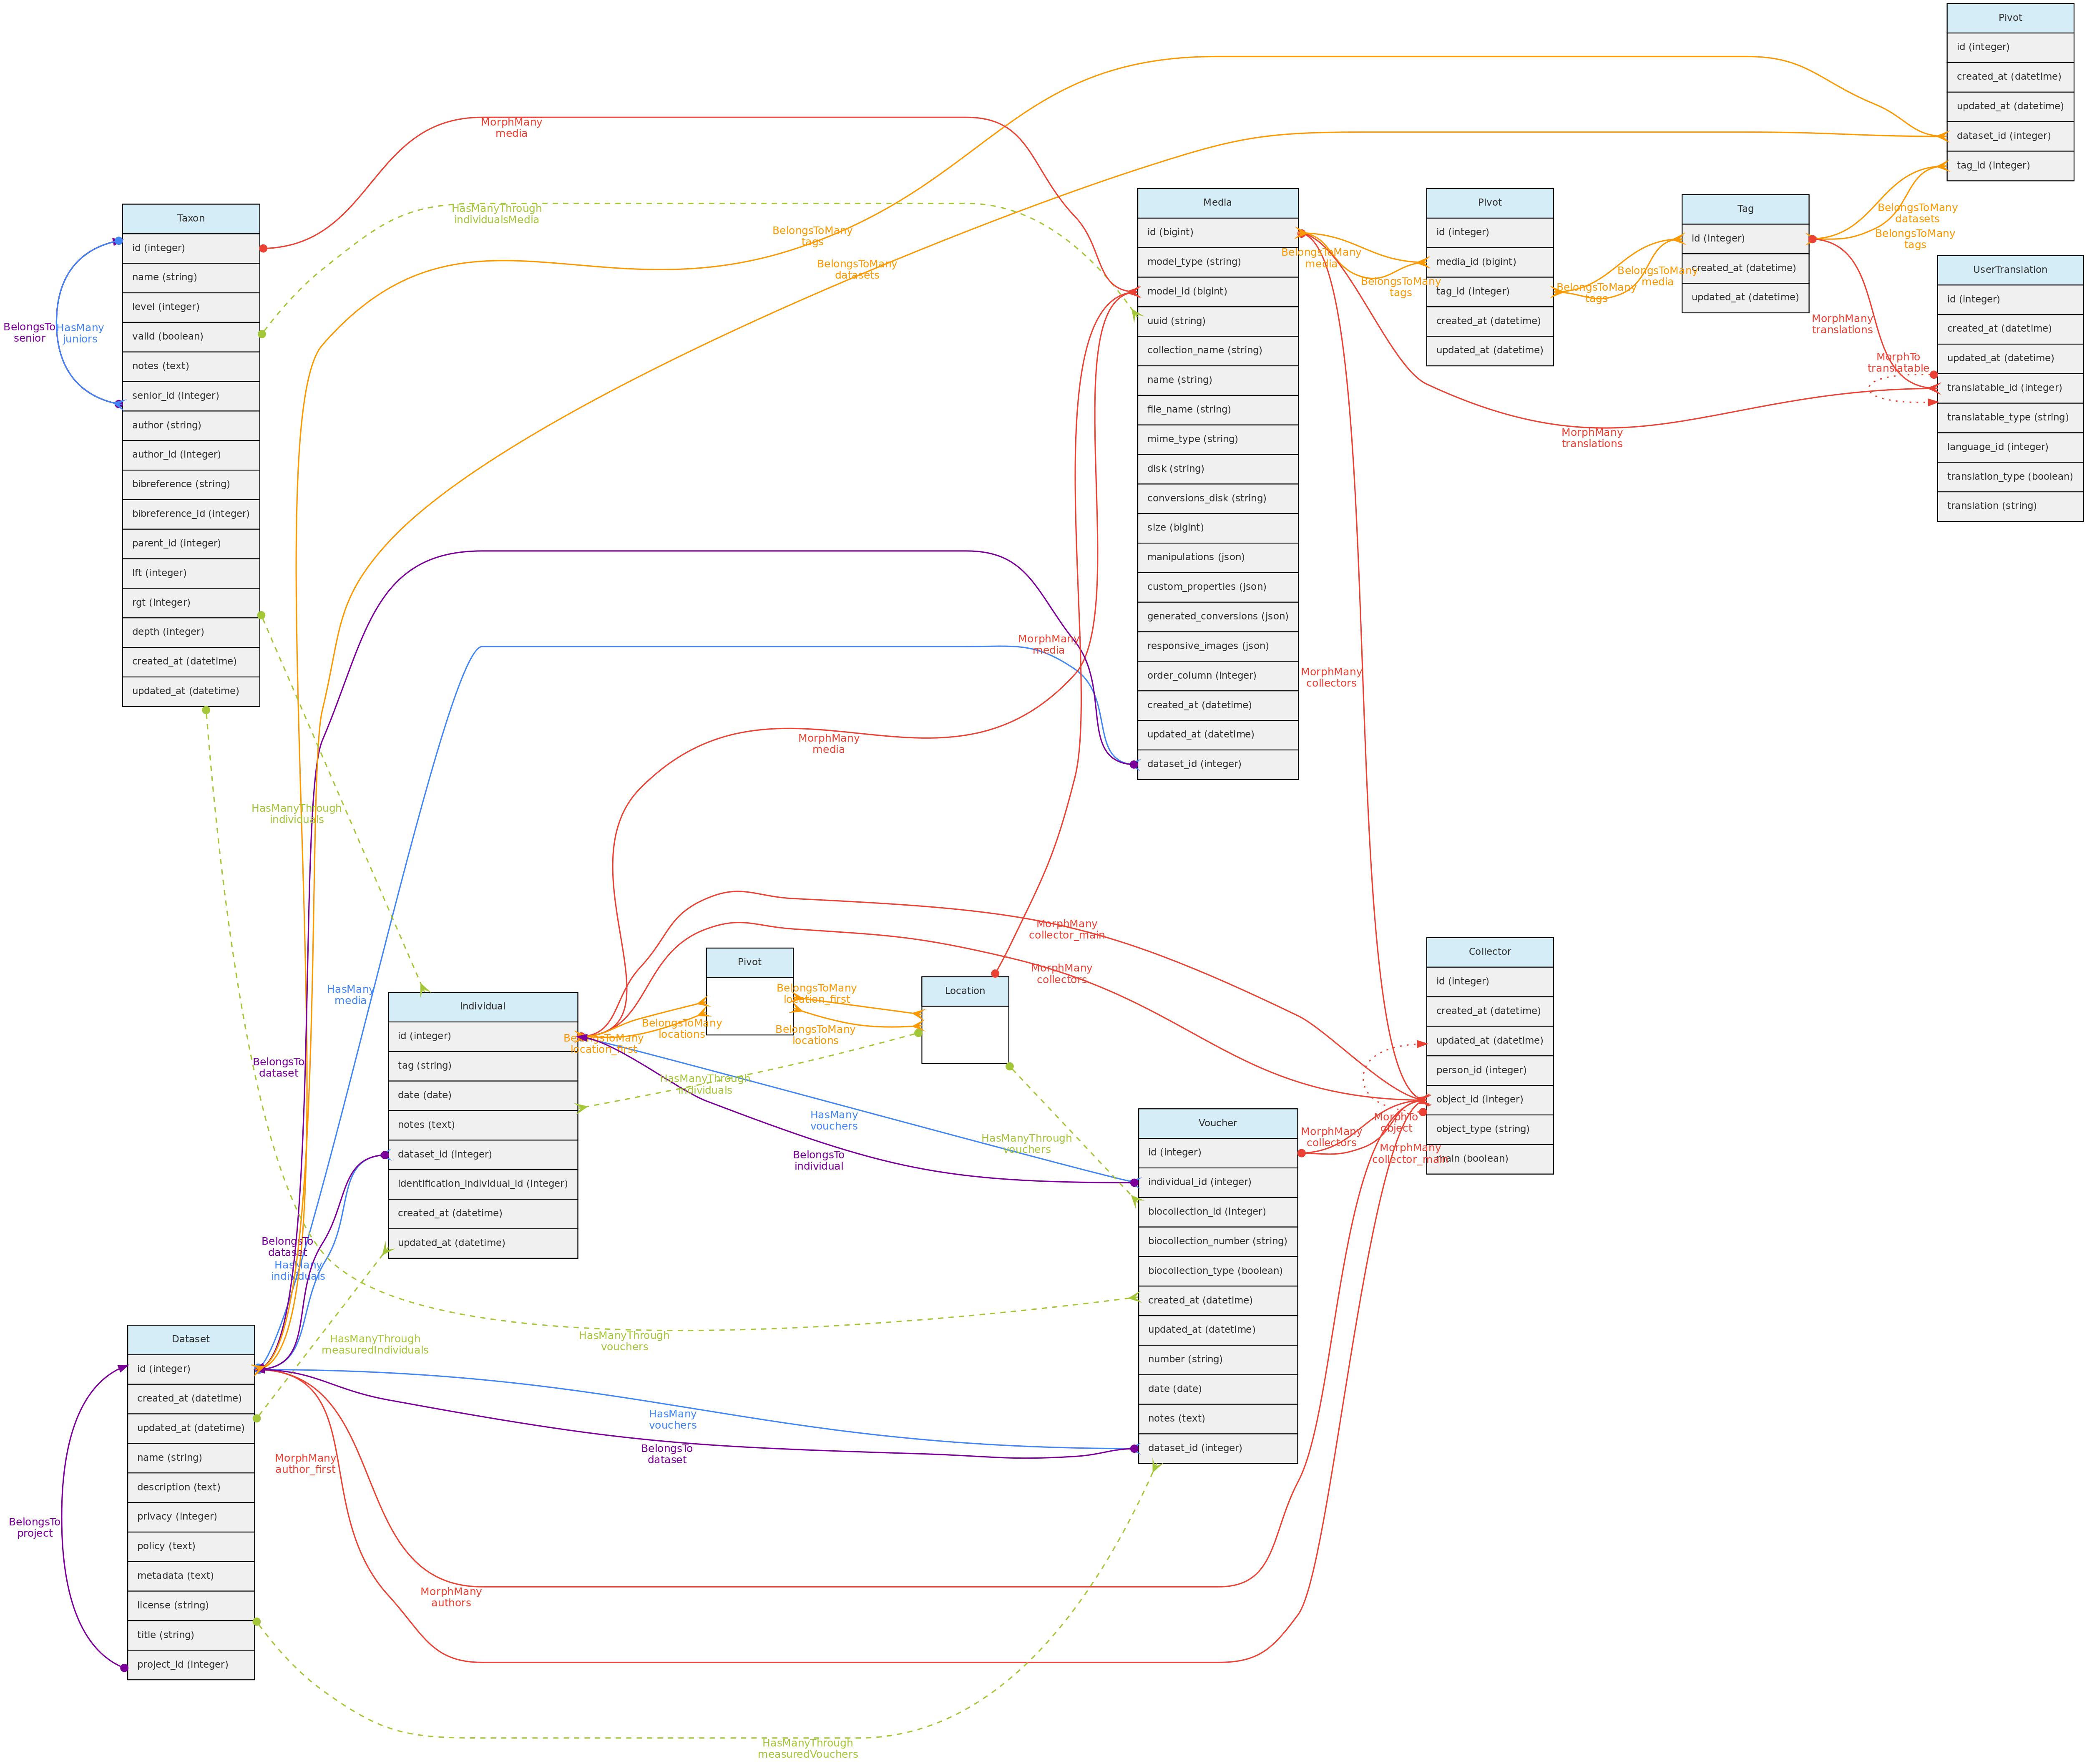
- Media files (image, video, audio) are linked to the Core-Objects through a polymorphic relationship defined by columns
model_idandmodel_type. - Multiple Persons may be associated with the Media for credits, these are linked with the Collectors table and its polymorphic relationship structure.
- A Media may have a
descriptionin each language configured in the Language table, which will be stored in theuser_translationstable, which relates to the Tag model through a polymorphic relationship. Inputs for each language are shown in the web-interface forms. - Media files are not stored in the database, but in the server storage folder.
- It is possible to batch upload media files through the web interface, requiring also a file informing the objects to link the media with.
Data access full users may register media files and delete the ones they have inserted. If Media is in a Dataset, dataset admins may delete the media in addition to the user. Media files have public access, except when linked to a Dataset with access restrictions.
Tag Model
The Tag model allows users to define translatable keywords that may be used to flag Datasets, Projects or MediaFiles. The Tag model is linked with these objects through a pivot table for each, named dataset_tag, project_tag and media_tag, respectively.
A Tag may have name and description in each language configured in the Language table, which will be stored in the user_translations table, which relates to the Tag model through a polymorphic relationship. Inputs for each language are shown in the web-interface forms.
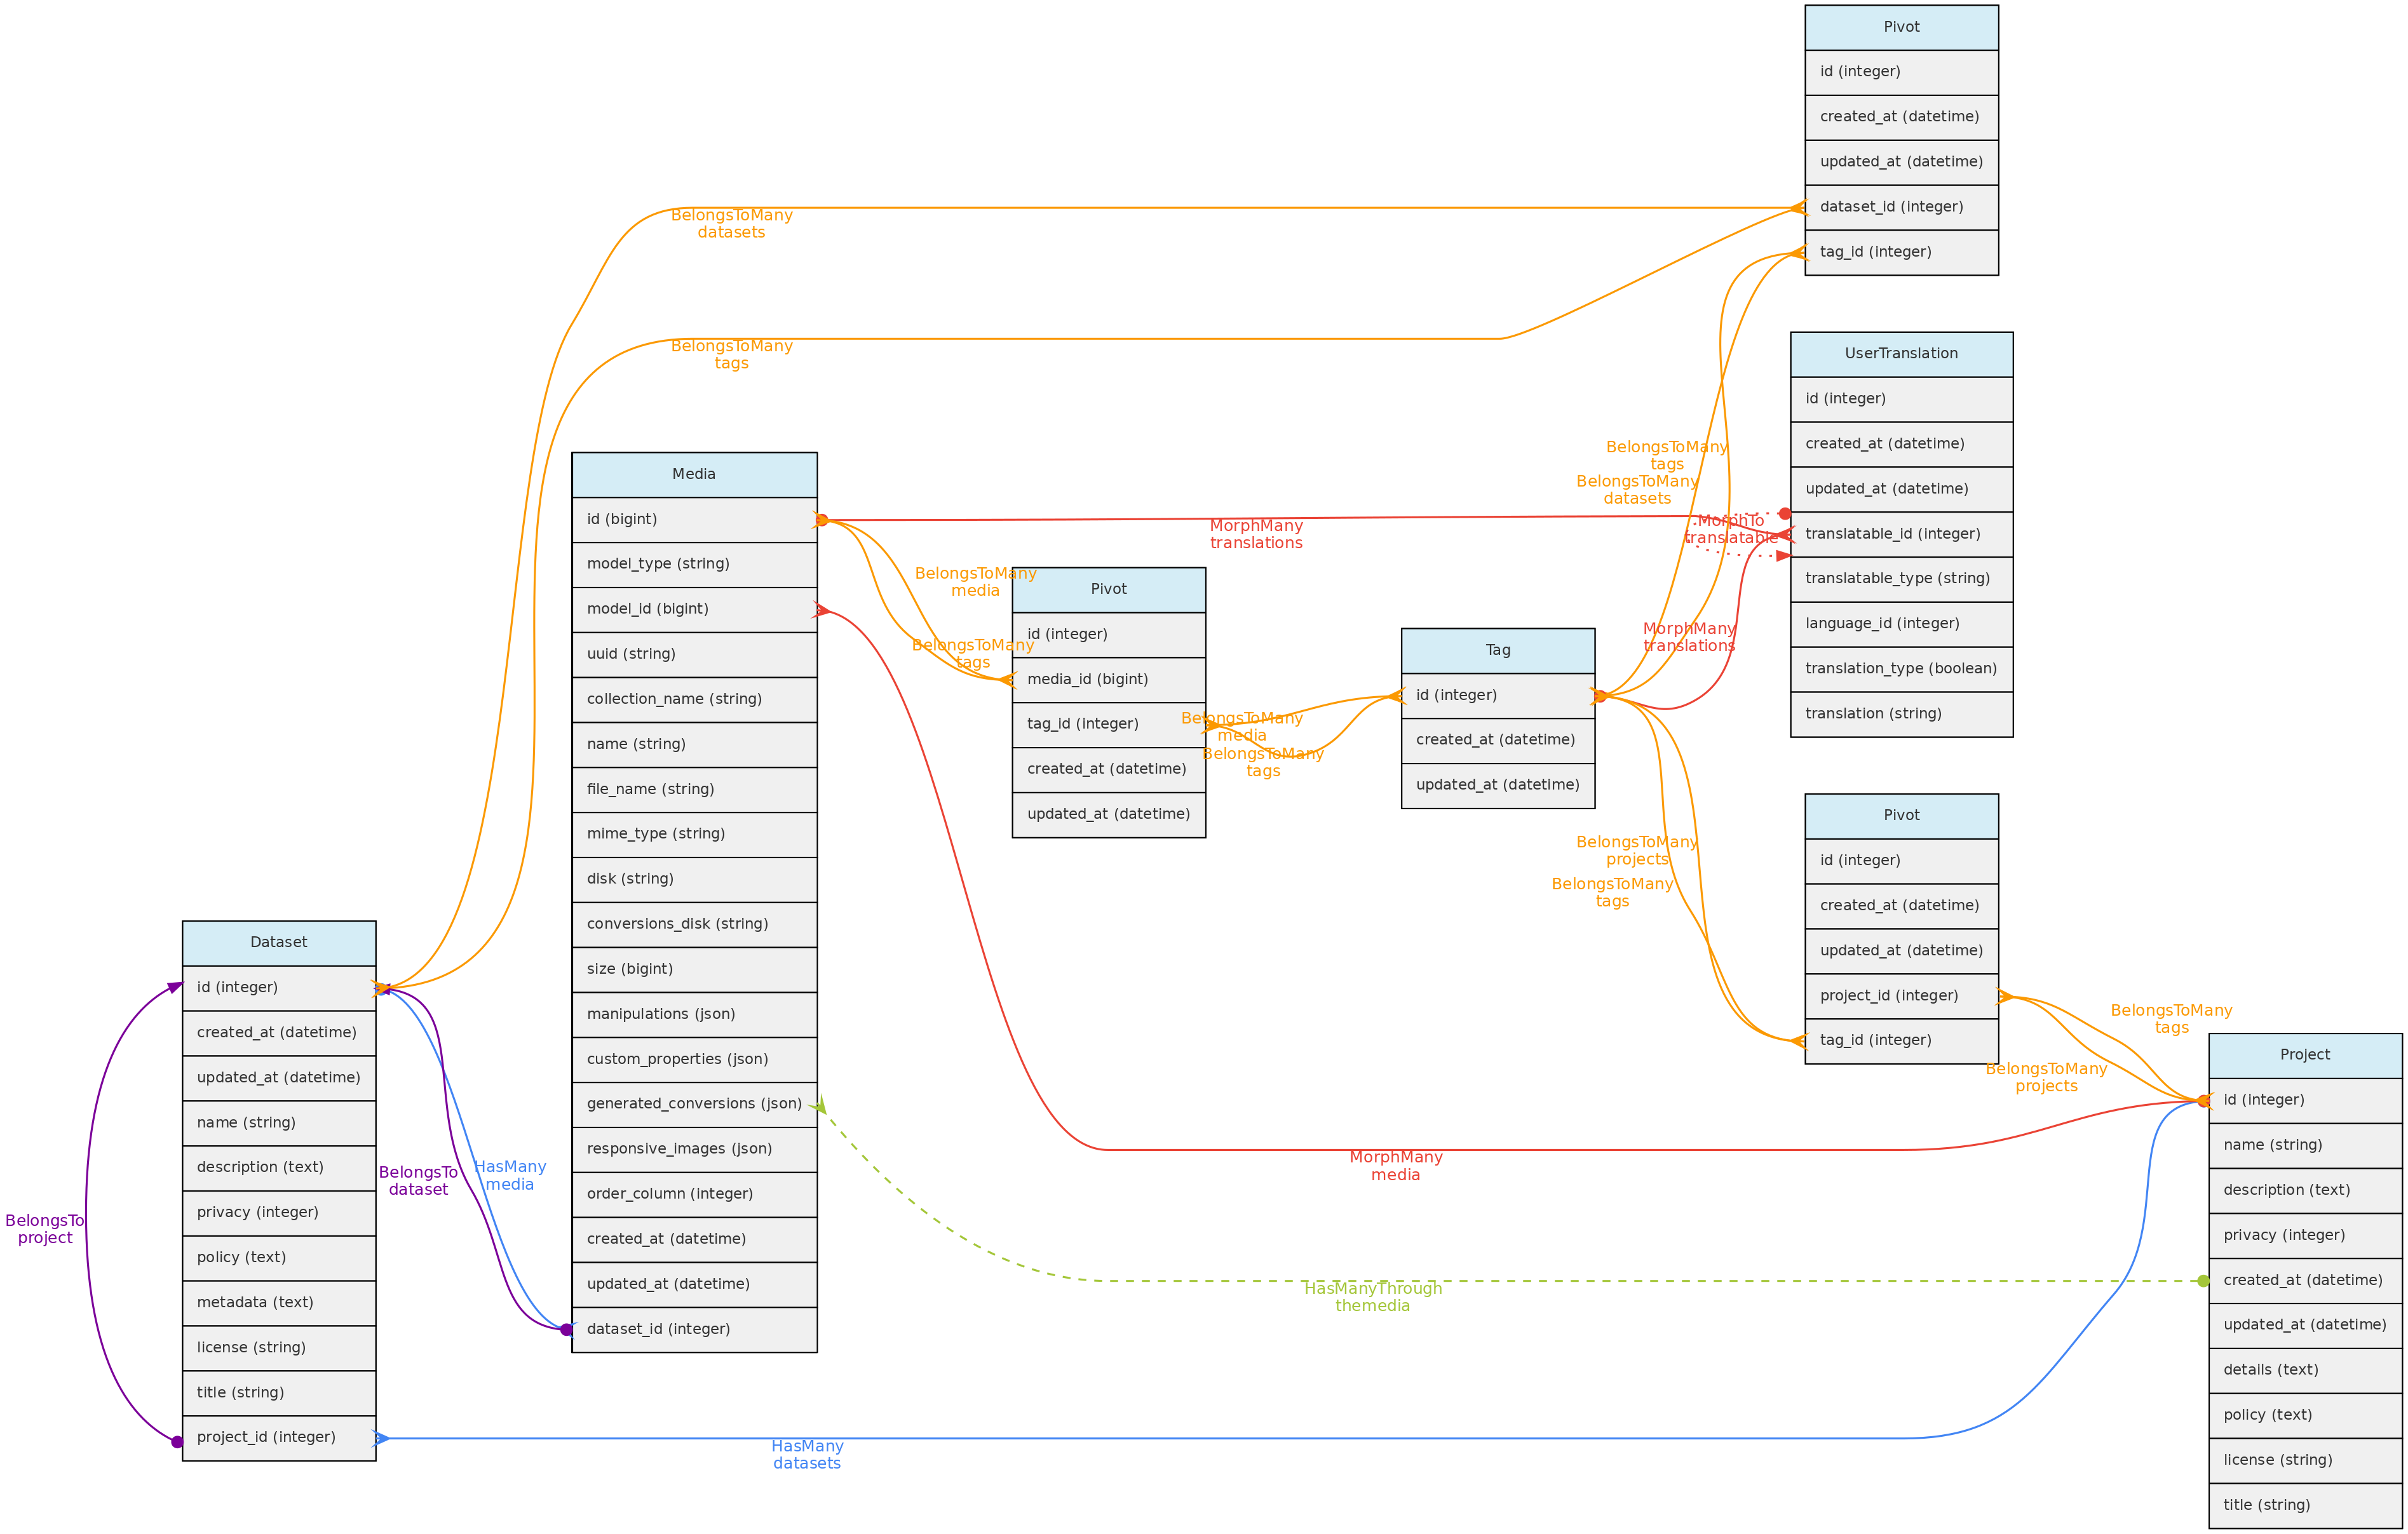
Data access full users may register tags, edit those they have inserted and delete those that have not been used. Tags have public access as they are just keywords to facilitate navigation.
User Translation Model
The UserTranslation model translates user data: Trait and Trait Categories names and descriptions, MediaFiles descriptions and Tags. The relations between these models are established by polymorphic relations using fields translatable_type and translatable_id. This model permits translations to any language listed in the Language table, which is currently only accessible for insertion and edition directly in the SQL database. Input forms in the web interface will be listed for registered Languages.
![]()
Incomplete Dates
Dates for Vouchers, Individuals, Measurements and Identifications may be Incomplete, but at least year is mandatory in all cases. The date columns in the tables are of ‘date’ type, and incomplete dates are stored having 00 in the missing part: ‘2005-00-00’ when only year is known; ‘1988-08-00’ when only month is known.
Auditing
Modifications in database records are logged to the activity_log table. This table is generated by the package ActivityLog. The activities are shown in a ‘History’ link provided in the Show.view of the models.
- The package stores changes as json in the
propertiesfield, which contains two elements:attributesandold, which are basically the new vs old values that have been changed. This structure must be respected. - Class ActivityFunctions contain custom functions to read the the properties Json record stored in the
activity_logtable and finds the values to show in the History datatable; - Most changes are logged by the package as a ’trait’ called within the Class. These allow to automatically log most updates and are all configured to log only the fields that have changed, not entire records (option
dirty). Also record creation are not logged as activity, only changes. - Some changes, like Individual and Vouchers collectors and identifications are manually logged, as they involve related tables and logging is specified in the Controller files;
- Logging contain a
log_namefield that groups log types, and is used to distinguish types of activity and useful to search the History Datatable; - Two special logging are also done:
- Any Dataset download is logged, so administrators may track who and when the dataset was downloaded;
- Any Dataset request is also logged for the same reason
The clean-command of the package SHOULD NOT be used during production, otherwise will just erase all logged changes. If run, will erase the logs older than the time specified in the /config/activitylog.php file.
The ActivityLog table has the following structure:
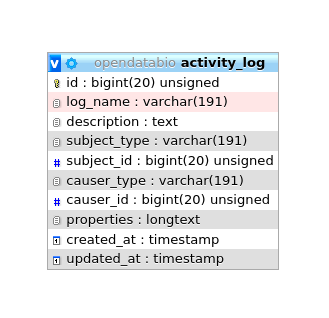
causer_typeandcauser_idwill be the User that made the changesubject_typeandsubject_idwill the model and record changedlog_name- to group logs together and permits queriesdescription- somewhat redundant with log_name in a OpenDataBio context.properties- stores the changes, for example, and identification change will have a log like:
{
    "attributes":
    {
        "person_id":"2",
        "taxon_id":"1424",
        "modifier":"2",
        "biocollection_id":"1",
        "biocollection_reference":"1234",
        "notes":"A new fake note has been inserted",
        "date":"2020-02-08"},
    "old":{
        "person_id":674,
        "taxon_id":1413,
        "date":"1995-00-00",
        "modifier":0,
        "biocollection_id":null,
        "notes":null,
        "biocollection_reference":null
    }
}
5 - Contribution Guidelines
Report bugs & suggest improvements
Post an issue on one of the GitLab repositories below, depending on the issue.
Before posting, check if an open issue does already contains what you want to report, ask or propose.
Tag your issue with one or more appropriate labels.
Issues for the main repository
Issues for the R package
Issues for this documentation site
Collaborate with development, language translations and docs
We expect this project to grow collaboratively, required for its development and use in the long term. Therefore, developer collaborators are welcome to help fixing and improving OpenDataBio. The issues list is a place to start to know what is needed.
The following guidelines are recommend if you want to collaborate:
- Communicate with the OpenDataBio repository maintainer indicating which issues you want to work on and join the development team.
Forkthe repository- Create a
branchto commit your modifications or additions - When happy with results, make a pull request to ask the project maintainer to review your contribution and merge it to the repository. Consult GitLab Help for more information on using pull requests.
Programming directives
- Use the docker installation for development, which shared among all developers facilitates debug. The Laravel-Datatables library is incompatible with
php artisan serve, so this command should not be used. - This software should adhere to Semantic Versioning, starting from version 0.1.0-alpha1. The companion R package and the Documentation (this site) should follow a similar versioning scheme. When changing version, a release tag must be created with the old version.
- All variables and functions should be named in English, with entities and fields related to the database being named in the singular form. All tables (where appropriate) should have an “id” column, and foreign keys should reference the base table with “_id” suffix, except in cases of self-joins (such as “taxon.parent_id”) or polymorphic foreign keys. The id of each table has type INT and should be autoincrementing.
- Use laravel migration class to add any modification to the database structure. Migration should include, if apply, management of existing data.
- Use camelCase for methods (i.e. relationships) and snake_case for functions.
- Document the code with comments and create documentation pages if necessary.
- There should be a structure to store which Plugins are installed on a given database and which are the compatible system versions.
- This system uses Laravel Mix to compile the SASS and JavaScript code used. If you add or modify these
npm run prodafter making any change to these files.
Collaborate with the docs
We welcome Tutorials for dealing with specific tasks.
To create a tutorial:
Forkthe documentation repository. When cloning this repository or a fork, include the submodule option to also get the included Docsy theme repository. You will need Hugo to run this site in your localhost.- Create a
branchto commit your modifications or additions - Add your tutorial:
- Create a folder within the
contents/{lang}/docs/Tutorialsusing kebab-case for the folder name. Ex.first-tutorial - You may create a tutorial in single language, or on multiple languages. Just place it in the correct folder
- Within the created folder, create a file named
_index.mdand create the markdown content with your tutorial. - You may start copying the content of an existing tutorial.
- When happy with results, make a pull request to ask the project maintainer to review your contribution and merge it to the repository. Consult GitLab Help for more information on using pull requests.
Collaborate with translations
You may help with translations for the web-interface or the documentation site. If want to have a new language for your installation, share your translation, creating a pull request with the new files.
New language for the web-interface:
- fork and create a branch for the main repository
- create a folder for the new language using the ISO 639-1 Code within the
resources/langfoldercd opendatabio cd resources/lang cp en es - translate all the values for all the variables within all the files in the new folder (may use google translation to start, just make sure variable names are not translated, otherwise, it will not work)
- add language to array in
config/languages.php - add language to database language table creating a laravel migration
- make a pull request
New language for the documentation site
- fork and create a branch for the documentation repository
- create a folder for the new language using the ISO 639-1 Code within the
contentfoldercd opendatabio.gitlab.io cd contents cp pt es - check all files within the folder and translate where needed (may use google translation to start, just make sure to translate only what can be translated)
- push to your branch and make a pull request to the main repository
Polymorphic relations
Some of the foreign relations within OpenDataBio are mapped using Polymorphic relations. These are indicated in a model by having a field ending in _id and a field ending in _type. For instance, all Core-Objects may have Measurements, and these relationships are established in the Measurements table by the measured_id and the measured_type columns, the first storing the related model unique id, the second the measured model class in strings like ‘App\Models\Individual’, ‘App\Models\Voucher’, ‘App\Models\Taxon’, ‘App\Models\Location’.
Data model images
Most figures for explaining the data model were generated using Laravel ER Diagram Generator, which allows to show all the methods implemented in each Class or Model and not only the table direct links:
To generate these figures a custom php artisan command was generated. These command is defined in file app/Console/Commands/GenerateOdbErds.php.
To update the figures follow the following steps:
- Figures are configure in the
config/erd-generator-odb.phpfile. There are many additional options for customizing the figures by changing or adding graphviz variables to theconfig/erd-generator-base.phpfile. - The custom command is
php artisan odb:erd {$model}, where model is the key of the arrays inconfig/erd-generator-odb.php, or the word “all”, to regenerate all doc figures.
cd opendatabio
make ssh
php artisan odb:erd all
- Figures will be saved in
storage/app/public/dev-imgs - Copy the new images to the documentation site. They need to be placed within
contents/{lang}/concepts/{subfolder}for all languages and in the respective sub-folders.
6 - Tutorials
Find here working examples of using OpenDataBio through the web-interface or through the OpenDataBio R package. See Contribution guidelines if you want to contribute with a tutorial.
6.1 - Getting data with OpenDataBio-R
The Opendatabio-R package was created to allow users to interact with an OpenDataBio server, to both obtain (GET) data or to import (POST) data into the database. This tutorial is a basic example of how to get data.
Set up the connection
- Set up the connection to the OpenDataBio server using the
odb_config()function. The most important parameters for this function arebase_url, which should point to the API url for your OpenDataBio server, andtoken, which is the access token used to authenticate your user. - The
tokenis only need to get data from datasets that have one of the restricted access policies. Data from datasets of public access can be extracted without the token specification. - Your token is avaliable in your profile in the web interface
library(opendatabio)
base_url="https://opendb.inpa.gov.br/api"
token ="GZ1iXcmRvIFQ"
cfg = odb_config(base_url=base_url, token = token)
More advanced configuration involves setting a specific API version, a custom User Agent, or other HTTP headers, but this is not covered here.
Test your connection
The function odb_test() may be used to check if the connection was successful, and whether
your user was correctly identified:
odb_test(cfg)
#will output
Host: https://opendb.inpa.gov.br/api/v0
Versions: server 0.9.1-alpha1 api v0
$message
[1] "Success!"

$user
[1] "admin@example.org"
As an alternative, you can specify these parameters as systems variables. Before starting R, set this up on your shell (or add this to the end of your .bashrc file):
export ODB_TOKEN="YourToken"
export ODB_BASE_URL="https://opendb.inpa.gov.br/api"
export ODB_API_VERSION="v0"
GET Data
Check the GET API Quick-Reference for a full list of endpoints and request parameters.
For data of public access the token is optional. Below two examples for the Locations and Taxons endpoints. Follow a similar reasoning for using the remaining endpoints. See the package help in R for all available odb_get_{endpoint} functions.
Getting Taxon names
See GET API Taxon Endpoint request parameters and a list of response fields.
base_url="https://opendb.inpa.gov.br/api"
cfg = odb_config(base_url=base_url)
#get id for a taxon
mag.id = odb_get_taxons(params=list(name='Magnoliidae',fields='id,name'),odb_cfg = cfg)
#use this id to get all descendants of this taxon
odb_taxons = odb_get_taxons(params=list(root=mag.id$id,fields='id,scientificName,taxonRank,parent_id,parentName'),odb_cfg = cfg)
head(odb_taxons)
If the server used the seed data provided and the default language is portuguese, the result will be:
  id scientificName taxonRank parent_id  parentName
1 25    Magnoliidae     Clado        20 Angiosperms
2 43     Canellales     Ordem        25 Magnoliidae
3 62       Laurales     Ordem        25 Magnoliidae
4 65    Magnoliales     Ordem        25 Magnoliidae
5 74      Piperales     Ordem        25 Magnoliidae
6 93  Chloranthales     Ordem        25 Magnoliidae
Getting Locations
See GET API Location Endpoint request parameters and a list of response fields.
Get some fields listing all Conservation Units (adm_level==99) registered in the server:
base_url="https://opendb.inpa.gov.br/api"
cfg = odb_config(base_url=base_url)
odblocais = odb_get_locations(params = list(fields='id,name,parent_id,parentName',adm_level=99),odb_cfg = cfg)
head(odblocais)
If the server used the seed data provided and the default language is portuguese, the result will be:
id                                                           name
1 5628                              Estação Ecológica Mico-Leão-Preto
2 5698          Área de Relevante Interesse Ecológico Ilha do Ameixal
3 5700 Área de Relevante Interesse Ecológico da Mata de Santa Genebra
4 5703     Área de Relevante Interesse Ecológico Buriti de Vassununga
5 5707                                Reserva Extrativista do Mandira
6 5728                                   Floresta Nacional de Ipanema
parent_id parentName
1         6  São Paulo
2         6  São Paulo
3         6  São Paulo
4         6  São Paulo
5         6  São Paulo
6         6  São Paulo
Get the plots imported in the import locations tutorial.
To obtain a spatial object in R, use the readWKT function of the rgeos package.
library(rgeos)
library(opendatabio)
base_url="https://opendb.inpa.gov.br/api"
cfg = odb_config(base_url=base_url)

locais = odb_get_locations(params=list(adm_level=100),odb_cfg = cfg)
locais[,c('id','locationName','parentName')]
colnames(locais)
for(i in 1:nrow(locais)) {
  geom = readWKT(locais$footprintWKT[i])
  if (i==1) {
    plot(geom,main=locais$locationName[i],cex.main=0.8)
    axis(side=1,cex.axis=0.5)
    axis(side=2,cex.axis=0.5,las=2)
  } else {
    plot(geom,main=locais$locationName[i],add=T,col='red')
  }
}
Figure generated:
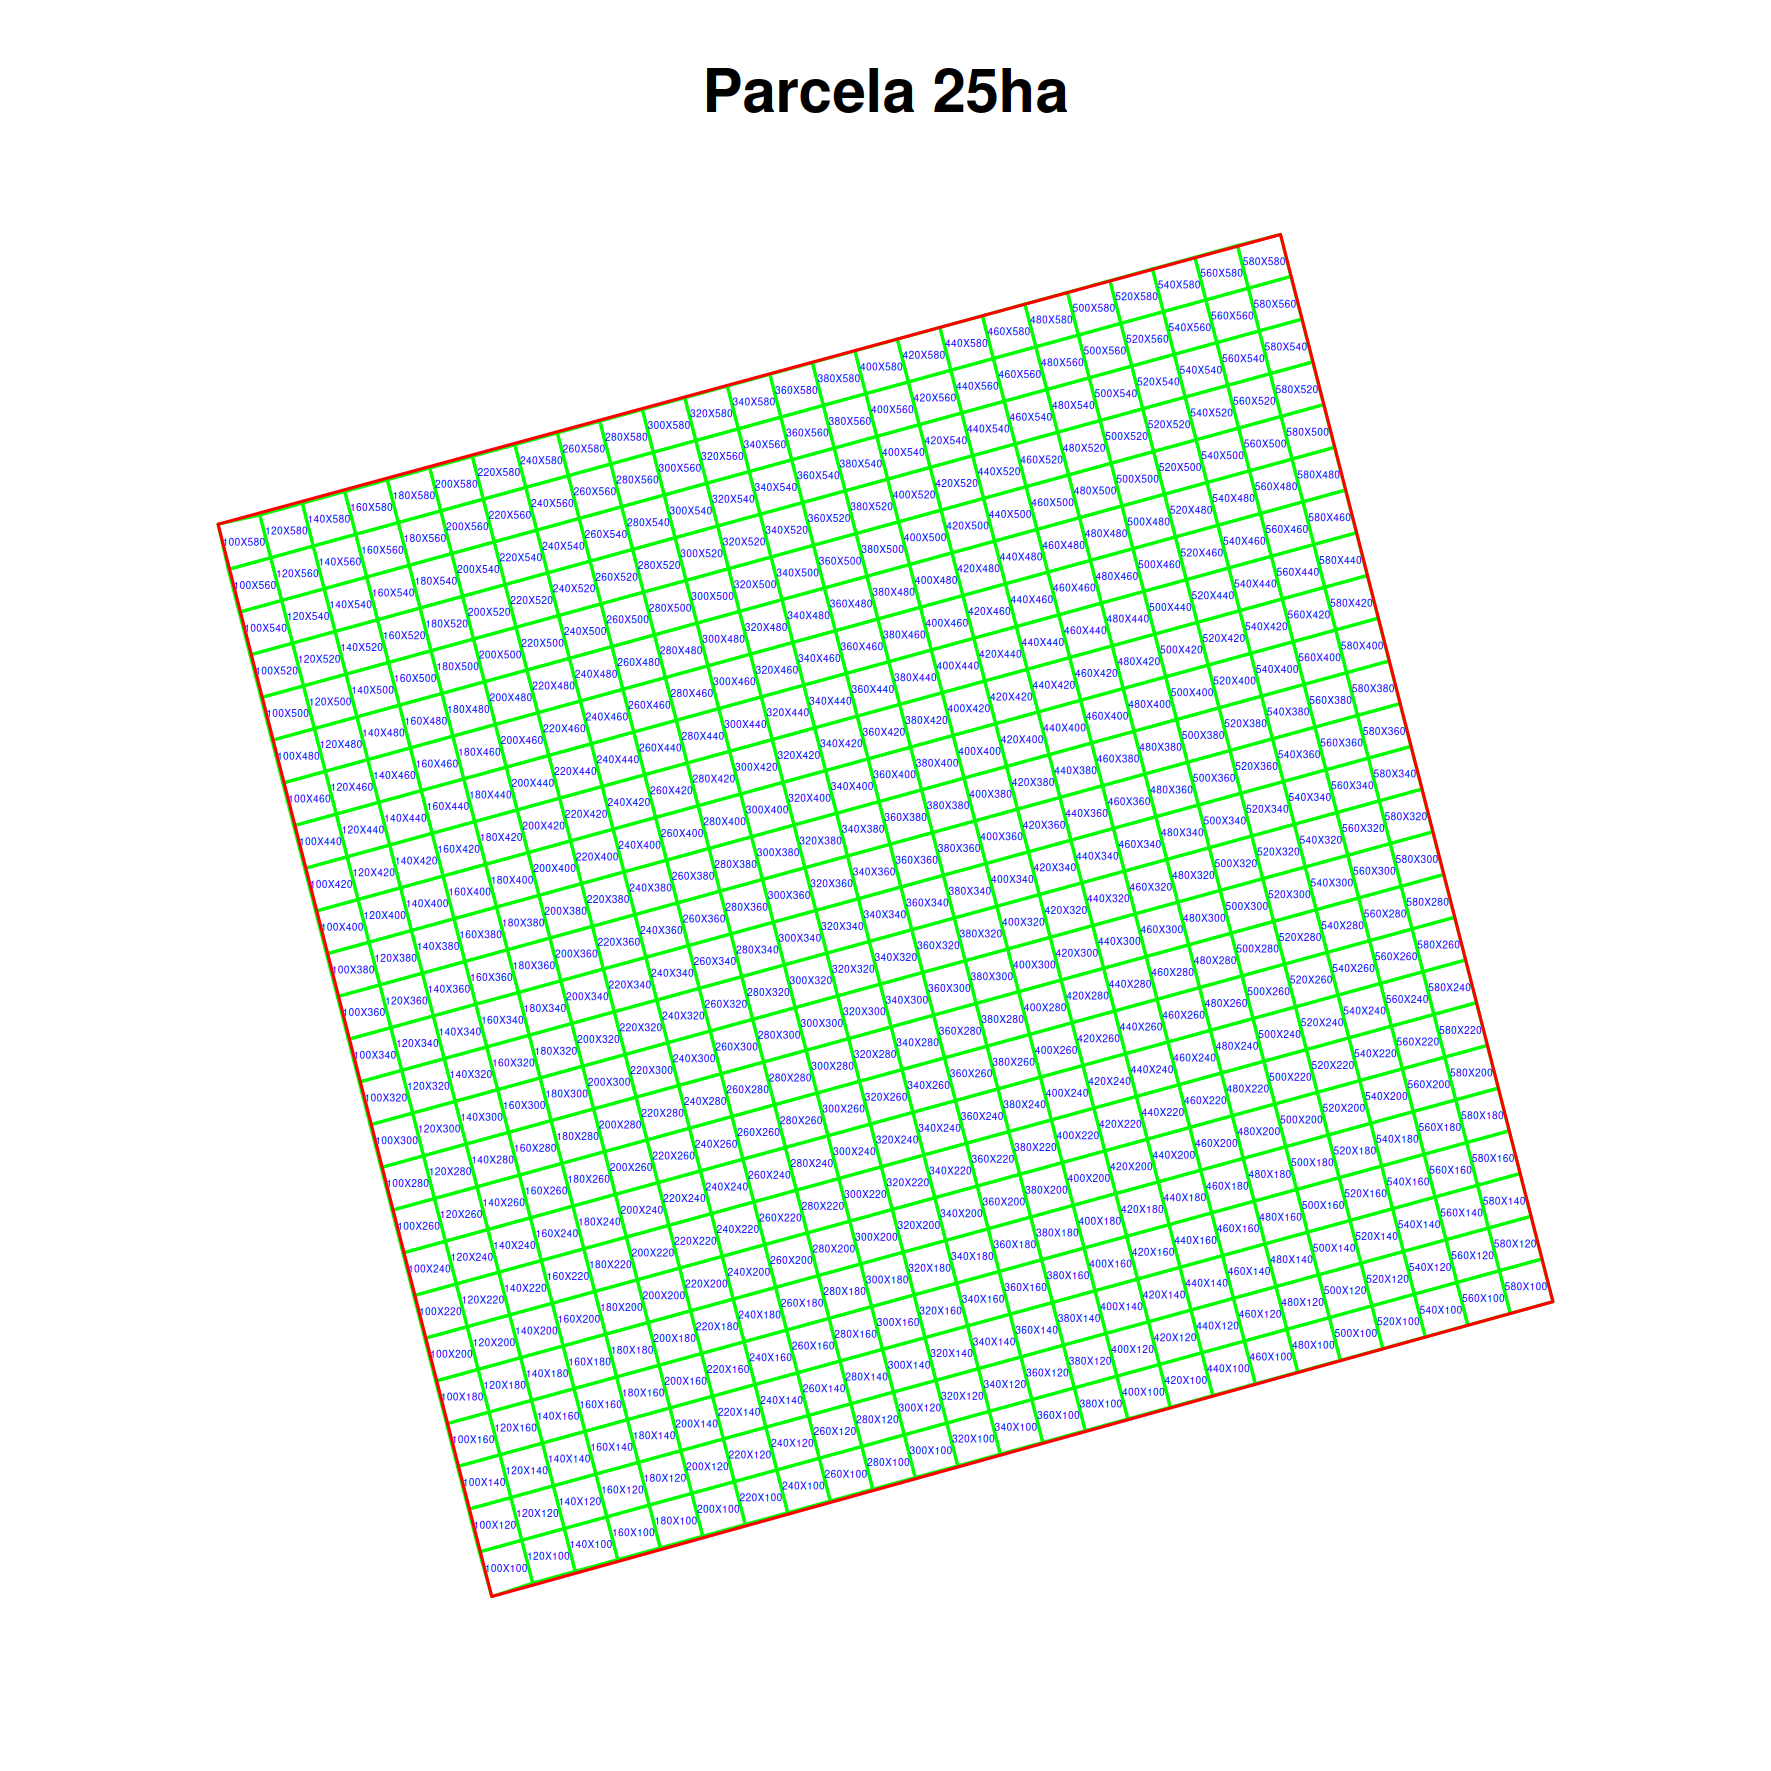
6.2 - Import data with R
The Opendatabio-R package was created to allow users to interact with an OpenDataBio server, to both obtain (GET) data or to import (POST) data into the database. This tutorial is a basic example of how to import data.
Set up the connection
- Set up the connection to the OpenDataBio server using the
odb_config()function. The most important parameters for this function arebase_url, which should point to the API url for your OpenDataBio server, andtoken, which is the access token used to authenticate your user. - The
tokenis mandatory to import data. - Your token is avaliable in your profile in the web interface
library(opendatabio)
base_url="https://opendb.inpa.gov.br/api"
token ="GZ1iXcmRvIFQ"
#create a config object
cfg = odb_config(base_url=base_url, token = token)
#test connection
odb_test(cfg)
Importing data (POST API)
Check the API Quick-Reference for a full list of POST endpoints and link to details.
OpenDataBio-R import functions
All import functions have the same signature: the first argument is a data.frame with data to be imported, and the second parameter is a configuration object generated by odb_config.
When writing an import request, check the POST API docs in order to understand which columns can be declared in the data.frame.
All import functions return a job id, which can be used to check if the job is still running, if it ended with success or if it encountered an error. This job id can be used in the functions odb_get_jobs(), odb_get_affected_ids() and odb_get_log(), to find details about the job, which (if any) were the IDs of the successfully imported objects, and the full log of the job. You may also see the log in your user jobs list in the web interface.
Attention
Order is Important - correctly importing data may depend on already registered records. For example, importing an Individual with a Taxon identity requires the taxon name registered in the database, so you would first validate your taxon list using the GET API and then import the records for the Individuals.Working with dates and incomplete dates
For Individuals, Vouchers and Identifications you may use incomplete dates.
The date format used in OpenDataBio is YYY-MM-DD (year - month - day), so a valid entry would be 2018-05-28.
Particularly in historical data, the exact day (or month) may not be known, so you can substitute this fields with NA: ‘1979-05-NA’ means “an unknown day, in May 1979”, and ‘1979-NA-NA’ means “unknown day and month, 1979”. You may not add a date for which you have only the day, but can if you have only the month if is actually meaningful in some way.
6.2.1 - Import Locations
OpenDataBio is distributed with a seed location dataset for Brazil, which includes state, municipality, federal conservation units, indigenous lands and the major biomes.
Working with spatial data is a very delicate area, so we have attempted to make the workflow for inserting locations as easy as possible.
If you want to upload administrative boundaries for a country, you may also just download a geojson file from OSM-Boundaries and upload it through the web interface directly. Or use the GADM repository exemplified below.
Importation is straightforward, but the main issues to keep in mind:
- OpenDataBio stores the geometries of locations using Well-known text (WKT) representation.
- Locations are hierarchical, so a location SHOULD lie completely within its parent location. The importation method will try to detect the parent locations based on its geometry. So you do not need to inform a parent. However, sometimes the parent and child locations share a border or have minor differences that prevent to be detected. Therefore, if this importation fail to place the location where you expected, you may update or import informing the correct parent. When you inform the parent a second check will be performed adding a buffer to the parent location, and should solve the issue.
- Country borders can be imported without parent detection or definition, and marine records may be linked to a parent even if they are not contained by the parent polygon. This requires a specific field specification and should be used only in such cases as it is a possible source of misplacement, but give such flexibility)
- Standardize the geometry to a common projection of use in the system. Strongly recommended to use EPSG:4326 WGS84., for standardization;
- Consider, uploading your political administrative polygons before adding specific POINT, PLOTS or TRANSECTS;
- Conservation Units, Indigenous Territories and Environmental layers may be added as locations and will be treated as special case as some of these locations span different administrative locations. So a POINT, PLOT or TRANSECT location may belong to a UC, a TI and many Environmental layers if these are stored in the database. These related locations, like the political parent, are auto-detected from the location geometry.
Check the POST Locations API docs in order to understand which columns can be declared when importing locations.
Adm_level defines the location type
The administrative level (adm_level) of a location is a number:
- 2 for country; 3 to 10 as other as ‘administrative areas’, following OpenStreeMap convention to facilitate external data importation and local translations (TO BE IMPLEMENTED). So, for Brazil, codes are (States=4, Municipalities=8);
- 999 for ‘POINT’ locations like GPS waypoints;
- 101 for transects
- 100 is the code for plots and subplots;
- 99 is the code for Conservation Units
- 98 for Indigenous Territories
- 97 for Environmental polygons (e.g. Floresta Ombrofila Densa, or Bioma Amazônia)
Importing spatial polygons
GADM Administrative boundaries
Administrative boundaries may also be imported without leaving R, getting data from GDAM and using the odb_import* functions
library(raster)
library(opendatabio)

#download GADM administrative areas for a country

#get country codes
crtcodes = getData('ISO3')
bra = crtcodes[crtcodes$NAME%in%"Brazil",]

#define a path where to save the downloaded spatial data
path = "GADMS"
dir.create(path,showWarnings = F)

#the number of admin_levels in each country varies
#get all levels that exists into your computer
runit =T
level = 0
while(runit) {
   ocrt <- try(getData('GADM', country=bra, level=level,path=path),silent=T)
   if (class(ocrt)=="try-error") {
      runit = FALSE
   }
   level = level+1
}

#read downloaded data and format to odb
files = list.files(path, full.name=T)
locations.to.odb = NULL
for(f in 1:length(files)) {
   ocrt <- readRDS(files[f])
   #class(ocrt)
   #convert the SpatialPolygonsDataFrame to OpenDataBio format
   ocrt.odb = opendatabio:::sp_to_df(ocrt)  #only for GADM data
   locations.to.odb = rbind(locations.to.odb,ocrt.odb)
}
#see without geometry
head(locations.to.odb[,-ncol(locations.to.odb)])

#you may add a note to location
locations.to.odb$notes = paste("Source gdam.org via raster::get_data()",Sys.Date())

#adjust the adm_level to fit the OpenStreeMap categories
ff = as.factor(locations.to.odb$adm_level)
(lv = levels(ff))
levels(ff) = c(2,4,8,9)
locations.to.odb$adm_level = as.vector(ff)

library(opendatabio)
base_url="https://opendb.inpa.gov.br/api"
token ="GZ1iXcmRvIFQ"
cfg = odb_config(base_url=base_url, token = token)
odb_import_locations(data=locations.to.odb,odb_cfg=cfg)

#ATTENTION: you may want to check for uniqueness of name+parent rather than just name, as name+parent are unique for locations. You may not save two locations with the same name within the same parent.
A ShapeFile example
library(rgdal)

#read your shape file
path = 'mymaps'
file = 'myshapefile.shp'
layer = gsub(".shp","",file,ignore.case=TRUE)
data = readOGR(dsn=path, layer= layer)

#you may reproject the geometry to standard of your system if needed
data = spTransform(data,CRS=CRS("+proj=longlat +datum=WGS84"))

#convert polygons to WKT geometry representation
library(rgeos)
geom = rgeos::writeWKT(data,byid=TRUE)

#prep import
names = data@data$name  #or the column name of the data
shape.to.odb = data.frame(name=names,geom=geom,stringsAsFactors = F)

#need to add the admin_level of these locations
shape.to.odb$admin_level = 2

#and may add parent and note if your want
library(opendatabio)
base_url="https://opendb.inpa.gov.br/api"
token ="GZ1iXcmRvIFQ"
cfg = odb_config(base_url=base_url, token = token)
odb_import_locations(data=shape.to.odb,odb_cfg=cfg)
Converting data from KML
#read file as SpatialPolygonDataFrame
file = "myfile.kml"
file.exists(file)
mykml = readOGR(file)
geom = rgeos::writeWKT(mykml,byid=TRUE)

#prep import
names = mykml@data$name  #or the column name of the data
to.odb = data.frame(name=names,geom=geom,stringsAsFactors = F)

#need to add the admin_level of these locations
to.odb$admin_level = 2

#and may add parent or any other valid field

#import
library(opendatabio)
base_url="https://opendb.inpa.gov.br/api"
token ="GZ1iXcmRvIFQ"
cfg = odb_config(base_url=base_url, token = token)
odb_import_locations(data=to.odb,odb_cfg=cfg)
Import Plots and Subplots
Plots and Transects are special cases within OpenDataBio:
- They may be defined with a Polygon or LineString geometry, respectively;
- Or they may be registered only as POINT locations. In this case OpenDataBio will create the polygon or linestring geometry for you;
- Dimensions (x and y) are stored in meters
- SubPlots are plot locations having a plot location as a parent, and must also have cartesian positions (startX, startY) within the parent location in addition to dimensions. Cartesian position refer to X and Y positions within parent plot and hence MUST be smaller than parent X and Y. And the same is true for Individuals within plots or subplots when they have their own X and Y cartesian coordinates.
- SubPlot is the only location that may be registered without a geographical coordinate or geometry, which will be calculated from the parent plot geometry using the startx and starty values.
Plot and subplot example 01
You need at least a single point geographical coordinate for a location of type PLOT. Geometry (or lat and long) cannot be empty.
#geometry of a plot in Manaus
southWestCorner = c(-59.987747, -3.095764)
northWestCorner = c(-59.987747, -3.094822)
northEastCorner = c(-59.986835,-3.094822)
southEastCorner = c(-59.986835,-3.095764)
geom = rbind(southWestCorner,northWestCorner,northEastCorner,southEastCorner)
library(sp)
geom = Polygon(geom)
geom = Polygons(list(geom), ID = 1)
geom = SpatialPolygons(list(geom))
library(rgeos)
geom = writeWKT(geom)
to.odb = data.frame(name='A 1ha example plot',x=100,y=100,notes='a fake plot',geom=geom, adm_level = 100,stringsAsFactors=F)
library(opendatabio)
base_url="https://opendb.inpa.gov.br/api"
token ="GZ1iXcmRvIFQ"
cfg = odb_config(base_url=base_url, token = token)
odb_import_locations(data=to.odb,odb_cfg=cfg)
Wait a few seconds, and then import subplots to this plot.
#import 20x20m subplots to the plot above without indicating a geometry.
#SubPlot is the only location type that does not require the specification of a geometry or coordinates,
#but it requires specification of startx and starty relative position coordinates within parent plot
#OpenDataBio will use subplot position values to calculate its geographical coordinates based on parent geometry
(parent = odb_get_locations(params = list(name='A 1ha example plot',fields='id,name',adm_level=100),odb_cfg = cfg))
sub1 = data.frame(name='sub plot 40x40',parent=parent$id,x=20,y=20,adm_level=100,startx=40,starty=40,stringsAsFactors=F)
sub2 = data.frame(name='sub plot 0x0',parent=parent$id,x=20,y=20,adm_level=100,startx=0,starty=0,stringsAsFactors=F)
sub3 = data.frame(name='sub plot 80x80',parent=parent$id,x=20,y=20,adm_level=100,startx=80,starty=80,stringsAsFactors=F)
dt = rbind(sub1,sub2,sub3)
#import
odb_import_locations(data=dt,odb_cfg=cfg)
Screen captures of imported plots
Below screen captures for the locations imported with the code above
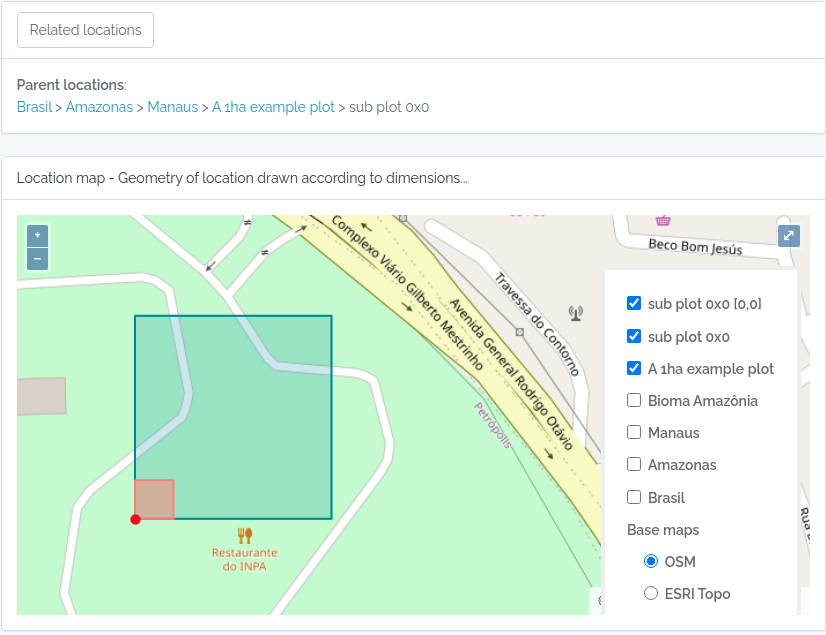
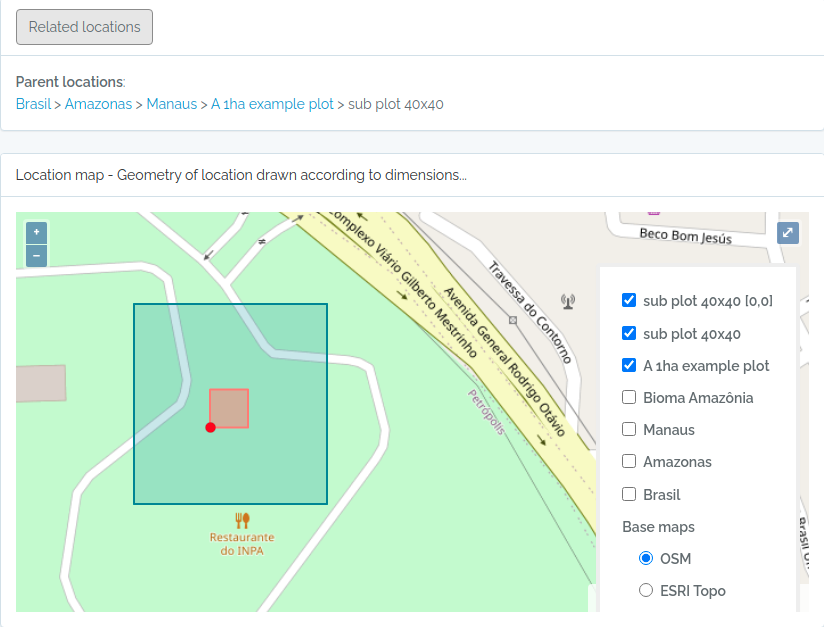
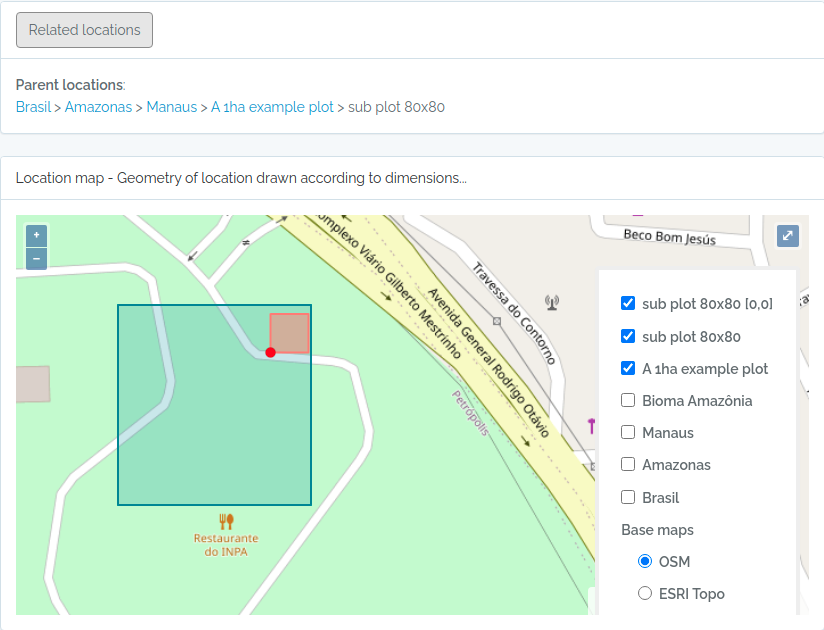
Plot and subplot example 02
Import a plot and subplots having only:
- a single point coordinate
- an azimuth or angle of the plot direction
library(opendatabio)
base_url="https://opendb.inpa.gov.br/api"
token ="GZ1iXcmRvIFQ"
cfg = odb_config(base_url=base_url, token = token)


#the plot
geom = "POINT(-59.973841 -2.929822)"
to.odb = data.frame(name='Example Point PLOT',x=100, y=100, azimuth=45,notes='OpenDataBio point plot example',geom=geom, adm_level = 100,stringsAsFactors=F)
odb_import_locations(data=to.odb,odb_cfg=cfg)

#define 20x20 subplots cartesian coordinates
x = seq(0,80,by=20)
xx = rep(x,length(x))
yy = rep(x,each=length(x))
names = paste(xx,yy,sep="x")

#import these subplots without having a geometry, but specifying the parent plot location
parent = odb_get_locations(params = list(name='Example Point PLOT',adm_level=100),odb_cfg = cfg)
to.odb = data.frame(name=names,startx=xx,starty=yy,x=20,y=20,notes="OpenDataBio 20x20 subplots example",adm_level=100,parent=parent$id)
odb_import_locations(data=to.odb,odb_cfg=cfg)

#get the imported plot locations and plot them using the root parameter
locais = odb_get_locations(params=list(root=parent$id),odb_cfg = cfg)
locais[,c('id','locationName','parentName')]
colnames(locais)
for(i in 1:nrow(locais)) {
  geom = readWKT(locais$footprintWKT[i])
  if (i==1) {
    plot(geom,main=locais$locationName[i],cex.main=0.8,col='yellow')
    axis(side=1,cex.axis=0.7)
    axis(side=2,cex.axis=0.7,las=2)
  } else {
    plot(geom,add=T,border='red')
  }
}
The figure generated above:
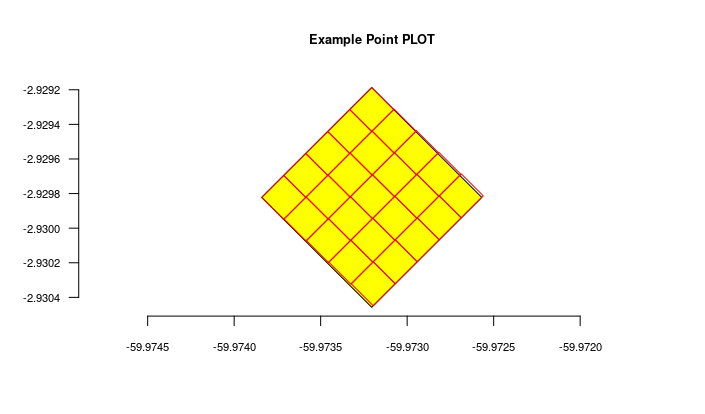
Import transects
This code will import two transects, when defined by a LINESTRING geometry, the other only by a point geometry. See figures below for the imported result
#geometry of transect in Manaus

#read trail from a kml file
  #library(rgdal)
  #file = "acariquara.kml"
  #file.exists(file)
  #mykml = readOGR(file)
  #library(rgeos)
  #geom = rgeos::writeWKT(mykml,byid=TRUE)

#above will output:
geom = "LINESTRING (-59.9616459699999993 -3.0803612500000002, -59.9617394400000023 -3.0805952900000002, -59.9618530300000003 -3.0807376099999999, -59.9621049400000032 -3.0808563200000001, -59.9621949100000009 -3.0809758500000002, -59.9621587999999974 -3.0812666800000001, -59.9621092399999966 -3.0815010400000000, -59.9620656999999966 -3.0816403499999998, -59.9620170600000009 -3.0818584699999998, -59.9620740699999999 -3.0819864099999998)";

#prep data frame
#the y value refer to a buffer in meters applied to the trail
#y is used to validate the insertion of related individuals
to.odb = data.frame(name='A trail-transect example',y=20, notes='OpenDataBio transect example',geom=geom, adm_level = 101,stringsAsFactors=F)

#import
library(opendatabio)
base_url="https://opendb.inpa.gov.br/api"
token ="GZ1iXcmRvIFQ"
cfg = odb_config(base_url=base_url, token = token)
odb_import_locations(data=to.odb,odb_cfg=cfg)

#NOW IMPORT A SECOND TRANSECT WITHOUT POINT GEOMETRY
#then you need to inform the x value, which is the transect length
#ODB will map this transect oriented by the azimuth paramater (south in the example below)
#point geometry = start point
geom = "POINT(-59.973841 -2.929822)"
to.odb = data.frame(name='A transect point geometry',x=300, y=20, azimuth=180,notes='OpenDataBio point transect example',geom=geom, adm_level = 101,stringsAsFactors=F)
odb_import_locations(data=to.odb,odb_cfg=cfg)

locais = odb_get_locations(params=list(adm_level=101),odb_cfg = cfg)
locais[,c('id','locationName','parentName','levelName')]
The code above will result in the following two locations:
![]()
![]()
6.2.2 - Import Taxons
Attention
- For a successful importation of published names, you just need to provide a
nameattribute, being the fullname for species and infraspecies (e.g. Licaria canella tenuicarpa, Ocotea delicata), same form asGBIF's canonicalName, i.e. do not include infraspecific ranks; - No need to import parent taxons for published names, OpenDataBio does that for you. The import process will use the
nameyou informed to retrieve taxon info from a nomenclature repository: currently Tropicos, GBIF BackBone Taxonomy and ZOOBANK. A fuzzy search will be performed on the GBIF service if needed. If the taxon name is found, it will automatically get the needed information and also all parent taxa (or accepted names if its tagged as a synonym) as needed and will store in the database for you. If your name is invalid, i.e. it is a synonym of a another name, it will be imported but tagged as invalid. - If you inform
parentand it is different from the one detected by the API the informed parent has preference. - For unpublished species
level,parent, and apersonorauthor_idmust also be provided; - The external API will use a fuzzy query while searching GBIF if it does not find an exact match, allowing to detect even when misspelled. However, spelling errors in names may prevent a taxon from being stored.
- Taxonomy is hierarchical and the structure within the OpenDataBio may be treelike. So, you may add, if you want, any node of the tree of life into the Taxon table. For these you need to use the
Cladetaxon level. But note, this may not be relevant if you are not going link data to such clade names. - Because the nomenclature check is time consuming, be patient.
OpenDataBio is distributed with a Taxon seed table, that include the root of all kingdoms and some high-level nodes for Plants, i.e. the APWeb Order level tree for Angiosperms.
A simple published name example
The scripts below were tested on top of the OpenDataBio Seed Taxon table, which contains only down to the order level for Angiosperms.
In the taxons table, families Moraceae, Lauraceae and Solanaceae were not yet registered:
library(opendatabio)
base_url="https://opendb.inpa.gov.br/api"
cfg = odb_config(base_url=base_url)
exists = odb_get_taxons(params=list(root="Moraceae,Lauraceae,Solanaceae"),odb_cfg=cfg)
Returned:
data frame with 0 columns and 0 rows
Now import some species and one infraspecies for the families above, specifying their fullname (canonicalName):
library(opendatabio)
base_url="https://opendb.inpa.gov.br/api"
token ="GZ1iXcmRvIFQ"
cfg = odb_config(base_url=base_url, token = token)
spp = c("Ficus schultesii", "Ocotea guianensis","Duckeodendron cestroides","Licaria canella tenuicarpa")
splist = data.frame(name=spp)
odb_import_taxons(splist, odb_cfg=cfg)
Now check with the same code for taxons under those children:
library(opendatabio)
base_url="https://opendb.inpa.gov.br/api"
cfg = odb_config(base_url=base_url)
exists = odb_get_taxons(params=list(root="Moraceae,Lauraceae,Chrysobalanaceae"),odb_cfg=cfg)
head(exists[,c('id','scientificName', 'taxonRank','taxonomicStatus','parentNameUsage')])
Which will return:
id                    scientificName  taxonRank taxonomicStatus      parentName
1  252                          Moraceae     Family        accepted         Rosales
2  253                             Ficus      Genus        accepted        Moraceae
3  254                  Ficus schultesii    Species        accepted           Ficus
4  258                        Solanaceae     Family        accepted       Solanales
5  259                     Duckeodendron      Genus        accepted      Solanaceae
6  260          Duckeodendron cestroides    Species        accepted   Duckeodendron
7  255                         Lauraceae     Family        accepted        Laurales
8  256                            Ocotea      Genus        accepted       Lauraceae
9  257                 Ocotea guianensis    Species        accepted          Ocotea
10 261                           Licaria      Genus        accepted       Lauraceae
11 262                   Licaria canella    Species        accepted         Licaria
12 263 Licaria canella subsp. tenuicarpa Subspecies        accepted Licaria canella
Note that although we specified only the species and infraspecies names, the API imported also all the needed parent hierarchy up to family, because orders where already registered.
An invalid published name example
The name Licania octandra pallida (Chrysobalanaceae) has been recently turned into a synonym of Leptobalanus octandrus pallidus.
The script below exemplify what happens in such cases.
library(opendatabio)
base_url="https://opendb.inpa.gov.br/api"
token ="GZ1iXcmRvIFQ"
cfg = odb_config(base_url=base_url, token = token)

#lets check
exists = odb_get_taxons(params=list(root="Chrysobalanaceae"),odb_cfg=cfg)
exists
#in this test returns an empty data frame
#data frame with 0 columns and 0 rows

#now import
spp = c("Licania octandra pallida")
splist = data.frame(name=spp)
odb_import_taxons(splist, odb_cfg=cfg)

#see the results
exists = odb_get_taxons(params=list(root="Chrysobalanaceae"),odb_cfg=cfg)
exists[,c('id','scientificName', 'taxonRank','taxonomicStatus','parentName')]
Which will return:
id                         scientificName  taxonRank taxonomicStatus             parentName
1 264                       Chrysobalanaceae     Family        accepted           Malpighiales
2 265                           Leptobalanus      Genus        accepted       Chrysobalanaceae
3 267                 Leptobalanus octandrus    Species        accepted           Leptobalanus
4 269 Leptobalanus octandrus subsp. pallidus Subspecies        accepted Leptobalanus octandrus
5 266                                Licania      Genus        accepted       Chrysobalanaceae
6 268                       Licania octandra    Species         invalid                Licania
7 270        Licania octandra subsp. pallida Subspecies         invalid       Licania octandra
Note that although we specified only one infraspecies name, the API imported also all the needed parent hierarchy up to family, and because the name is invalid it also imported the acceptedName for this infraspecies and its parents.
An unpublished species or morphotype
It is common to have unpublished local species names (morphotypes) for plants in plots, or yet to be published taxonomic work. Unpublished designation are project specific and therefore MUST also provide an author as different projects may use the same ‘sp.1’ or ‘sp.A’ code for their unpublished taxons.
You may link an unpublished name as any taxon level and do not need to use genus+species logic to assign a morphotype for which the genus or upper level taxonomy is undefined. For example, you may store a ‘species’ level with name ‘Indet sp.1’ and parent_name ‘Laurales’, if the lowest level formal determination you have is the order level. In this example, there is no need to store a Indet genus and Indet family taxons just to account for this unidentified morphotype.
##assign an unpublished name for which you only know belongs to the Angiosperms and you have this node in the Taxon table already
library(opendatabio)
base_url="https://opendb.inpa.gov.br/api"
cfg = odb_config(base_url=base_url)

#check that angiosperms exist
odb_get_taxons(params=list(name='Angiosperms'),odb_cfg = cfg)

#if it is there, start creating a data.frame to import
to.odb = data.frame(name='Morphotype sp.1', parent='Angiosperms', stringsAsFactors=F)

#get species level numeric code
to.odb$level=odb_taxonLevelCodes('species')

#you must provide an author that is a Person in the Person table. Get from server
odb.persons = odb_get_persons(params=list(search='João Batista da Silva'),odb_cfg=cfg)
#found
head(odb.persons)

#add the author_id to the data.frame
#NOTE it is not author, but author_id or person)
#this makes odb understand it is an unpublished name
to.odb$author_id = odb.persons$id

#import
token ="GZ1iXcmRvIFQ" #this must be your token not this value
cfg = odb_config(base_url=base_url, token = token)
odb_import_taxons(to.odb,odb_cfg = cfg)
Check the imported record:
exists = odb_get_taxons(params=list(name='Morphotype sp.1'),odb_cfg = cfg)
exists[,c('id','scientificName', 'taxonRank','taxonomicStatus','parentName','scientificNameAuthorship')]
Some columns for the imported record:
id  scientificName taxonRank taxonomicStatus  parentName              scientificNameAuthorship
1 276 Morphotype sp.1   Species     unpublished Angiosperms João Batista da Silva - Silva, J.B.D.
Import a published clade
You may add a clade Taxon and may reference its publication using the bibkey entry. So, it is possible to actually store all relevant nodes of any phylogeny in the Taxon hierarchy.
#parent must be stored already
odb_get_taxons(params=list(name='Pagamea'),odb_cfg = cfg)

#define clade Taxon
to.odb = data.frame(name='Guianensis core', parent_name='Pagamea', stringsAsFactors=F)
to.odb$level = odb_taxonLevelCodes('clade')

#add a reference to the publication where it is published
#import bib reference to database beforehand
odb_get_bibreferences(params(bibkey='prataetal2018'),odb_cfg=cfg)
to.odb$bibkey = 'prataetal2018'

#then add valid species names as children of this clade instead of the genus level
children = data.frame(name = c('Pagamea guianensis','Pagamea angustifolia','Pagamea puberula'),stringsAsFactors=F)
children$parent_name = 'Guianensis core'
children$level = odb_taxonLevelCodes('species')
children$bibkey = NA

#merge
to.odb = rbind(to.odb,children)

#import
odb_import_taxons(to.odb,odb_cfg = cfg)
6.2.3 - Import Persons
Check the POST Persons API docs in order to understand which columns can be declared when importing Persons.
It is recommended you use the web interface, as it will warn you in case the person you want to register has a similar, likely the same, person already registered. The API will only check for identical Abbreviations, which is the single restriction of the Person class. Abbreviations are unique and duplications are not allowed. This does not prevent data downloaded from repositories to have different abbreviations or full name for the same person. So, you should standardize secondary data before importing into the server to minimize such common errors.
library(opendatabio)
base_url="https://opendb.inpa.gov.br/api"
token ="GZ1iXcmRvIFQ"
cfg = odb_config(base_url=base_url, token = token)

one = data.frame(full_name='Adolpho Ducke',abbreviation='DUCKE, A.',notes='Grande botânico da Amazônia',stringsAsFactors = F)
two = data.frame(full_name='Michael John Gilbert Hopkins',abbreviation='HOPKINKS, M.J.G.',notes='Curador herbário INPA',stringsAsFactors = F)
to.odb= rbind(one,two)
odb_import_persons(to.odb,odb_cfg=cfg)

#may also add an email entry if you have one
Get the data
library(opendatabio)
base_url="https://opendb.inpa.gov.br/api"
cfg = odb_config(base_url=base_url)
persons = odb_get_persons(odb_cfg=cfg)
persons = persons[order(persons$id,decreasing = T),]
head(persons,2)
Will output:
id                    full_name     abbreviation email institution                       notes
613 1582 Michael John Gilbert Hopkins HOPKINKS, M.J.G.  <NA>          NA       Curador herbário INPA
373 1581                Adolpho Ducke        DUCKE, A.  <NA>          NA Grande botânico da Amazônia
6.2.4 - Import Traits
Attention
- Strongly recommended you use the web interface to enter traits one by one. Use batch imports only if you have too many.
- Before importing any trait, make sure the variable is not already registered in the system with a different name. Preventing duplication is important as the Trait class is shared among all users of an OpenDataBio installation. This also means that once a trait is used for Measurements, you may only alter the trait’s definition, for example, a category name, if you were the only user entering measurements for the trait. Otherwise, somebody else used that definition and you will not be able to alter it.
- Export_name must be unique in a single ODB installation. This name is used when exporting data and on forms, and you should consider making it as short and informative (of definition) as possible. Also, API will validate the export name - must be camelCase, PascalCase or snake_case, and you cannot add spaces or any special character (accents). Ex. ‘dbh’,‘dbhPom’, ’leafLength’, ‘LeafLength’ or ’leaf_length’, respectively.
Traits can be imported using odb_import_traits().
Read carefully the Traits POST API.
Traits types
See odb_traitTypeCodes() for possible trait types.
Trait name and categories User translations
Fields name and description could be one of following:
- using the Language code as keys:
list("en" = "Diameter at Breast Height","pt-br" ="Diâmetro a Altura do Peito") - or using the Language names as keys:
list("English" ="Diameter at Breast Height","Portuguese" ="Diâmetro a Altura do Peito").
Field categories must include for each category+rank+lang the following fields: lang=mixed - required, the id, code or name of the language of the translationname=string - required, the translated category name required (name+rank+lang must be unique)rank=number - required, rank is important to indicate the same category across languages, and defines ordinal traits;description=string - optional for categories, a definition of the category.
This may be formatted as a data.frame and placed in the categories column of another data.frame:
data.frame(
  rbind(
    c("lang"="en","rank"=1,"name"="small","description"="smaller than 1 cm"),
    c("lang"="pt-br","rank"=1,"name"="pequeno","description"="menor que 1 cm"),
    c("lang"="en","rank"=2,"name"="big","description"="bigger than 10 cm"),
    c("lang"="pt-br","rank"=2,"name"="grande","description"="maior que 10 cm")
  ),
  stringsAsFactors=FALSE
)
Quantitative trait example
For quantitative traits for either integers or real values (types 0 or 1).
odb_traitTypeCodes()

library(opendatabio)
base_url="https://opendb.inpa.gov.br/api"
token ="GZ1iXcmRvIFQ" #this must be your token not this value
cfg = odb_config(base_url=base_url, token = token)

#do this first to build a correct data.frame as it will include translations list
to.odb = data.frame(type=1,export_name = "dbh", unit='centimeters',stringsAsFactors = F)

#add translations (note double list)
#format is language_id = translation (and the column be a list with the translation lists)
to.odb$name[[1]]= list('1' = 'Diameter at breast height', '2' = 'Diâmetro à altura do peito')
to.odb$description[[1]]= list('1' = 'Stem diameter measured at 1.3m height','2' = 'Diâmetro do tronco medido à 1.3m de altura')

#measurement validations
to.odb$range_min = 10  #this will restrict the minimum measurement value allowed in the trait
to.odb$range_max = 400 #this will restrict the maximum value

#measurements can be linked to (classes concatenated by , or a list)
to.odb$objects = "Individual,Voucher,Taxon"  #makes no sense link such measurements to Locations

to.odb$notes = 'this is quantitative trait example'

#import
odb_import_traits(to.odb,odb_cfg=cfg)
Categorical trait example
- Must include categories. The only difference between ordinal and categorical traits is that ordinal categories will have a rank and the rank will be inferred from the order the categories are informed during importation. Note that ordinal traits are semi-quantitative and so, if you have categories ask yourself whether they are not really ordinal and register accordingly.
- Like the Trait name and description, categories may also have different language translations, and you SHOULD enter the translations for the languages available (
odb_get_languages()) in the server, so the Trait will be accessible in all languages. English is mandatory, so at least the English name must be informed. Categories may have a description associated, but sometimes the category name is self explanatory, so descriptions of categories are not mandatory.
odb_traitTypeCodes()

library(opendatabio)
base_url="https://opendb.inpa.gov.br/api"
token ="GZ1iXcmRvIFQ" #this must be your token not this value
cfg = odb_config(base_url=base_url, token = token)

#do this first to build a correct data.frame as it will include translations list

#do this first to build a correct data.frame as it will include translations list
to.odb = data.frame(type=3,export_name = "specimenFertility", stringsAsFactors = F)

#trait name and description
to.odb$name =  data.frame("en"="Specimen Fertility","pt-br"="Fertilidade do especímene",stringsAsFactors=F)
to.odb$description =  data.frame("en"="Kind of reproductive stage of a collected plant","pt-br"="Estágio reprodutivo de uma amostra de planta coletada",stringsAsFactors=F)

#categories (if your trait is ORDINAL, the add categories in the wanted order here)
categories = data.frame(
  rbind(
    c('en',1,"Sterile"),
    c('pt-br',1,"Estéril"),
    c('en',2,"Flowers"),
    c('pt-br',2,"Flores"),
    c('en',3,"Fruits"),
    c('pt-br',3,"Frutos"),
    c('en',4,"Flower buds"),
    c('pt-br',4,"Botões florais")
  ),
  stringsAsFactors =FALSE
)
colnames(categories) = c("lang","rank","name")

#descriptions not included for categories as they are obvious,
# but you may add a 'description' column to the categories data.frame

#objects for which the trait may be used for
to.odb$objects = "Individual,Voucher"

to.odb$notes = 'a fake note for a multiselection categorical trait'
to.odb$categories = list(categories)

#import
odb_import_traits(to.odb,odb_cfg=cfg)
Link type trait example
Link types are traits that allow you link a Taxon or Voucher as a value measurement to another object. For example, you may conduct a plant inventory for which you have only counts for Taxon associated to a locality. Therefore, you may create a LINK trait, which will allow you to store the count values for any Taxon as measurements for a particular location (POINT, POLYGON). Or you may link such values to Vouchers instead of Taxons if you have a representative specimen for the taxons.
Use the WebInterface.
Text and color traits
Text and color traits require the minimum fields only for trait registration. Text traits allow the storage of textual observations. Color will only allow color codes (see example in Importing Measurements)
odb_traitTypeCodes()

library(opendatabio)
base_url="https://opendb.inpa.gov.br/api"
token ="GZ1iXcmRvIFQ" #this must be your token not this value
cfg = odb_config(base_url=base_url, token = token)


to.odb = data.frame(type=5,export_name = "taxonDescription", stringsAsFactors = F)

#trait name and description
to.odb$name =  data.frame("en"="Taxonomic descriptions","pt-br"="Descrições taxonômicas",stringsAsFactors=F)
to.odb$description =  data.frame("en"="Taxonomic descriptions from the literature","pt-br"="Descrições taxonômicas da literatura",stringsAsFactors=F)

#will only be able to use this trait for a measurment associated with a Taxon
to.odb$objects = "Taxon"

#import
odb_import_traits(to.odb,odb_cfg=cfg)
Spectral traits
Spectral traits are specific to spectral data. You must specify the range of wavenumber values for which you may have absorbance or reflectance data, and the length of the spectra to be stored as measurements to allow validation during input. So, for each range and spacement of the spectral values you have, a different SPECTRAL trait must be created.
Use the WebInterface.
6.2.5 - Import Individuals & Vouchers
Attention
- You may import vouchers with the Individual POST endpoint. Use the voucher endpoint only for already registered individuals, else follow below to import individuals and their vouchers at once.
- Individuals may have a self taxonomic identification or a non-self taxonomic identification
- Individuals may have multiple locations, but when registering the individual a single location is needed. You may then import additional locations using the Individual-location POST API.
Individuals can be imported using odb_import_individuals() and vouchers with the odb_import_vouchers().
Read carefully the Individual POST API and the Voucher POST API.
Individual example
Prep data for a single individual basic example, representing a tree in a forest plot location.
library(opendatabio)
base_url="https://opendb.inpa.gov.br/api"
token ="GZ1iXcmRvIFQ" #this must be your token not this value
cfg = odb_config(base_url=base_url, token = token)

#the number in the aluminium tag in the forest
to.odb = data.frame(tag='3405.L1', stringsAsFactors=F)

#the collectors (get ids from the server)
(joao = odb_get_persons(params=list(search='joao batista da silva'),odb_cfg=cfg)$id)
(ana = odb_get_persons(params=list(search='ana cristina sega'),odb_cfg=cfg)$id)
#ids concatenated by | pipe
to.odb$collector = paste(joao,ana,sep='|')

#tagged date (lets use an incomplete).
to.odb$date = '2018-07-NA'

#lets place in a Plot location imported with the Location post tutorial
plots = odb_get_locations(params=list(name='A 1ha example plot'),odb_cfg=cfg)
head(plots)
to.odb$location = plots$id


#relative position within parent plot
to.odb$x = 10.4
to.odb$y = 32.5
#or could be
#to.odb$relative_position = paste(x,y,sep=',')

#taxonomic identification
taxon = 'Ocotea guianensis'
#check that exists
(odb_get_taxons(params=list(name='Ocotea guianensis'),odb_cfg=cfg)$id)

#person that identified the individual
to.odb$identifier = odb_get_persons(params=list(search='paulo apostolo'),odb_cfg=cfg)$id
#or you also do to.odb$identifier = "Assunção, P.A.C.L."
#the used form only guarantees the persons is there.

#may add modifers as well [may need to use numeric code instead]
to.odb$modifier = 'cf.'
#or check with  to see you spelling is correct
odb_detModifiers()
#and submit the numeric code instaed
to.odb$modifier = 3

#an incomplete identification date
to.odb$identification_date = list(year=2005)
#or  to.odb$identification_date =  "2005-NA-NA"
Lets import the above record:
odb_import_individuals(to.odb,odb_cfg = cfg)
#lets import this individual
odb_import_individuals(to.odb,odb_cfg = cfg)

#check the job status
odb_get_jobs(params=list(id=130),odb_cfg = cfg)
Ops, I forgot to inform a dataset and my user does not have a default dataset defined.
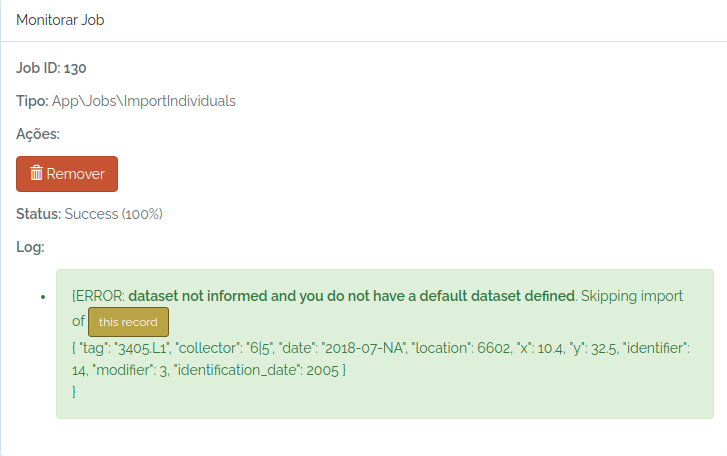
So, I just inform an existing dataset and try again:
dataset = odb_get_datasets(params=list(name="Dataset test"),odb_cfg=cfg)
dataset
to.odb$dataset = dataset$id
odb_import_individuals(to.odb,odb_cfg = cfg)
The individual was imported. The image below shows the individual (yellow dot) mapped in the plot:
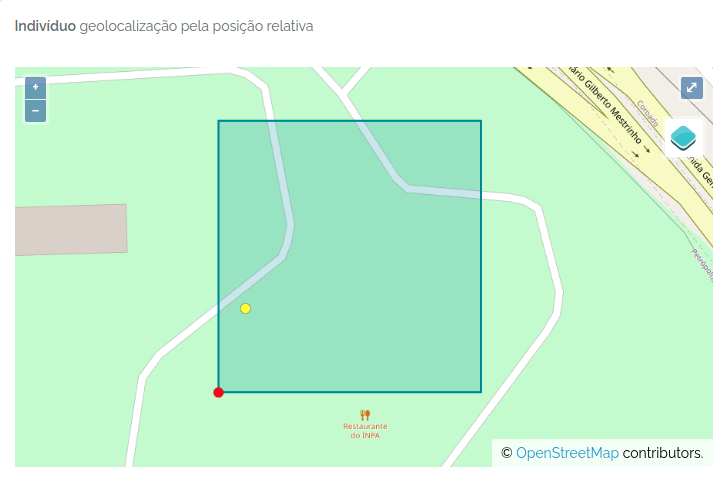
Importing Individuals and Vouchers at once
Individuals are the actual object that has most of the information related to Vouchers, which are samples in a Biocollection. Therefore, you may import an individual record with the specification of one or more vouchers.
#a fake plant record somewhere in the Amazon
aplant =  data.frame(taxon="Duckeodendron cestroides", date="2021-09-09", latitude=-2.34, longitude=-59.845,angle=NA,distance=NA, collector="Oliveira, A.A. de|João Batista da Silva", tag="3456-A",dataset=1)

#a fake set of vouchers for this individual
herb = data.frame(biocollection=c("INPA","NY","MO"),biocollection_number=c("12345A","574635","ANOTHER FAKE CODE"),biocollection_type=c(2,3,3))

#add this dataframe to the object
aplant$biocollection = NA
aplant$biocollection = list(herb)

#another fake plant
asecondplant =  data.frame(taxon="Ocotea guianensis", date="2021-09-09", latitude=-2.34, longitude=-59.89,angle=240,distance=50, collector="Oliveira, A.A. de|João Batista da Silva", tag="3456",dataset=1)
asecondplant$biocollection = NA

#merge the fake data
to.odb = rbind(aplant,asecondplant)

library(opendatabio)
base_url="https://opendb.inpa.gov.br/api"
token ="GZ1iXcmRvIFQ" #this must be your token not this value
cfg = odb_config(base_url=base_url, token = token)

odb_import_individuals(to.odb, odb_cfg=cfg)
Check the imported data
The script above has created records for both the Individual and Voucher model:
#get the imported individuals using a wildcard
inds = odb_get_individuals(params = list(tag='3456*'),odb_cfg = cfg)
inds[,c("basisOfRecord","scientificName","organismID","decimalLatitude","decimalLongitude","higherGeography") ]
Will return:
basisOfRecord           scientificName                               organismID decimalLatitude decimalLongitude                      higherGeography
1      Organism        Ocotea guianensis   3456 - Oliveira - UnnamedPoint_5989234         -2.3402         -59.8904 Brasil | Amazonas | Rio Preto da Eva
2      Organism Duckeodendron cestroides 3456-A - Oliveira - UnnamedPoint_5989234         -2.3400         -59.8900 Brasil | Amazonas | Rio Preto da Eva
And the vouchers:
#get the vouchers imported with the first plant data
vouchers = odb_get_vouchers(params = list(individual=inds$id),odb_cfg = cfg)
vouchers[,c("basisOfRecord","scientificName","organismID","collectionCode","catalogNumber") ]
Will return:
basisOfRecord           scientificName                            occurrenceID collectionCode     catalogNumber
1 PreservedSpecimens Duckeodendron cestroides          3456-A - Oliveira -INPA.12345A           INPA            12345A
2 PreservedSpecimens Duckeodendron cestroides 3456-A - Oliveira -MO.ANOTHER FAKE CODE             MO ANOTHER FAKE CODE
3 PreservedSpecimens Duckeodendron cestroides            3456-A - Oliveira -NY.574635             NY            574635
Import Vouchers for Existing Individuals
Attention
- Vouchers are samples of Individuals deposited in BioCollections. If the Biocollection is a genetic resource, the Voucher may just represent a DNA or tissue sample.
- Therefore, Vouchers must belong to an Individual and to a BioCollection, which are the mandatory information to register vouchers. Collectors, collection date, location and taxonomic identity may just be extracted from the Individual’s record.
- A Voucher may have its own collector, collector number and collecting date, different from the Individual it belongs to, when needed.
The mandatory fields are:
individual= individual id or fullname (organismID);biocollection= acronym or id of the BioCollection - useodb_get_biocollections()to check if it is registered, otherwise, first store the BioCollection in in the database;
For additional fields see Voucher POST API.
A simple voucher import
#a holotype voucher with same collector and date as individual
onevoucher = data.frame(individual=1,biocollection="INPA",biocollection_number=1234,biocollection_type=1,dataset=1)
library(opendatabio)
base_url="https://opendb.inpa.gov.br/api"
token ="GZ1iXcmRvIFQ" #this must be your token not this value
cfg = odb_config(base_url=base_url, token = token)

odb_import_vouchers(onevoucher, odb_cfg=cfg)

#get the imported voucher
voucher = odb_get_vouchers(params=list(individual=1),cfg)
vouchers[,c("basisOfRecord","scientificName","occurrenceID","collectionCode","catalogNumber") ]
Different voucher for an individual
Two vouchers for the same individual, one with the same collector and date as the individual, the other at different time and by other collectors.
#one with same date and collector as individual
one = data.frame(individual=2,biocollection="INPA",biocollection_number=1234,dataset=1,collector=NA,number=NA,date=NA)
#this one with different collector and date
two= data.frame(individual=2,biocollection="INPA",biocollection_number=4435,dataset=1,collector="Oliveira, A.A. de|João Batista da Silva",number=3456,date="1991-08-01")


library(opendatabio)
base_url="https://opendb.inpa.gov.br/api"
token ="GZ1iXcmRvIFQ" #this must be your token not this value
cfg = odb_config(base_url=base_url, token = token)


to.odb = rbind(one,two)
odb_import_vouchers(to.odb, odb_cfg=cfg)

#get the imported voucher
voucher = odb_get_vouchers(params=list(individual=2),cfg)
voucher[,c("basisOfRecord","scientificName","occurrenceID","collectionCode","catalogNumber") ]
Output of imported records:
basisOfRecord scientificName                     occurrenceID collectionCode catalogNumber    recordedByMain
1 PreservedSpecimens   Unidentified plot tree - Vicentini -INPA.1234           INPA          1234     Vicentini, A.
2 PreservedSpecimens   Unidentified       3456 - Oliveira -INPA.4435           INPA          4435 Oliveira, A.A. de
6.2.6 - Import Measurements
Attention
- Measurement have one restriction: duplicated measurement values or categories for the same object_id and same date will not be imported unless you specify a
duplicated=1with for the record. - Measurements are straightforward, but you need to grap some info from other models to import them. You need to provide a
datasetfor which you do have permissions,trait_id(export_name or id),value(content varies depending on trait type),date(a complete or incomplete date),person(person that measured),object_type(one of taxon, individual, voucher or location) andobject_id(its odb id). For LINK trait type you must provide alink_idcolumn, and ‘value’ becomes optional for this specific case. - TIP: To link among measurements for different traits you may add standard keys to the
notemeasurement field. For example, you measure LeafLength and LeafWidth for the same leaves, so in both measurements add “leaf1” ,“leaf2” to the note field to link them. Also, if you measure DBH and DBH.POM in a forest plot inventory and have several stems for a plant, you may add “stem1”,“stem2” to permit matching a stem DBH to its specific height of measurement. This kind of link may be useful in analyses. - Several validations will happen during measurement importation. Consider verifying the data locally before submitting a job to facilitate troubleshooting, and guarantee the values are consistent with your expectations. You will not be able to UPDATE nor DELETE measurements with the API, so, avoid importing several measurements that will require fixing afterwards (one by one).
- For Quantitative Traits, OpenDataBio cannot validate that your measurements are in the same unit as the Trait definition. Therefore, check which unit the trait has, and convert your data accordingly before uploading.
Measurements can be imported using odb_import_measurements(). Read carefully the Measurements POST API.
Quantitative measurements
library(opendatabio)
base_url="https://opendb.inpa.gov.br/api"
token ="GZ1iXcmRvIFQ" #this must be your token not this value
cfg = odb_config(base_url=base_url, token = token)

#get the trait id from the server (check that trait exists)
#generate some fake data for 10 measurements

dbhs = sample(seq(10,100,by=0.1),10)
object_ids = sample(1:3,length(dbhs),replace=T)
dates = sample(as.Date("2000-01-01"):as.Date("2000-03-31"),length(dbhs))
dates = lapply(dates,as.Date,origin="1970-01-01")
dates = lapply(dates,as.character)
dates = unlist(dates)


to.odb = data.frame(
  trait_id = 'dbh',
  value = dbhs,
  date = dates,
  object_type = 'Individual',
  object_id=object_ids,
  person="Oliveira, A.A. de",
  dataset = 1,
  notes = "some fake measurements",
  stringsAsFactors=F)

#this will only work if the person exists, the individual ids exist
#and if the trait with export_name=dbh exist
odb_import_measurements(to.odb,odb_cfg=cfg)
Get the imported data:
dad = odb_get_measurements(params = list(dataset=1),odb_cfg=cfg)
dad[,c("id","basisOfRecord", "measured_type", "measured_id", "measurementType",
  "measurementValue", "measurementUnit", "measurementDeterminedDate",
  "datasetName", "license")]
id      basisOfRecord           measured_type measured_id measurementType measurementValue measurementUnit measurementDeterminedDate
1   1 MeasurementsOrFact App\\Models\\Individual           3             dbh             86.8     centimeters                2000-02-19
2   2 MeasurementsOrFact App\\Models\\Individual           2             dbh             84.8     centimeters                2000-03-25
3   3 MeasurementsOrFact App\\Models\\Individual           2             dbh             65.7     centimeters                2000-03-15
4   4 MeasurementsOrFact App\\Models\\Individual           3             dbh             88.0     centimeters                2000-03-05
5   5 MeasurementsOrFact App\\Models\\Individual           3             dbh             35.3     centimeters                2000-01-04
6   6 MeasurementsOrFact App\\Models\\Individual           2             dbh             36.0     centimeters                2000-03-23
7   7 MeasurementsOrFact App\\Models\\Individual           2             dbh             78.6     centimeters                2000-03-22
8   8 MeasurementsOrFact App\\Models\\Individual           2             dbh             69.7     centimeters                2000-03-09
9   9 MeasurementsOrFact App\\Models\\Individual           3             dbh             12.3     centimeters                2000-01-30
10 10 MeasurementsOrFact App\\Models\\Individual           3             dbh             14.7     centimeters                2000-01-18
   datasetName   license
1  Dataset test CC-BY 4.0
2  Dataset test CC-BY 4.0
3  Dataset test CC-BY 4.0
4  Dataset test CC-BY 4.0
5  Dataset test CC-BY 4.0
6  Dataset test CC-BY 4.0
7  Dataset test CC-BY 4.0
8  Dataset test CC-BY 4.0
9  Dataset test CC-BY 4.0
10 Dataset test CC-BY 4.0
Categorical measurements
Categories MUST be informed by their ids or name in the value field. For CATEGORICAL or ORDINAL traits, value must be single value. For CATEGORICAL_MULTIPLE, value may be one or multiple categories ids or names separated by one of | or ; or ,.
library(opendatabio)
base_url="https://opendb.inpa.gov.br/api"
token ="GZ1iXcmRvIFQ" #this must be your token not this value
cfg = odb_config(base_url=base_url, token = token)

#a categorical trait
(odbtraits = odb_get_traits(params=list(name="specimenFertility"),odb_cfg = cfg))

#base line
to.odb = data.frame(trait_id = odbtraits$id, date = '2021-07-31', stringsAsFactors=F)

#the plant was collected with both flowers and fruits, so the value are the two categories
value = c("Flowers","Fruits")

#get categories for this trait if found
(cats = odbtraits$categories[[1]])
#check that your categories are registered for the trait and get their ids
value = cats[match(value,cats$name),'id']
#make multiple categories ids a string value
value = paste(value,collapse=",")

to.odb$value = value

#this links to a voucher
to.odb$object_type = "Voucher"

#get voucher id from API (must be ID).
#Search for collection number 1234
odbspecs = odb_get_vouchers(params=list(number="3456-A"),odb_cfg=cfg)
to.odb$object_id = odbspecs$id[1]

#get dataset id
odbdatasets = odb_get_datasets(params=list(name='Dataset test'),odb_cfg=cfg)
head(odbdatasets)
to.odb$dataset = odbdatasets$id

#person that measured
odbperson = odb_get_persons(params=list(search='ana cristina sega'),odb_cfg=cfg)
to.odb$person = odbperson$id

#import'
odb_import_measurements(to.odb,odb_cfg=cfg)

#get imported
dad = odb_get_measurements(params = list(voucher=odbspecs$id[1]),odb_cfg=cfg)
dad[,c("id","basisOfRecord", "measured_type", "measured_id", "measurementType",
       "measurementValue", "measurementUnit", "measurementDeterminedDate",
       "datasetName", "license")]
id      basisOfRecord        measured_type measured_id   measurementType measurementValue measurementUnit
1 11 MeasurementsOrFact App\\Models\\Voucher           1 specimenFertility  Flowers, Fruits              NA
  measurementDeterminedDate  datasetName   license
1                2021-07-31 Dataset test CC-BY 4.0
Color measurements
For color values you have to enter color as their hex RGB strings codes, so they can be rendered graphically and in the web interface. Therefore, any color value is allowed, and it would be easier to use the palette colors in the web interface to enter such measurements. Package gplots allows you to convert color names to hex RGB codes if you want to do it through the API.
library(opendatabio)
base_url="https://opendb.inpa.gov.br/api"
token ="GZ1iXcmRvIFQ" #this must be your token not this value
cfg = odb_config(base_url=base_url, token = token)

#get the trait id from the server (check that trait exists)
odbtraits = odb_get_traits(odb_cfg=cfg)
(m = match(c("fruitColor"),odbtraits$export_name))

#base line
to.odb = data.frame(trait_id = odbtraits$id[m], date = '2014-01-13', stringsAsFactors=F)

#get color value
#install.packages("gplots",dependencies = T)
library(gplots)
(value =  col2hex("red"))
to.odb$value = value

#this links to a specimen
to.odb$object_type = "Individual"
#get voucher id from API (must be ID). Search for collection number 1234
odbind = odb_get_individuals(params=list(tag='3456'),odb_cfg=cfg)
odbind$scientificName
to.odb$object_id = odbind$id[1]

#get dataset id
odbdatasets = odb_get_datasets(params=list(name='Dataset test'),odb_cfg=cfg)
head(odbdatasets)
to.odb$dataset = odbdatasets$id

#person that measured
odbperson = odb_get_persons(params=list(search='ana cristina sega'),odb_cfg=cfg)
to.odb$person = odbperson$id

odb_import_measurements(to.odb,odb_cfg=cfg)
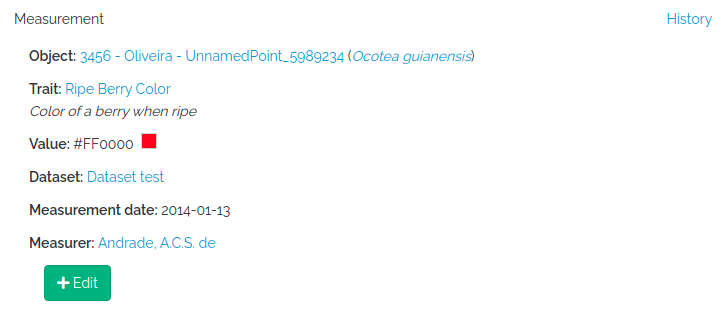
Database link type measurements
The LINK trait type allows one to register count data, as for example the number of individuals of a species at a particular location. You have to provide the linked object (link_id), which may be a Taxon or a Voucher depending on the trait definition, and then value recieves the numeric count.
library(opendatabio)
base_url="https://opendb.inpa.gov.br/api"
token ="GZ1iXcmRvIFQ" #this must be your token not this value
cfg = odb_config(base_url=base_url, token = token)

#get the trait id from the server (check that trait exists)
odbtraits = odb_get_traits(odb_cfg=cfg)
(m = match(c("taxonCount"),odbtraits$export_name))

#base line
to.odb = data.frame(trait_id = odbtraits$id[m], date = '2014-01-13', stringsAsFactors=F)

#the taxon to link the count value
odbtax = odb_get_taxons(params=list(name='Ocotea guianensis'),odb_cfg=cfg)
to.odb$link_id = odbtax$id

#now add the count value for this trait type
#this is optional for this measurement,
#however, it would make no sense to include such link without a count in this example
to.odb$value = 23

#a note to clarify the measurement (optional)
to.odb$notes = 'No voucher, field identification'

#this measurement will link to a location
to.odb$object_type = "Location"
#get location id from API (must be ID).
#lets add this to a transect
odblocs = odb_get_locations(params=list(adm_level=101,limit=1),odb_cfg=cfg)
to.odb$object_id = odblocs$id

#get dataset id
odbdatasets = odb_get_datasets(params=list(name='Dataset test'),odb_cfg=cfg)
head(odbdatasets)
to.odb$dataset = odbdatasets$id

#person that measured
odbperson = odb_get_persons(params=list(search='ana cristina sega'),odb_cfg=cfg)
to.odb$person = odbperson$id

odb_import_measurements(to.odb,odb_cfg=cfg)
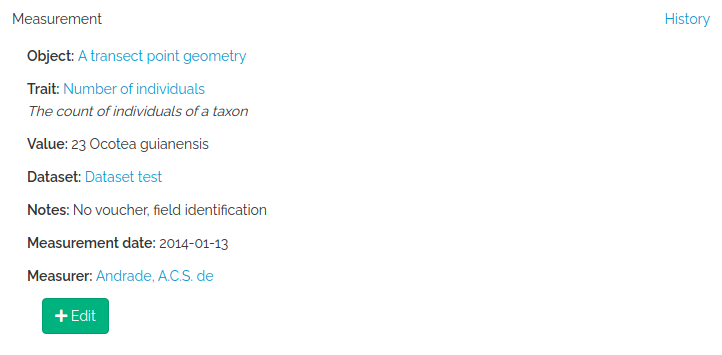
Spectral measurements
value must be a string of spectrum values separated by “;”. The number of concatenated values must match the Trait value_length attribute of the trait, which is extracted from the wavenumber range specification for the trait. So, you may easily check this before importing with odb_get_traits(params=list(fields='all',type=9),cfg)
library(opendatabio)
base_url="https://opendb.inpa.gov.br/api"
token ="GZ1iXcmRvIFQ" #this must be your token not this value
cfg = odb_config(base_url=base_url, token = token)

#read a spectrum
spectrum = read.table("1_Sample_Planta-216736_TAG-924-1103-1_folha-1_abaxial_1.csv",sep=",")

#second column are  NIR leaf absorbance values
#the spectrum has 1557 values
nrow(spectrum)
#[1] 1557
#collapse to single string
value = paste(spectrum[,2],collapse = ";")
substr(value,1,100)
#[1] "0.6768057;0.6763237;0.6755353;0.6746023;0.6733549;0.6718447;0.6701176;0.6682984;0.6662288;0.6636459;"

#get the trait id from the server (check that trait exists)
odbtraits = odb_get_traits(odb_cfg=cfg)
(m = match(c("driedLeafNirAbsorbance"),odbtraits$export_name))

#see the trait
odbtraits[m,c("export_name", "unit", "range_min", "range_max",  "value_length")]
#export_name       unit range_min range_max value_length
#6 driedLeafNirAbsorbance absorbance   3999.64  10001.03         1557

#must be true
odbtraits$value_length[m]==nrow(spectrum)
#[1] TRUE

#base line
to.odb = data.frame(trait_id = odbtraits$id[m], value=value, date = '2014-01-13', stringsAsFactors=F)

#this links to a voucher
to.odb$object_type = "Voucher"
#get voucher id from API (must be ID).
#search for a collection number
odbspecs = odb_get_vouchers(params=list(number="3456-A"),odb_cfg=cfg)
to.odb$object_id = odbspecs$id[1]

#get dataset id
odbdatasets = odb_get_datasets(params=list(name='Dataset test'),odb_cfg=cfg)
to.odb$dataset = odbdatasets$id

#person that measured
odbperson = odb_get_persons(params=list(search='adolpho ducke'),odb_cfg=cfg)
to.odb$person = odbperson$id

#import
odb_import_measurements(to.odb,odb_cfg=cfg)
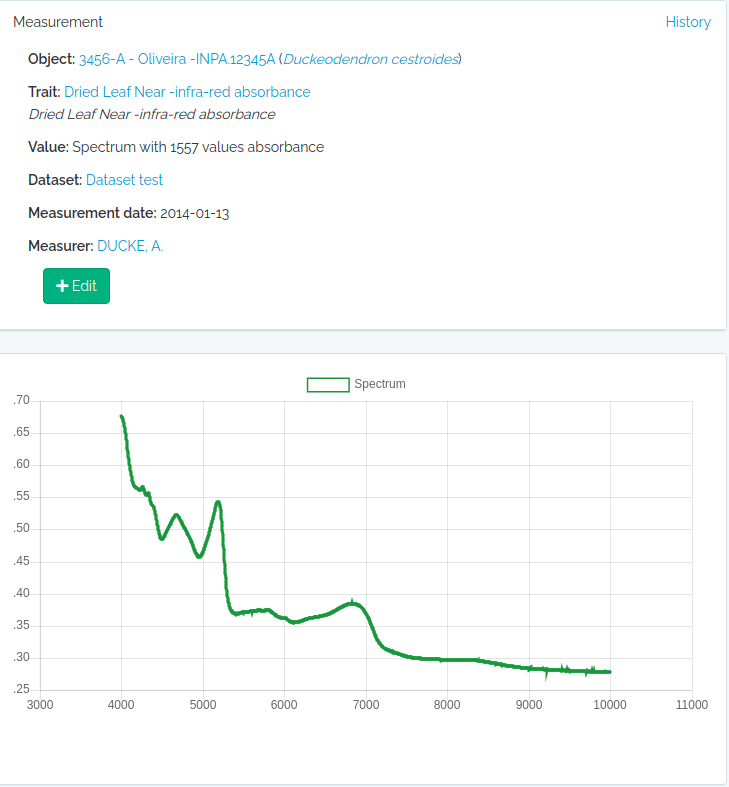
Text measurements
Just add the text to the value field and proceed as for the other trait types.